


As a backend developer, the API you build will typically be for consumption by other applications or services. The sensitivity of the data carried by an application varies from application to application.
Hence, it is ideal that only authenticated users have access to these data based on their authorization level when building a backend service.
Key takeaways
In this article:
- We’ll have an overview of the need to secure your application.
- We’ll dive further into the Springboot Antmatcher technique of securing an application.
Prerequisites
- Fundamental knowledge of the Springboot framework.
- Fundamental understanding of Application Programming Interfaces (APIs). You can learn how to build a Springboot REST API here.
- A suitable development environment such as IntelliJ.
- Postman API testing tool or any suitable browser.
The need to secure your application
When building an application that is expected to transfer sensitive data, you want to ensure that this data does not get into the wrong hands.
An application that transfers customers’ financial details should be built to accommodate the most premium set of security protocols and measures. We should secure such a service enough to prevent data breaches, cyberattacks, data corruption and so on.
The integrity of the data generated by a service depends on the measures put in place to ensure that only authorized users can retrieve or manipulate that data.
Nevertheless, the kind of data generated and transferred determines how you should protect the service.
AntMatchers
The antMatchers() is a Springboot HTTP method used to configure the URL paths from which the Springboot application security should permit requests based on the user’s roles. The antmatchers() method is an overloaded method that receives both the HTTP request methods and the specific URLs as its arguments.
Springboot uses the antmatchers() to protect URLs by binding patterns representing the application’s endpoints to specific users. Then it either permits or denies access to these URLs based on the roles or permissions of the users.
The following are some of the methods applied on antmatchers():
hasAnyRole(): This binds the URL to any user whose role is included in the configured roles created in the application. It receives a variable-length argument of roles.hasRole(): This method receives a single role argument bound to the URL.hasAuthority(): This method binds the URL to the granted authorities of the client. Any client who has been granted certain authorities is authorized to send a request to the URL.hasAnyAuthority(): This binds the URL to any user whose granted authorities is included in the configured authorities/permissions created in the application. It receives a variable-length argument of granted authorities.anonymous(): This binds the URL to an unauthenticated client.authenticated(): This binds the URL to any authenticated client.
Let’s build an API to demonstrate
Let us proceed to explore the features of the antMatchers technique. We’ll build an API consisting of a Product model and its resources.
Project structure
controller/
|--- ProductContoller.java
model/
|--- Product.java
repository/
|--- ProductRepository.java
security/
|--- AppSecurityConfig.java
|--- Roles.java
services/
|--- ProductService.java
|--- ProductServiceImpl.java
DemoApplication.java
Roles
The role of the client is either of the following:
- Intern
- Supervisor
- Admin
The server grants the request from the client depending on whether or not the client is authorized to receive the resource from the URL.
Create an Enum class to declare the roles of the users.
package com.example.demo.security;


public enum Roles {

    INTERN,

    SUPERVISOR,

    ADMIN;


}
Permissions
| Permissions | |||||
|---|---|---|---|---|---|
| Role | Add a product | View all products | View product | Update product | Delete product |
| Intern | Yes | Yes | – | – | – |
| Supervisor | Yes | Yes | Yes | -` | – |
| Admin | Yes | Yes | Yes | Yes | Yes |
The dependencies required for this API are:
- Spring web
		<dependency>

           	<groupId>org.springframework.boot</groupId>

          	<artifactId>spring-boot-starter-web</artifactId>

       	</dependency>
- Spring security
		<dependency>

            <groupId>org.springframework.boot</groupId>

           <artifactId>spring-boot-starter-security</artifactId>

      	</dependency>
- Guava maven
		<dependency>

            <groupId>com.google.guava</groupId>

            <artifactId>guava</artifactId>

            <version>28.1-jre</version>

      	</dependency>
Database
I’ll be using the PostgreSQL database management server to store the instances of the Product model. You can use any database of your choice.
    <dependency>

        <groupId>org.postgresql</groupId>

            <artifactId>postgresql</artifactId>

           <scope>runtime</scope>

    </dependency>
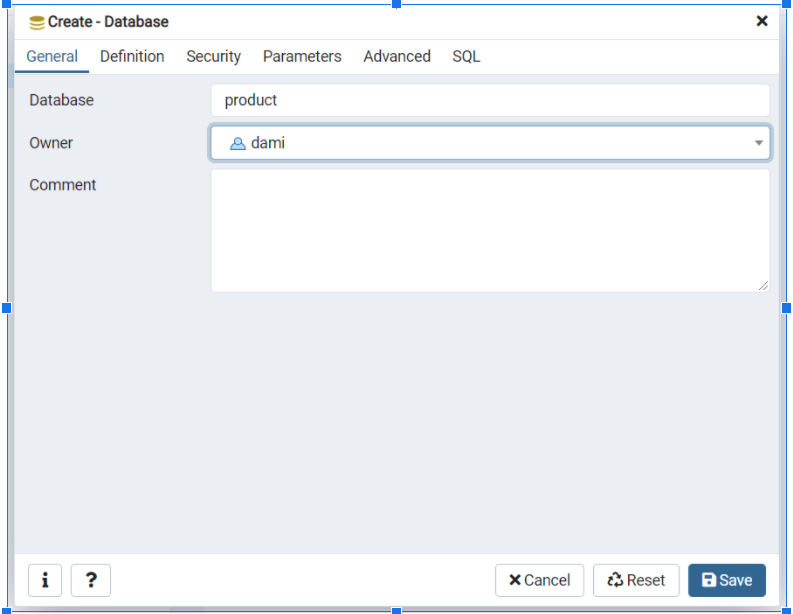
Create a Product database in your Database management server.
Database configuration
Add the following code to your application.properties file to configure the database to your Springboot application.
spring.datasource.url=jdbc:postgresql://localhost:5432/product

spring.datasource.username=<username>

spring.datasource.password=<password>

spring.jpa.hibernate.ddl-auto=create-drop

spring.jpa.show-sql=true

spring.jpa.properties.hibernate.dialect = org.hibernate.dialect.PostgreSQLDialect

spring.jpa.properties.hibernate.format\_sql = true


server.error.include-message=always
Replace <username> and <password> with your database server’s actual username and password.
Creating the model
@Entity

@Table

public class Product {


    // Autogenerate the primary key
    @Id
    @SequenceGenerator(

        name = "product\_sequence",

        sequenceName = "product\_sequence",

       allocationSize = 1

    )

   @GeneratedValue(

        strategy = GenerationType.SEQUENCE,

       generator = "product\_sequence"

    )

    private Integer productId;

    private String name;

    private String description;

    private Double price;


    public Product(Integer productId, String name, String desc, Double price){

        this(name, desc, price);

        this.productId = productId;

   }

   public Product(){

    }

   public Product(String name, String desc, Double price) {

        this.name = name;

        this.description = desc;

       this.price = price;

    }

    public String getDescription() {

       return description;

    }

    public void setDescription(String description) {

        this.description = description;

    }

   public Number getPrice() {

        return price;

    }

   public void setPrice(Double price) {

      this.price = price;

   }


   public Integer getProductId() {

       return productId;

    }


   public String getName() {

      return name;

    }

   public void setName(String name) {

       this.name = name;

    }


}
The Product model in the code above has an autogenerated primary key – productId generated through the @SequenceGenerator and GeneratedValue annotations.
Repository interface
This is the portion of the application that interacts with the database. The interface extends JpaRepository interface, which is a Springboot built-in database interactive interface.
@Repository

public interface ProductRepository extends JpaRepository<Product, Integer> {


}
Service
This interface contains the declaration of the services that the API will provide. It is not always mandatory to declare this interface. A developer can skip the service interface and proceed with the implementation.
However, this approach is advisable because it improves the encapsulation of your application.
@Service

public interface ProductService {

    Product addProduct(Product product);

    List<Product> getAllProducts();

    Product getProduct(Integer productId);

    void deleteProduct(Integer productId);

    Product updateProduct(Integer productId, String productName, String productDescription, Double price);

}
Service implementation
This contains the business logic of the API. Here, we implement the already pre-defined methods from the ProductService interface.
@Service

public class ProductServiceImpl implements ProductService{

    @Autowired

    private ProductRepository productRepository;

    @Override

    public Product addProduct(Product product) {

        return productRepository.save(product);

    }

    @Override

    public List<Product> getAllProducts() {

        return productRepository.findAll();

    }

    @Override

   public Product getProduct(Integer productId) {

        return productRepository.findById(productId).orElseThrow(() -> new IllegalArgumentException("Invalid product id"));

   }

   @Override

   public void deleteProduct(Integer productId) {

       Product product = getProduct(productId);

       productRepository.delete(product);

   }

   /* To update the value a property:
        - validate that the new value is not null nor empty.
        - validate that the new value is not the same as the old value to be replaced.
        - If the values are the same, skip the operation.
   */

   @Override
   @Transactional
    public Product updateProduct(Integer productId, String productName, String productDescription, Double price) {


        Product product = getProduct(productId);

        boolean emptyName = productName == null || productName.length() < 1;

       boolean emptyProductDesc = productDescription == null || productDescription.length() < 1;

        boolean validPrice = price != null && (price.compareTo((double) 0) > 0);

       if (!emptyName && !product.getName().equals(productName)) {

        product.setName(productName);

       }

       if (!emptyProductDesc && !product.getDescription().equals(productDescription)) {
            product.setDescription(productDescription);
        }

      if(validPrice){
            product.setPrice(price);
        }

       productRepository.save(product);

            return product;

    }

}
Controller
/*
All requests are received from the client and sent to the service for processing.
*/

@RestController

@RequestMapping("api/v1/products")

public class ProductController {

    @Autowired

    private ProductService productService;

   @PostMapping("/add")

    public Product addProduct(@RequestBody Product product){

        return productService.addProduct(product);

    }

    // Get a product by its ID
    @GetMapping("/{productId}")

   public Product getProduct(@PathVariable("productId") Integer productId){

        return productService.getProduct(productId);

   }

    @GetMapping
    public List<Product> getAllProducts(){

        return productService.getAllProducts();

    }

    @DeleteMapping("{productId}")
    public void deleteProduct(@PathVariable("productId") Integer productId){

        productService.deleteProduct(productId);

    }


    // The product ID is the only required argument.
    @PutMapping(path = "/{productId}")
   public Product updateProduct(
        @PathVariable Integer productId,

        @RequestParam(required =false) String productName,

        @RequestParam(required =false) String productDesc,

       @RequestParam(required =false) Double price

    ){

        return productService.updateProduct(productId, productName, productDesc, price);

    }


}
Security configurations
Finally, let’s create a class where we configure the security operations of the application.
A password encoder is required to encrypt the user’s password when provided for authentication. To achieve this, add the following code below either in your main application class or a separate class and annotate the class with the @Configuration annotation.
  // Create and configure an instance of a Password encoder to encrypt the users' passwords.

    @Bean
    public PasswordEncoder passwordEncoder(){

        return new BCryptPasswordEncoder(15);

    }
The HTTP session is set as stateless; therefore, authentication is required for every request. This will ease up the demonstration of testing the endpoints on Postman.
If the client is not authorized to request the URL, the request is terminated with an error message, regardless of whether the client is authenticated.
Custom user details were created through the UserDetailsService() method, another overridden method of the WebSecurityConfigurerAdapter class.
The details are given as:
| Username | Role |
|---|---|
| timmy | intern |
| john | supervisor |
| sarah | admin |
The client’s login credentials are received through the Basic Authentication technique.
// The @EnableWebSecurity annotation maps this class as a program which configures the security of the application.
@Configuration
@EnableWebSecurity

public class AppSecurityConfig extends WebSecurityConfigurerAdapter {

    @Autowired

    private final PasswordEncoder passwordEncoder;


    public AppSecurityConfig(PasswordEncoder passwordEncoder) {

    this.passwordEncoder = passwordEncoder;

   }


    @Override

   protected void configure(HttpSecurity http) throws Exception {

    /*
    Stateless session enables authentication for every request. This would help ease the demonstration
    of this tutorial on Postman.
    */
    http.sessionManagement().sessionCreationPolicy(SessionCreationPolicy.STATELESS);

        http

            .csrf().disable()
            .authorizeRequests()
           .antMatchers(HttpMethod.DELETE, "/api/v1/products/{productId}").hasRole(ADMIN.name()) // Admin should be able to delete
           .antMatchers(HttpMethod.PUT, "/api/v1/products/{productId}").hasRole(ADMIN.name()) // Admin should be able to update
            .antMatchers("/api/v1/products/add").hasAnyRole(ADMIN.name(), SUPERVISOR.name()) // Admin and Supervisor should be able to add product.
            .antMatchers("/api/v1/products").hasAnyRole(ADMIN.name(), SUPERVISOR.name(), INTERN.name()) // All three users should be able to get all products.
            .antMatchers("/api/v1/products{productId}").hasAnyRole(ADMIN.name(), SUPERVISOR.name(), INTERN.name()) // All three users should be able to get a product by id.
            .anyRequest()
            .authenticated()
            .and()
            .httpBasic();

}

    // Setting up the details of the application users with their respective usernames, roles and passwords.
    @Bean
    @Override
    protected UserDetailsService userDetailsService() {
    UserDetails timmy = User.builder()
                            .username("timmy")
                            .password(passwordEncoder.encode("password"))
                            .roles(INTERN.name())
                            .build();

    UserDetails john = User.builder()
                            .username("john")
                            .password(passwordEncoder.encode("password"))
                            .roles(SUPERVISOR.name())
                            .build();

    UserDetails sarah = User.builder()
                            .username("sarah")
                            .password(passwordEncoder.encode("password"))
                            .roles(ADMIN.name())
                            .build();

    InMemoryUserDetailsManager userDetailsManager = new InMemoryUserDetailsManager(timmy, john, sarah);

        return userDetailsManager;

    }


}
Postman
Click on authorization and set the authorization type to Basic Auth.
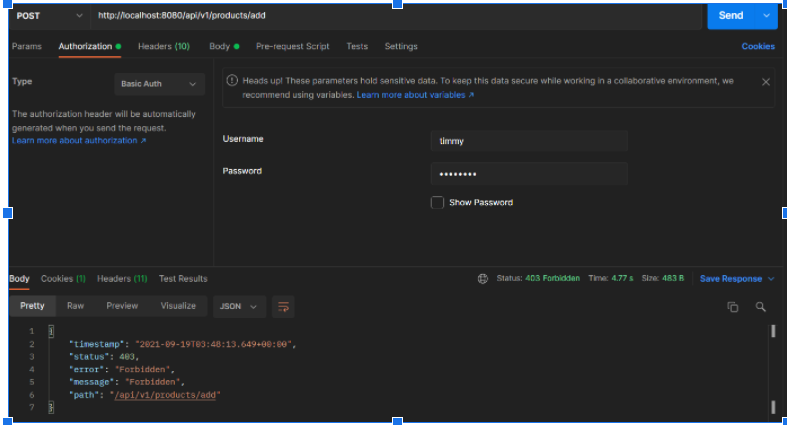
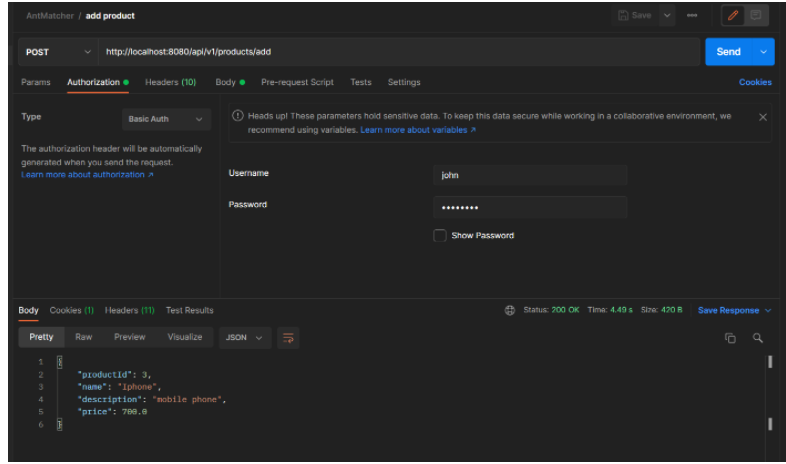
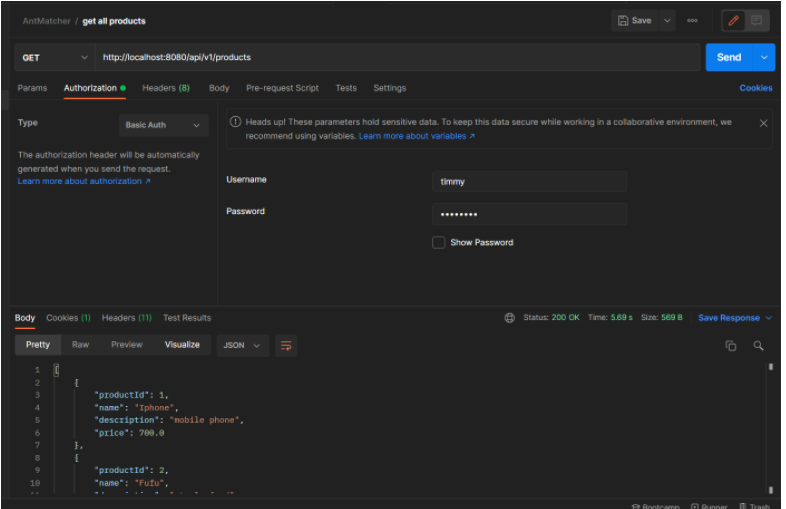
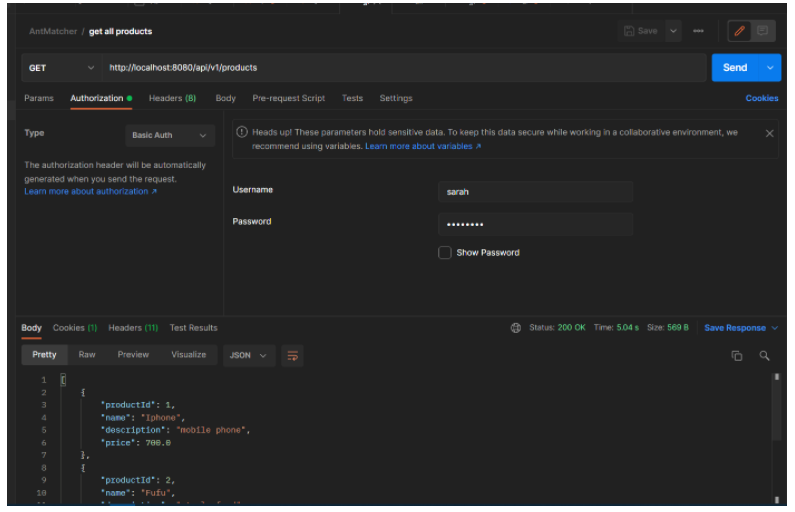
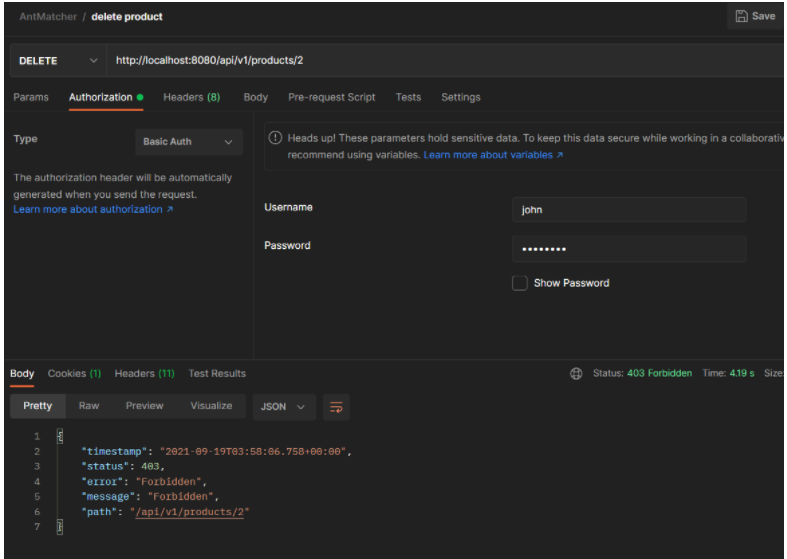
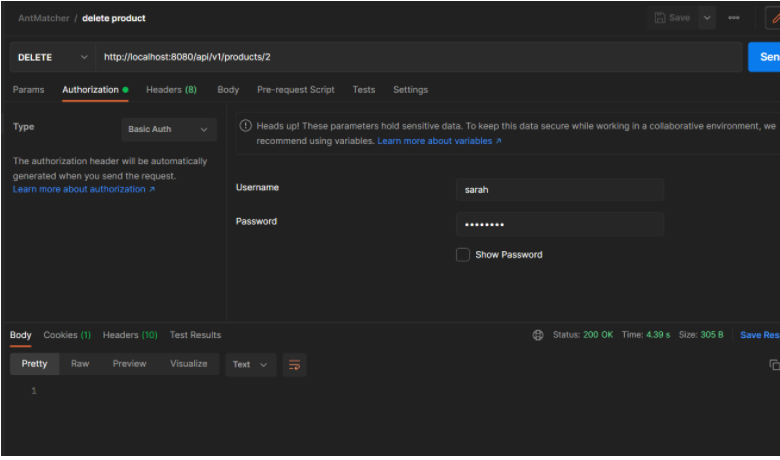
As shown via Postman, we achieved authorizations based on the role of the client through the antmatchers() method. Unauthorized requests were forbidden, and authorized clients received a status code of 200.
Conclusion
In this article, we learned about the need of securing your application. We explored some of the methods of securing an application and proceeded to build an application that demonstrates how AntMatchers can be used to achieve a level of security on our applications.
Cyberattacks do not seem like they are going away for good anytime soon. As a backend developer, you are required to ensure your applications are not vulnerable to attacks.
The code for this project is available on my GitHub repo.
Happy coding.


Comments: