


Different categories of users access a website at any given time. However, some pages in a website are meant to be accessed by specific users.
For instance, web pages accessed by the system administrator may not be the same as the pages which are accessible to the general users.
When deploying critical websites for financial institutions, as well as other governments, protection of specific pages is necessary.
It is important to protect certain web pages to control user access. This article will help the learner understand how to limit access to certain web pages in PHP.
Prerequisites
To gain more from this tutorial, you will need:
- Basic knowledge of HTML, CSS, and PHP.
- An editor such as visual studio code or any other that you prefer.
- XAMPP.
- Bootstrap 5
Step 1 – Creating the project folder
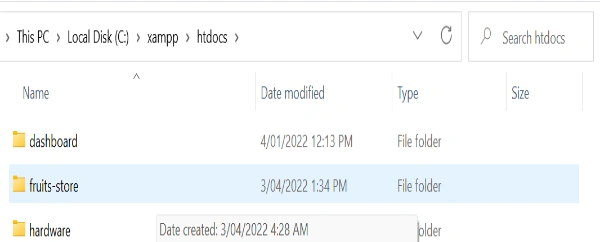
On your computer, search for a folder called xampp in your root partition (Assuming you installed Xampp).
Open this folder then browse and locate another directory called htddocs. Inside htdocs, create another folder and add your project’s name. In this tutorial, I named the folder fruits-store.
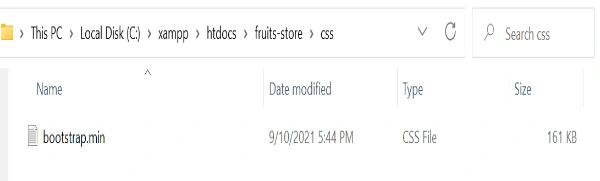
Inside the fruits-store, create another directory and name it css. Inside CSS, insert the Bootstrap file you downloaded.
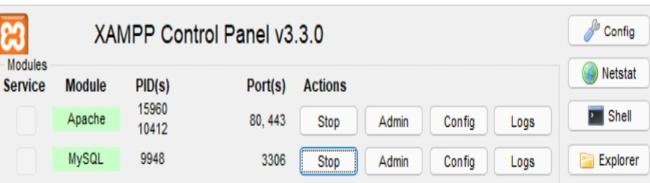
Step 2 – Ensuring that XAMPP is working correctly
Double-click on the XAMPP application and start Apache and MySQL services. Ensure that these services are running normally without any errors.
Step 3 – Opening the project folder in your editor
We can now open the project folder in a code editor such as VS code

Step 4 – Creating a Home page
In your root folder, create a new file named home.php: Add the following code to the generated file:
<!DOCTYPE html>
<html lang="en">

<head>
    <meta charset="UTF-8">
    <meta http-equiv="X-UA-Compatible" content="IE=edge">
    <meta name="viewport" content="width=device-width,initial-scale=1.0">
    <title>home page</title>
    <link rel="icon" type="image/x-icon" href="images/logo.jfif">
    <link rel="stylesheet" type="text/css" href="css/bootstrap.min.css">
</head>

<body>
    <?php include 'nav.php'?>
    <div class="container justify-content-center">
        h3 class="text-center">welcome to our fruit store</h3>
        <h2 class="text-center">we deliver fruits to your doorstep</h2>
    </div>

    <div class="container justify-content-center">
        <div class="row">
            <div class="col-sm-3 m-2 card border-black shadow-lg" style="width:300px">
                <img class="card-img-top" src="images/apple.jpg" alt="Card image">
                <div class="card-body">
                    <h4 class="card-title">Apple</h4>
                    <p class="card-text">Price: $0.5</p>
                    <a href="#" class="btn btn-primary">Order</a>
                </div>
            </div>

            <div class="col-sm-3 m-2 card border-black shadow-lg" style="width:300px">

                <img class="card-img-top" src="images/banana.jpg" alt="Card image">
                <div class="card-body">
                    <h4 class="card-title">Banana</h4>
                    <p class="card-text">Price: $0.3</p>
                    <a href="#" class="btn btn-primary">Order</a>
                </div>
            </div>

            <div class="col-sm-3 m-2 card border-black shadow-lg" style="width:300px">
                <img class="card-img-top" src="images/grape.jpg" alt="Card image">
                <div class="card-body">
                    <h4 class="card-title">Grapes</h4>
                    <p class="card-text">Price: $2.5</p>
                    <a href="#" class="btn btn-primary">Order</a>
                </div>

            </div>

            <div class="col-sm-3 m-2 card border-black shadow-lg" style="width:300px">
                <img class="card-img-top" src="images/strawberry.jpg" alt="Card image">
                <div class="card-body">
                    <h4 class="card-title">Strawberry</h4>
                    <p class="card-text">Price: $5.5</p>
                    <a href="#" class="btn btn-primary">Order</a>
                </div>

            </div>

        </div>

</body>

</html>
Step 5 – Creating a Contact page
Create a contact.php file and then add the following code:
<?php
include 'protect.php';
?>

<!DOCTYPE html>
<html lang="en">
<head>
    <meta charset="UTF-8">
    <meta http-equiv="X-UA-Compatible" content="IE=edge">
    <meta name="viewport" content="width=device-width, initial-scale=1.0">
    <title>Contact us</title>
    <link rel="icon" type="image/x-icon" href="images/logo.jfif">
    <link rel="stylesheet" type="text/css" href="css/bootstrap.min.css">
</head>

<body>
    <?php include 'nav.php'?>
    <div class="container justify-content-center">
        <div class="row d-flex">
            <div class="col-sm-4">
                <form action="">
                    <h2>send us a massage</h2>
                    <div class="form-group">
                        <label>Name</label>
                        <input type="text" class="form-control mb-4" placeholder="text">
                    </div>
                    <div class="form-group">
                        <label>Subject</label>
                        <input type="text" class="form-control mb-4" placeholder="subject">
                    </div>
                    <div class="form-group">
                        <label>Subject details</label>
                        <input type="text" class="form-control mb-4" placeholder="subject details">
                    </div>
                    <button>submit</button>
                </form>
            </div>
        </div>
    </div>
</body>
</html>
Step 6 – Creating an About page
Create a new file named about.php then add the following code:
<?php
include 'protect.php'
?>

<!DOCTYPE html>

<html lang="en">

<head>
    <meta charset="UTF-8">
    <meta http-equiv="X-UA-Compatible" content="IE=edge">
    <meta name="viewport" content="width=device-width,initial-scale=1.0">
    <title>About us</title>
    <link rel="icon" type="image/x-icon" href="images/logo.jfif">
    <link rel="stylesheet" type="text/css" href="css/bootstrap.min.css">
</head>

<body>

    <?php include 'nav.php'?>
    <h2 class="text-center">about fruits vendor Ltd</h2>
    <div class="col-sm-9 text-center">
        <p>Lorem ipsum dolor sit amet consectetur adipisicing elit.Iste quas provident dolorum! Voluptate totam illum
            eum! Fugiat corrupti sint perspiciatis minus neque, cupiditate aperiam
            saepe quisquam asperiores illum itaque autem!</p>
        <p>Lorem ipsum dolor sit amet consectetur adipisicing elit.Possimus quas minus autem tenetur neque quos ut sunt
            aliquid
            reprehenderit magni nostrum, dolor culpa dolorum deleniti quidem libero pariatur quam explicabo!
        </p>
    </div>
</body>

</html>
Step 7 – Creating a Registration form
The registration form will be used to store users’ information in the database. This information is used when the user wants to log in to the system. Create a new file and name it register.php.
Ensure that the form action points to the action in the same file i.e., register.php, and the form method to be POST as it is a secure way to send data.
In the form items, ensure each item has a name. It will be useful when accessing the database.
Add the code below to your register.php file:
<?PHP
if(isset($_REQUEST["name"]))

{
$name = $_REQUEST["name"];
$email= $_REQUEST["email"];
$phone = $_REQUEST["phone"];
$password = $_REQUEST["password"];
$password = password_hash($password, PASSWORD_BCRYPT);
include 'connect.php';

  $sql = "INSERT INTO `clients`(`id`, `name`, `email`,
`phone`, `password`) VALUES
(null,'$name','$email','$phone','$password')";
  mysqli_query($con,$sql) or die(mysqli_error($con));
  header("location:home.php");
  }
?>
<!DOCTYPE html>
<html lang="en">

<head>
    <meta charset="UTF-8">
    <meta http-equiv="X-UA-Compatible" content="IE=edge">
    <meta name="viewport" content="width=device-width, initial-scale=1.0">
    <title>Register</title>
    <link rel="icon" type="image/x-icon" href="images/logo.jfif">
    <link rel="stylesheet" type="text/css" href="css/bootstrap.min.css">
</head>

<body>

    <?php include 'nav.php'?>

    <div class="container">
        <div class="row justify-content-center">
            <div class="col-sm-6 border shadow-lg">
                <form action="register.php" method="post" class="mb-5 mt-5 rounded-top rounded-bottom form-group">

                    <div class="mt-5 mb-5 flex-column text-center">
                        <div class="mx-auto d-block">
                            <img src="images/logo.jfif" alt="Logo" style="width: 80px;" class="rounded-pill">
                            <h3>Fruits vendors Ltd</h3>
                        </div>
                        <h4>Registration form</h4>
                    </div>

                    <div class="form-group">
                        <label>Enter Your Name</label>
                        <input type="text" class="form-control mb-4" placeholder="name" name="name" required>
                    </div>
                    <div class="form-group">
                        <label>Enter Your Email</label>
                        <input type="email" class="form-control mb-4" placeholder="email" name="email" required>
                    </div>
                    <div class="form-group">
                        <label>Enter Your Phone Number</label>
                        <input type="tel" class="form-control mb-4" placeholder="phone" name="phone" required>
                    </div>
                    <div class="form-group">
                        <label>Set Password</label>
                        <input type="password" class="form-control mb-4" placeholder="password" name="password" required>
                    </div>
                    <button class="btn btn-block col-sm-4 btn-outline-info btn-control">register</button>
                </form>
            </div>
        </div>
    </div>
</body>

</html>
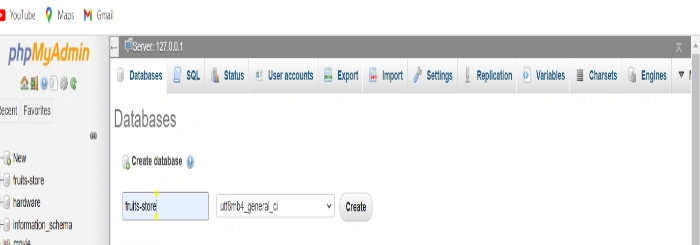
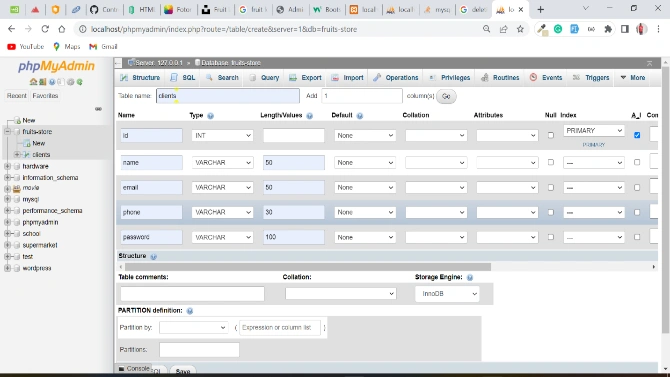
Step 8 – Creating a database
On your browser type localhost and navigate to phpMyAdmin. Next, click on new then enter database name i.e., fruits-store, then create.
Inside this database, create a table and name it as clients. It should have the following fields:
Id - (type INT, primary key),
name - (type CHAR, size 50),
email - (type VARCHAR, size 50),
phone - (type VARCHAR, size 30)
password - (type VARCHAR, size 100)
After saving the clients table, select the phone and the email field and make them unique. This is done to ensure that the same email or phone number cannot belong to multiple users.
Creating a database connection
Create a new PHP file and name it connect.php. This file will help us save time by avoiding code repetition.
Create a variable called con that will be used to store the connection. We will also use the mysqli_connect function which takes in four parameters i.e., name of the host, username, password and database name.
<?php

  $con = mysqli_connect("localhost", "root", "",
"fruits-store") or die(mysqli_connect_error());

?>
Step 9 – Creating a Navigation bar
Navigation plays a very important role since it will help determine the pages which will be visible to different users.
Create a new file and name it nav.php. Next, add the following code in the generated file:
Include this file in all the pages, right after the body tag in your HTML.
<nav class="navbar navbar-expand-sm navbar-light bg-info p-2 mb-5">
    <div class="container-fluid">
        <a class="navbar-brand d-block mx-auto text-center" href="home.php">
            <img src="images/logo.jfif" alt="Logo" style="width:80px;" class="rounded-pill">
            <h4 class="vollkorn text-white">fruits vendor Ltd</h4>
        </a>
        <button class="navbar-toggler" type="button" data-bs-toggle="collapse" data-bs-target="#mynavbar">
            <span class="navbar-toggler-icon"></span>
        </button>

        <div class="collapse navbar-collapse m-3" id="mynavbar">

            <ul class="navbar-nav ms-auto px-4">
                <li class="nav-item">
                    <a class="nav-link link-success" href="home.php">Home</a>
                </li>
                <li class="nav-item">
                    <a class="nav-link link-primary" href="contact.php">contact us</a>
                </li>
                <li class="nav-item">
                    <a class="nav-link link-primary" href="about.php">aboutus</a>
                </li>
                <li class="nav-item">
                    <a class="nav-link link-primary" href="register.php">Register</a>
                </li>

                <li class="nav-item">
                    <a class="nav-link link-primary" href="login.php">login.php</a>
                </li>
                <li class="nav-item">
                    <a class="nav-link link-primary" href="logout.php">logout</a>
                </li>
            </ul>
        </div>
    </div>
</nav>
Step 10 – Creating a Login form
In this step, we now want to implement login so that it will be used to control user access. Certain pages will not be accessible before logging into the system while others will be visible even before logging into the system.
To get started with the login form paste the following code into your login.php file:
<!DOCTYPE html>
<html lang="en">

<head>
    <meta charset="UTF-8">
    <meta http-equiv="X-UA-Compatible" content="IE=edge">
    <meta name="viewport" content="width=device-width, initial-scale=1.0">
    <title>login</title>
    <link rel="icon" type="image/x-icon" href="images/logo.jfif">
    <link rel="stylesheet" type="text/css" href="css/bootstrap.min.css">
</head>

<body class="bg-light">
    <?php include 'nav.php'?>
    <div class="container">
        <div class="row justify-content-center">
            <div class="col-sm-6 border shadow-lg">
                <div class="mt-5 mb-5 flex-column text-center">
                    <div class="mx-auto d-block">
                        <img src="images/logo.jfif" alt="Logo" style="width: 80px;" class="rounded-pill">
                        <h3 class="vollkorn"> Fruits Vendor Ltd</h3>
                    </div>
                    <h4>Login</h4>

                </div>
                <form action="login.php" method="post" class="mb-5 mt-5 rounded-top rounded-bottom">
                    <div class="form-group">
                        <label>Enter Your Email</label>
                        <input type="email" class="form-control mb-4" placeholder="email" name="email" required>
                    </div>

                    <div class="form-group">
                        <label>Enter Your Password</label>
                        <input type="password" class="form-control mb-4" placeholder="password" name="password"
                            required>
                    </div>

                    <div class="container">
                        <div class="row justify-content-center">
                            <div class="col-sm-6">
                                <button class="btn btn-control btn-outline-info btn-block col-sm-4">login</button>
                            </div>
                            <div class="col-sm-6 d-flex">
                                <p class="float-right">Don't have an account? </p>
                                <a href="register.php" class="signin">register</a>

                            </div>
                        </div>
                    </div>
                </form>
            </div>
        </div>
    </div>
</body>

</html>
Step 11 – Implementing Login functionality
Now, let’s implement the login form’s functionality that will fetch the login details of the user from the database and verify if its correct before allowing the user to view certain web pages.
Create a file and name it login.php. In this file, add the code below:
<?php
include 'connect.php';

 if(isset($_REQUEST["password"]))

{

$email = $_REQUEST["email"]; checking and retrieving email
$password = $_REQUEST["password"];

//retrieve one record that matches the email
//check the password hash
//store data in a session
//preparing the query so that hacking the database becomes difficult

$query = mysqli_prepare($con, "SELECT * FROM `clients` WHERE
email = ?");
mysqli_stmt_bind_param($query, "s", $email);
mysqli_stmt_execute($query);
$result = mysqli_stmt_get_result($query);

//checking number of rows that are stored in the result variable
if(mysqli_num_rows($result) == 1){ //counting number of rows in result
   $client = mysqli_fetch_assoc($result);
   $hash = $client["password"]; //retrieving the encrypted password

  if(password_verify($password, $hash)){ /*compare the password that the user provided and the hash password. If the passwords match then the user
can log in. If they do not match then an error message is displayed using
a cookie*/

//storing user information in a session

    session_start();
    $_SESSION["name"] = $customer["name"];
    $_SESSION["id"] = $customer["id"];
    $_SESSION["logged_in"] = true;
    header("location:home.php");
      //success
  }else{
    //if the number of rows is not one then show this message
    setcookie("error", "wrong username or password", time()+3);
  }

}else{
  //if the password provided by user and hash do not match
  setcookie("error", "wrong username or password", time()+3);
}
}
?>
To this point, the login should work perfectly.
Step 12 – Protecting files from unauthorized access
Create a new file and name as protect.php. This file checks if the session exists meaning that the user has already logged in. If the session is not found this file will redirect the user to the login page.
This file also protects certain pages from being accessed by unauthorized users. In this case, you cannot access a page if you are not logged in.
Add the code below in the protect.php file:
<?php

  session_start();

//checking if the session exists
//if the session is not set it redirects the user to the login form/page

  if(! isset($_SESSION["logged_in"])){
      header("location:login.php");
  }

?>
When we want to protect a page, we will import/include this file at the start of the file that you want to protect, as demonstrated below:
<?php include 'protect.php'?>
Step 13 – Creating a Logout page
Create a logout.php file and then add the following code:
<?php

session_start();

session_destroy();

header("location:login.php");
Step 14 – Hiding certain web pages
We need to include an if statement in our nav.php file which will ensure that a user cannot access certain pages if they are not logged in.
Assuming that you have created all the pages you need for your website, in our case, we have a home, login, logout, register, contact, and about page.
We want to make the login, home, and register pages accessible even when one is not logged into the system. Logout, contact, and about pages will only be visible when a user has logged in.
In the nav.php file, contact.php, about.php, and logout.php should be enclosed in an if statement which will check if the session [“logged_in”] exists. If it exists, these pages will be accessible.
<?php if (isset($_SESSION["logged_in"])): ?>

        <li class="nav-item">
          <a class="nav-link link-primary" href="contact.php">contact us</a>
        </li>

        <li class="nav-item">
          <a class="nav-link link-primary" href="about.php">about us</a>
        </li>

        <li class="nav-item">
          <a class="nav-link link-primary" href="logout.php">logout</a>
        </li>
<?php
endif;
?>
Furthermore, if the session is not set, we will direct the user to the login.php page. Modify nav.php under login.php by enclosing it in an if statement as follows:
<?php if (! isset($_SESSION["logged_in"])): ?>
    <li class="nav-item">
       <a class="nav-link link-primary" href="login.php">login</a>
    </li>
<?php endif; ?>
Conclusion
In this tutorial, we learned how to control access to specific pages using PHP. The $SESSION objects allow us to monitor user interactions across the websites. We can, therefore, determine if they are logged in or not and thus, invoke appropriate actions.
You can, therefore, use this knowledge to craft other beautiful and high-quality applications.


Comments: