


An Application Programming Interface, denoted as API, enables applications to access data and other external software functionalities. APIs are gaining popularity among developers since they save time and resources. Companies do not need to develop complex systems from scratch.
They can opt to consume data from other existing frameworks. An API is responsible in returning the appropriate response whenever an application sends a request.
Introduction
Laravel is a vital PHP framework used in creating interactive websites and APIs. It supports numerous dependencies and templates. Laravel lays a foundation that allows you, as a developer, to focus on more demanding things. It’s popular due to its ability to support real-time communication, API authentication, and job queues. This tutorial outlines the steps needed to create a Laravel Web API. Since we now know what Laravel is all about, let’s dive into the cool stuff.
Goal of the tutorial
The tutorial seeks to create a simple task manager API using Laravel.
Prerequisites
You need some basic knowledge of PHP to benefit from this tutorial. Furthermore, you must have Composer and XAMPP installed on your computer. Composer helps download and install the required dependencies. XAMPP is a collection of tools such as Apache Server and MySQL.
1. Creating the project
A new Laravel project is created by the command below. You can substitute taskmanager with any project name.
Laravel new taskmanager.
Alternatively, you can use Composer to install the required dependencies.
composer create-project –prefer-dist Laravel/Laravel taskmanager
Ensure that the project you create is in the xampp/htdocs folder. You can view your generated website template by visiting localhost/taskmanager/public/ on your browser.
2. Creating the database
Open Xampp and launch phpMyAdmin. Use it to create a database called tasks. We will create tables and insert data using migrations. You can now open the Laravel project in your preferred IDE. Visual Studio Code will be used for this project.
The database can be changed to tasks in the .env. You can also change the authentication information including passwords and emails in the .env file.. This largely depends on the Xampp settings.
3. Migration
We use the php artisan make:model Task -mf command to create a model. The '-mf' portion generates a task factory and database migration files for this model.
The new files are stored in the factories and migrations folders.
Open the 2020_11_25_173913_create_tasks_table file and go to the up() function. We need to outline the names of our database columns in the up() function as shown below.
<?php

use Illuminate\Database\Migrations\Migration;
use Illuminate\Database\Schema\Blueprint;
use Illuminate\Support\Facades\Schema;

class CreateTasksTable extends Migration{

  // Run the migrations.
  @return void

  public function up()  {

      Schema::create('tasks', function (Blueprint $table) {
          $table->id(); //table column
          $table->string('title'); //table column
          $table->string('description');//table column
          $table->timestamps();//table column
      });
  }

  // Reverse the migrations.
  @return void

  public function down(){
      Schema::dropIfExists('tasks');
  }

}
The database table will have the ID, title, description, and timestamps columns. We can perform a migration by using a php artisan migrate command in the terminal.
4. Seeding data
This stage entails adding some dummy data to our database. Let’s create a TaskFactory class by using php artistan make:factory TaskFactory command. We then need to define the columns that will have fake data as follows.
'title'=>$this->faker->word,
'description'=>$this->faker->text,
The full code of the TaskFactory is as shown.
<?php

namespace Database\Factories;
use App\Models\Task;
use Illuminate\Database\Eloquent\Factories\Factory;

class TaskFactory extends Factory

{

  // The name of the factory's corresponding model.
  @var string

  protected $model = Task::class;

  // Define the model's default state.
  @return array

  public function definition(){
      return [
          'title'=>$this->faker->word,
          'description'=>$this->faker->text,
      ];
  }

}
Before we create dummy data, we need to create a TaskTableSeeder class. It allows us to determine the amount of dummy data we wish to generate. The TaskTableSeeder class is shown below.
<?php

namespace Database\Seeders;
use Illuminate\Database\Seeder;
use App\Models\Task;
use database\factories\TaskFactory;

class TaskTableSeeder extends Seeder{

  // Run the database seeds.
  @return void

  public function run() {
      Task::factory()->times(50)->create();//we will generate 50 records
  }

}
We state the number of records that should be pre-populated in the database using this Task::factory()->times(50)->create() statement. In this case, 50 records will be generated. We can generate the data using php artisan db:seed command.
5. Controller
The next step is to create a task controller by using php artisan make:controller TaskController --resource command. The Controller class helps in handling requests.
You can find the created file at App\http\Controllers\TaskController.
The --resource portion allows Laravel to add functions that support CRUD functionalities in the controller. The generated methods are index(), create(), store(), show(), edit(), and update().
<?php
namespace App\Http\Controllers;
use Illuminate\Http\Request;

class TaskController extends Controller {

  // Display a listing of the resource.
  @return \Illuminate\Http\Response

  public function index() {
      //showing all values present in the database
  }

  // Show the form for creating a new resource.

  @return \Illuminate\Http\Response

  public function create() {
      //not required in APIs
  }

  // Store a newly created resource in storage.
  @param  \Illuminate\Http\Request  $request

  @return \Illuminate\Http\Response

  public function store(Request $request) {
      //storing new values in the database
  }

  // Display the specified resource.
  @param  int  $id

  @return \Illuminate\Http\Response

  public function show($id) {
  //viewing a particular task from a database
  }

  // Show the form for editing the specified resource.
   @param  int  $id
   @return \Illuminate\Http\Response

   */

  public function edit($id) {
      //editing data
  }

  // Update the specified resource in storage.

   @param  \Illuminate\Http\Request  $request

   @param  int  $id

   @return \Illuminate\Http\Response

  public function update(Request $request, $id) {
      //updating data in the database
  }

  // Remove the specified resource from storage.

   @param  int  $id

   @return \Illuminate\Http\Response

  public function destroy($id) {
      //deleting data
  }

}
Let’s modify the generated functions to activate the CRUD functionalities.
A) Index
This method will return all the data or tasks in the database.
 public function index(){
      return Task::orderBy('created_at', 'asc')->get();  //returns values in ascending order
  }
B) Show
This method allows us to retrieve values of a specific object.
public function show($id) {
      return Task::findorFail($id); //searches for the object in the database using its id and returns it.
  }
C) Store
This method allows us to receive user inputs and store them in the database.
public function store(Request $request){

      $this->validate($request, [ //inputs are not empty or null
          'title' => 'required',
          'description' => 'required',
      ]);

      $task = new Task;
      $task->title = $request->input('title'); //retrieving user inputs
      $task->description = $request->input('description');  //retrieving user inputs
      $task->save(); //storing values as an object
      return $task; //returns the stored value if the operation was successful.
  }
D) Update
This method allows the user to update existing values in the database.
public function update(Request $request, $id){
        $this->validate($request, [ // the new values should not be null
          'title' => 'required',
          'description' => 'required',
      ]);

      $task = Task::findorFail($id); // uses the id to search values that need to be updated.
      $task->title = $request->input('title'); //retrieves user input
      $task->description = $request->input('description');////retrieves user input
      $task->save();//saves the values in the database. The existing data is overwritten.
      return $task; // retrieves the updated object from the database
E) Destroy
This function is used to delete values in the database. It searches for an object in the database using the provided ID and deletes it.
 public function destroy($id){ //receives an object's id
      $task = Task::findorFail($id); //searching for object in database using ID
      if($task->delete()){ //deletes the object
          return 'deleted successfully'; //shows a message when the delete operation was successful.
      }
  }
6. Registering and Listing routes
We can register our Controller in the api.php file, as shown below. Routes are declared automatically.
Route::resource('tasks', TaskController::class);
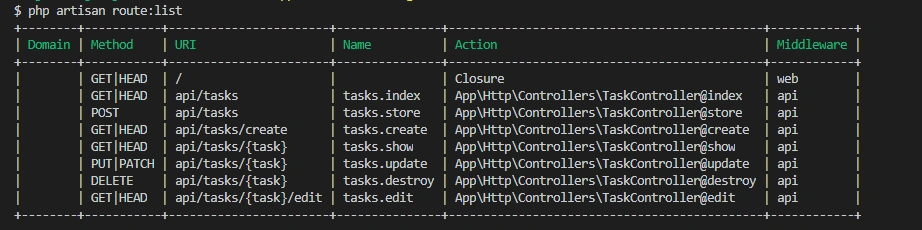
We can list the available routes using the command below.
php artisan route:list
Here are the available routes in the taskmanager project.
7. Testing
We will use Postman for our tests. Please watch the video below to learn how the tests are done.
Conclusion
The Laravel framework has made it easy to create powerful and secure APIs quickly. Using the resource command simplifies the routing process. It automatically adds all known routes to the application. The framework also provides dependencies for exception and Error handling. Any bug can be traced and resolved.


Comments: