


We use reports in our day-to-day activities. We may use them when we are purchasing products, services, or managing transactions. This includes summary reports, financial reports, inventory reports, and budget reports.
These reports help in generating insights into an organization and making the right decision based on the knowledge generated from them. For example, an inventory report helps to decide on the appropriate reorder level.
In this tutorial, the reader will learn how to design an inventory report and how to integrate it into a Spring Boot application. The reader will use custom products to generate a standard report for use by an organization.
Prerequisites
To follow along the reader will need:
- Knowledge in Spring Boot.
- Knowledge in Thymeleaf.
- JDK 11+
- Intellij IDEA installed on your computer.
- Jaspersoft Studio installed on your computer.
- A MySQL connector jar file.
Create a Spring Boot application
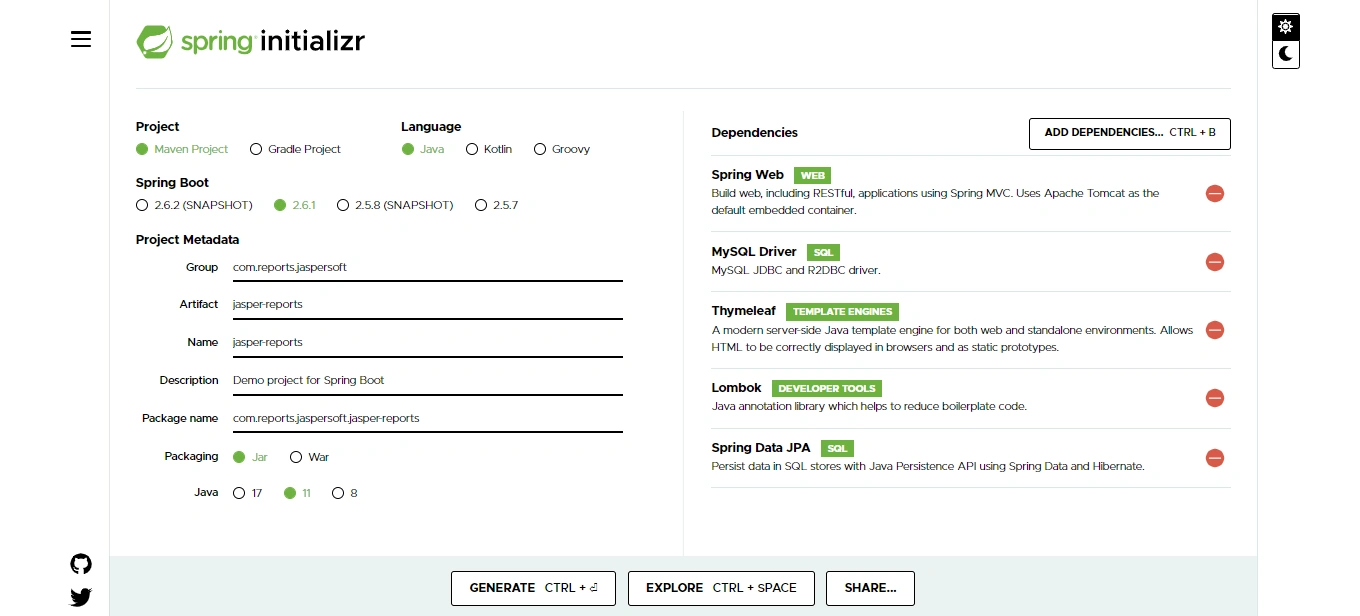
On your browser, go to the spring initializr and create a new application. Add the dependencies: Spring Web, MySQL Driver, Thymeleaf, Lombok, and Spring Data JPA.
Extract the zip file to the desired folder and import the application in Intellij. Maven will download all our dependencies from the internet.
Add database configuration properties
Add the following properties in the application.properties file. The main properties include the database URL, username, and password:
#Database connection properties
spring.datasource.url=jdbc:mysql://localhost:3306/jaspersoftdb
spring.datasource.username=root
spring.datasource.password=password
spring.jpa.hibernate.ddl-auto=create-drop
spring.jpa.show-sql=true
spring.jpa.properties.hibernate.format_sql=true
spring.jpa.properties.hibernate.dialect=org.hibernate.dialect.MySQL8Dialect
The spring.jpa.hibernate.ddl-auto property influences how the database tables are created and managed. The value create-drop tells Spring to create the tables on startup but drop them when the app terminates. The spring.jpa.show-sql property prints the queries generated by Hibernate so we know when errors occur.
The spring.jpa.properties.hibernate.format_sql property formats the SQL statements for readability. The spring.jpa.properties.hibernate.dialect property tells the application which SQL dialect to use.
Create a Products model
Create a class named Product with fields name, description, productType, price, and createdAt. The price is aBigDecimal, productType is an enum, and createdAt is a LocalDate.
public enum ProductType {
    PHONE,
    COMPUTER
}
import lombok.Data;
import lombok.NoArgsConstructor;

import javax.persistence.*;
import java.math.BigDecimal;
import java.time.LocalDate;

@Entity
@Table(name = "product")
@Data
@NoArgsConstructor
public class Product {
    @Id
    @GeneratedValue(strategy = GenerationType.AUTO)
    @Column(name = "id")
    private Long id;

    @Column(name = "name")
    private String name;

    @Column(name = "description")
    private String description;

    @Column(name = "product_type")
    @Enumerated(EnumType.STRING)
    private ProductType productType;

    @Column(name = "price")
    private BigDecimal price;

    @Column(name = "created_at")
    private LocalDate createdAt;

    public Product(String name,
                   String description,
                   ProductType productType,
                   BigDecimal price,
                   LocalDate createdAt) {
        this.name = name;
        this.description = description;
        this.productType = productType;
        this.price = price;
        this.createdAt = createdAt;
    }
}
The @Data annotation generates the getter and setter methods. This ensures we can display the list of products on our Thymeleaf page. The @NoArgsConstructor generates an empty constructor.
Create a products repository to find all products by date
Create an interface named ProductRepository that extends JpaRepository. Then, create a method that returns a collection of products queried by date in the interface:
import com.reports.jaspersoft.jasperreports.model.Product;
import org.springframework.data.jpa.repository.JpaRepository;

import java.time.LocalDate;
import java.util.List;

public interface ProductRepository extends JpaRepository<Product,Long> {
    List<Product> findAllByCreatedAt(LocalDate localDate);
}
Create a report service to filter products by type
Create an interface named ReportService and add two methods. The first method returns the report link, given the date and the file format. The other method returns a collection of products from the database.
The JRException comes from the net.sf.jasperreports library which is added later in the application. This class will be thrown when there is an error when compiling or filling the report with our data from the database.
import com.reports.jaspersoft.jasperreports.model.Product;
import net.sf.jasperreports.engine.JRException;

import java.io.IOException;
import java.time.LocalDate;
import java.util.List;

public interface ReportService {
    String generateReport(LocalDate localDate, String fileFormat) throws JRException, IOException;
    List<Product> findAllProducts();
}
Design a report using Jaspersoft template
Let’s open JasperSoft studio. Before we create a design of the report, we will add the MySQL connector to the classpath. This will ensure we can connect to our database and generate the desired fields from our table.
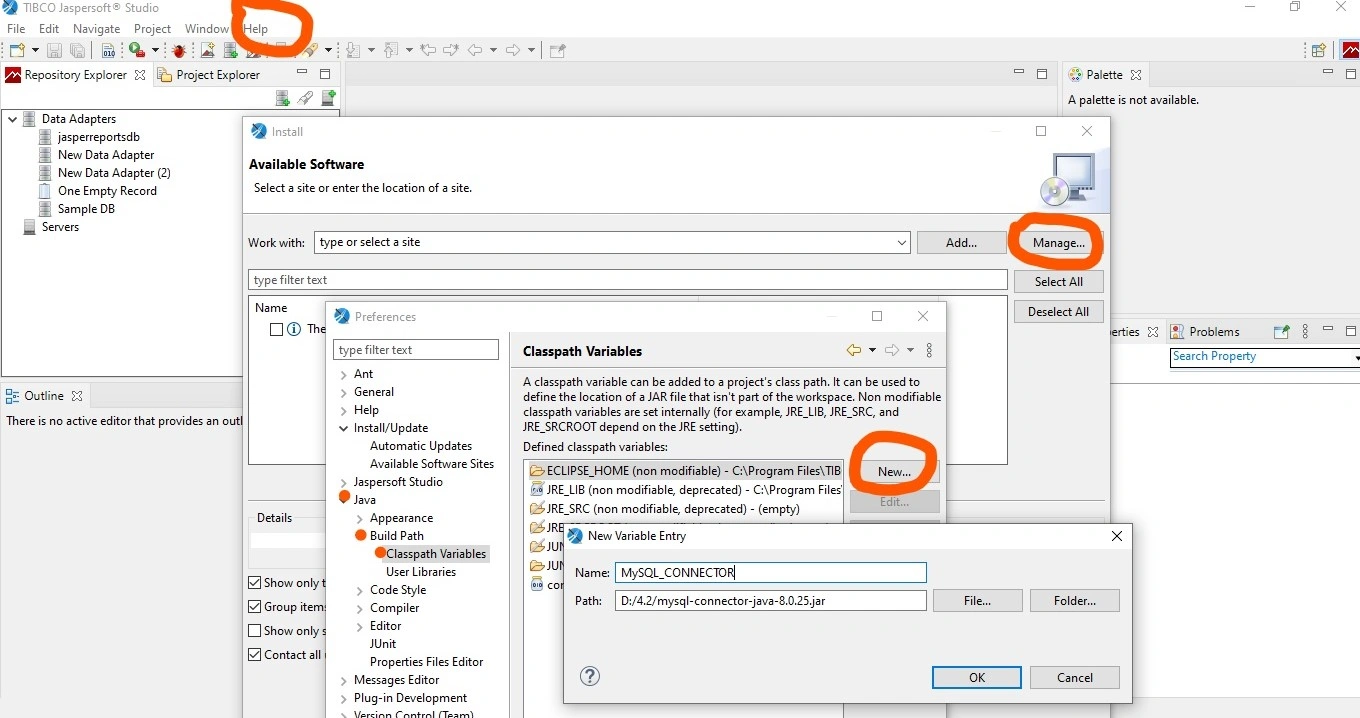
In Jaspersoft studio, click on help, install new software, manage. Once you click manage a new panel named preferences opens. Use the search field provided by the panel to search for java. The search will return different results but in our case click on build path.
Under build path, click on classpath variables. The classpath variables provide us with the capability to add, edit, and remove variables using the new, edit, and remove buttons. Click on new and add the jar file on the window that opens with the desired name as shown below:
Add the MySQL connector and run the spring boot app. The spring boot app will generate the tables required by Jaspersoft studio. Create a design for our report from existing templates. On the Jaspersoft toolbar click on file, new, jasper report.
A window opens with a list of templates to choose from. For this tutorial, select the template named simple blue and click next. Add a new .jrxml file using the window that opens up. This is an extension for Jaspersoft report files. For our case name the file as products.jrxml and click next.
There are situations where Jaspersoft studio does not connect to the database by only adding the MySQL connector using the above steps. A ClassNotFoundException is caused by the software not being able to locate the MySQL driver class. To fix this error, we should add the MySQL connector in the driver classpath menu provided on the next window.
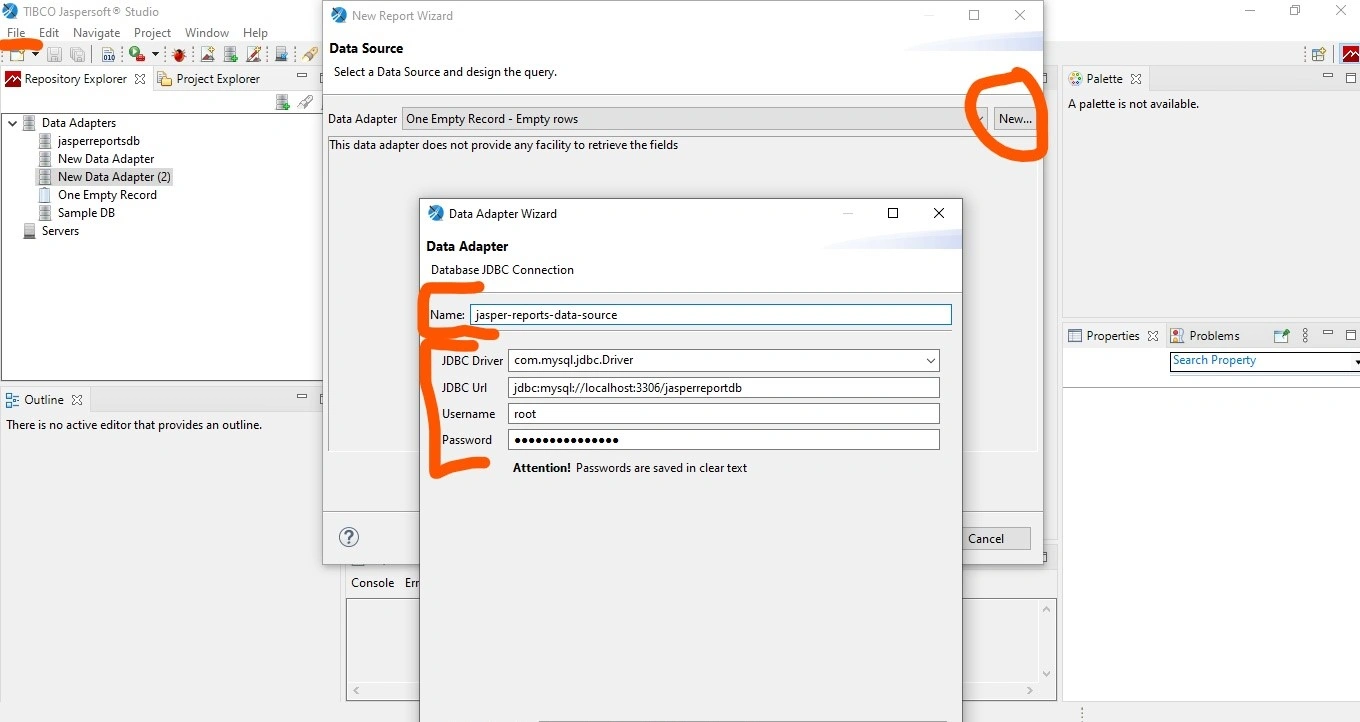
The window that opens next requires us to provide our data source. The data source is our database URL, username, and password to connect to our database. Click on new and on the data adapters window select database JDBC connection and click next. A window then opens where we need to fill the database connection properties as shown below:
Connect and write a query on the next window to select all the fields on the products table and click next:

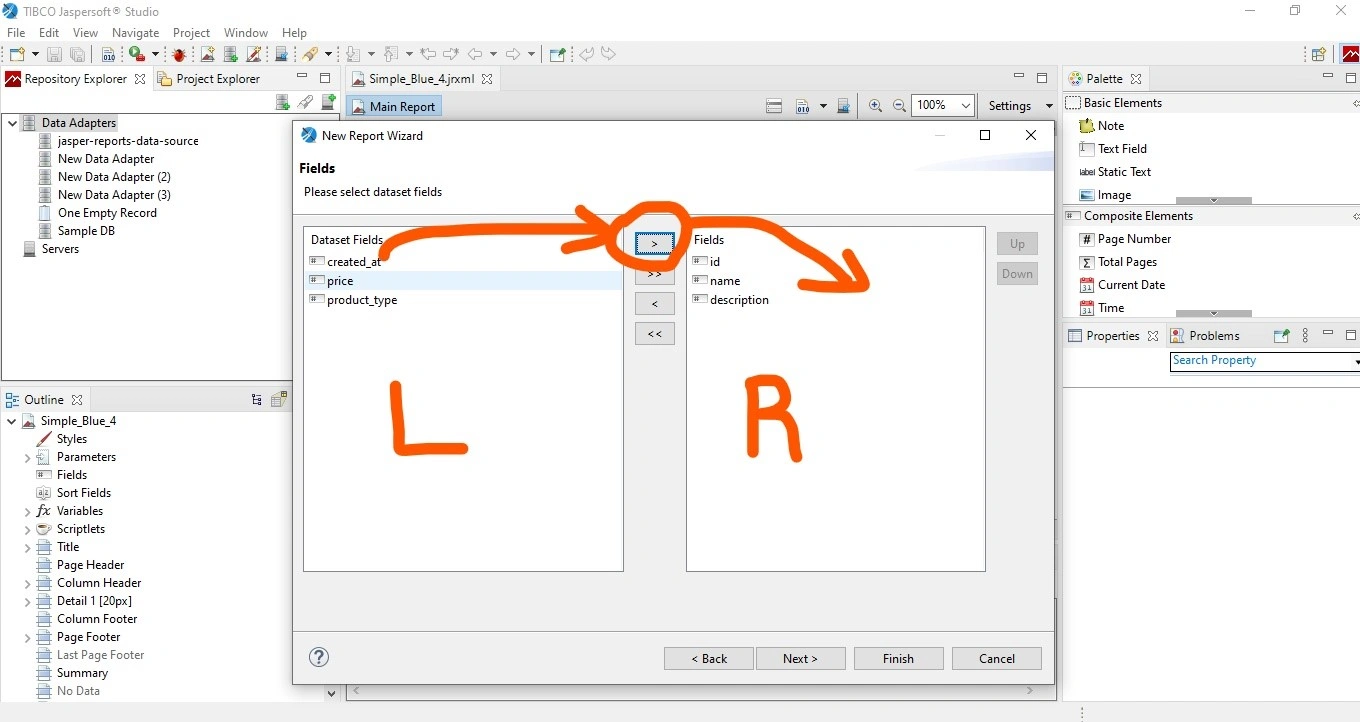
The new window that appears displays all the fields from our database table. Add all the fields we want to appear in the report. Add from the data fields on the left side to the fields section on the right side. You can do this using the button with the greater-than symbol:
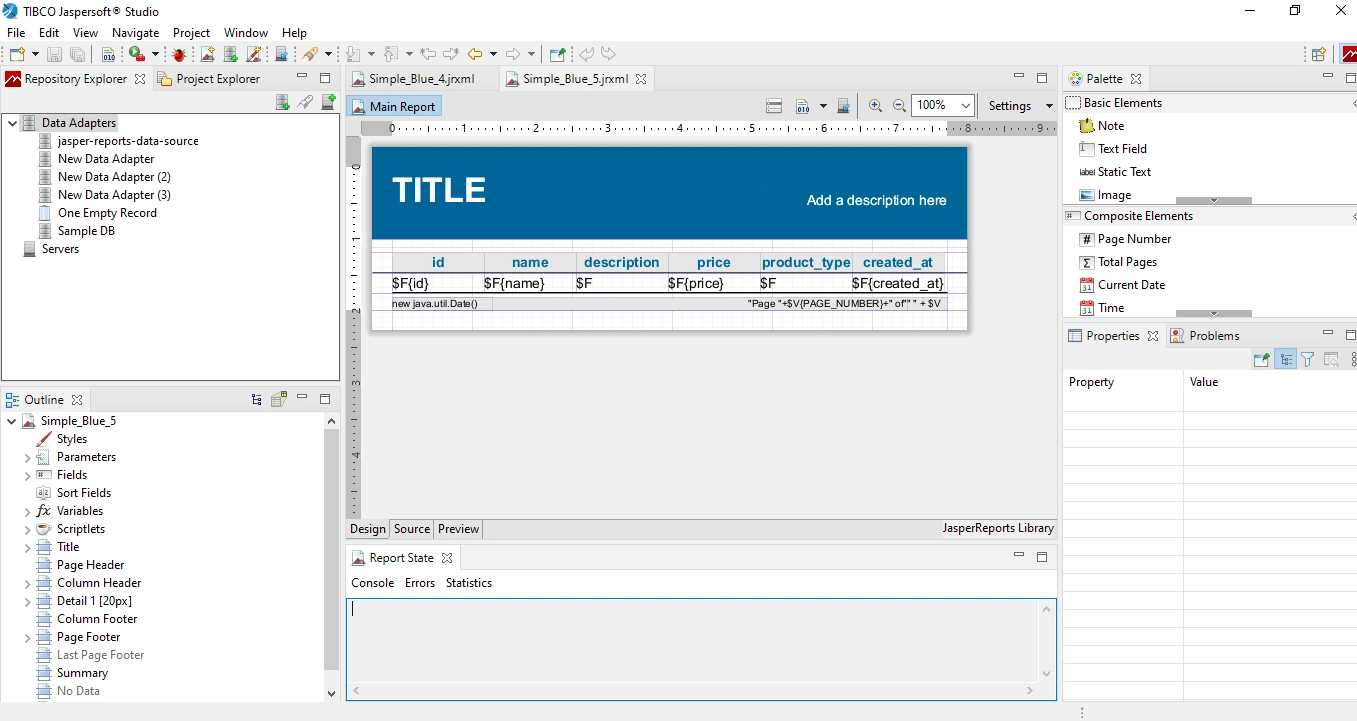
Click the Finish button to generate the final report. The report has our fields from the products entity as shown below. Edit the title and the description on the design header where necessary:
Add the design to our spring boot application
The design we have created generates XML describing the report structure. Get the code for it by clicking the source button on the bottom of the Jaspersoft design window:
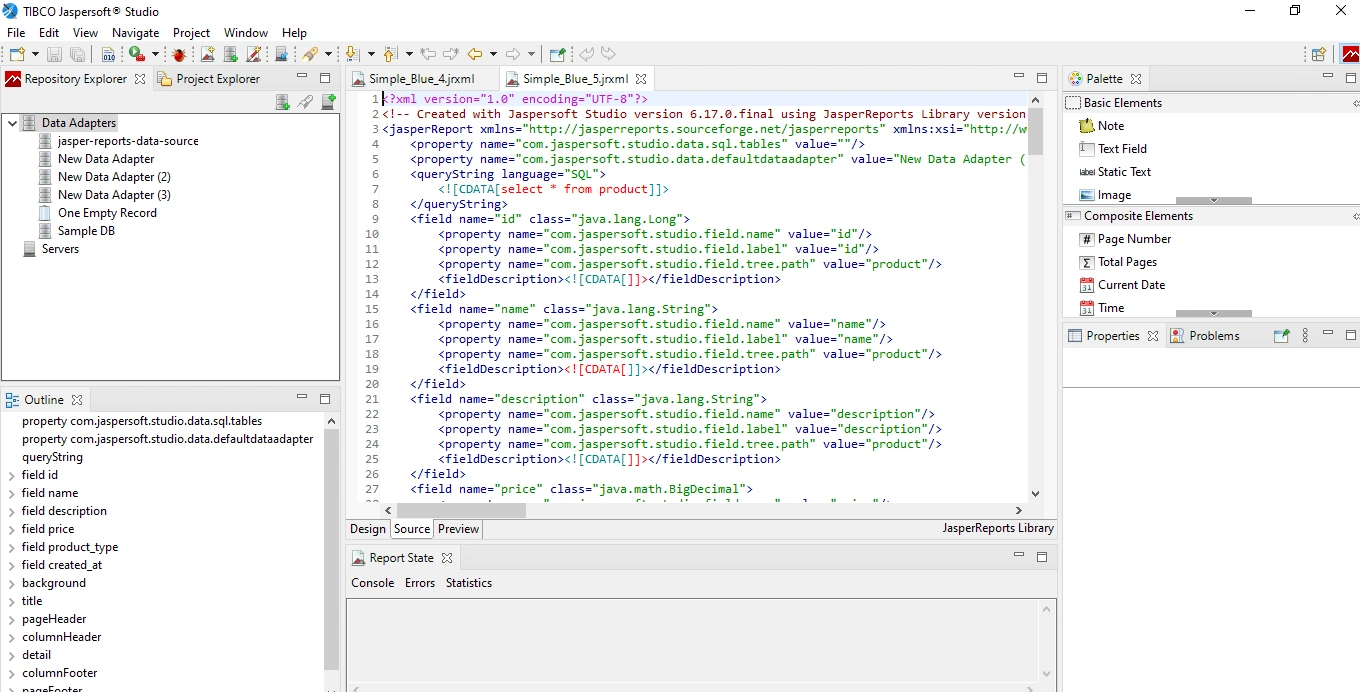
Remove the properties in the field tags in the source file. Ensure the class and name properties of the field tag are the same as that of our product model:
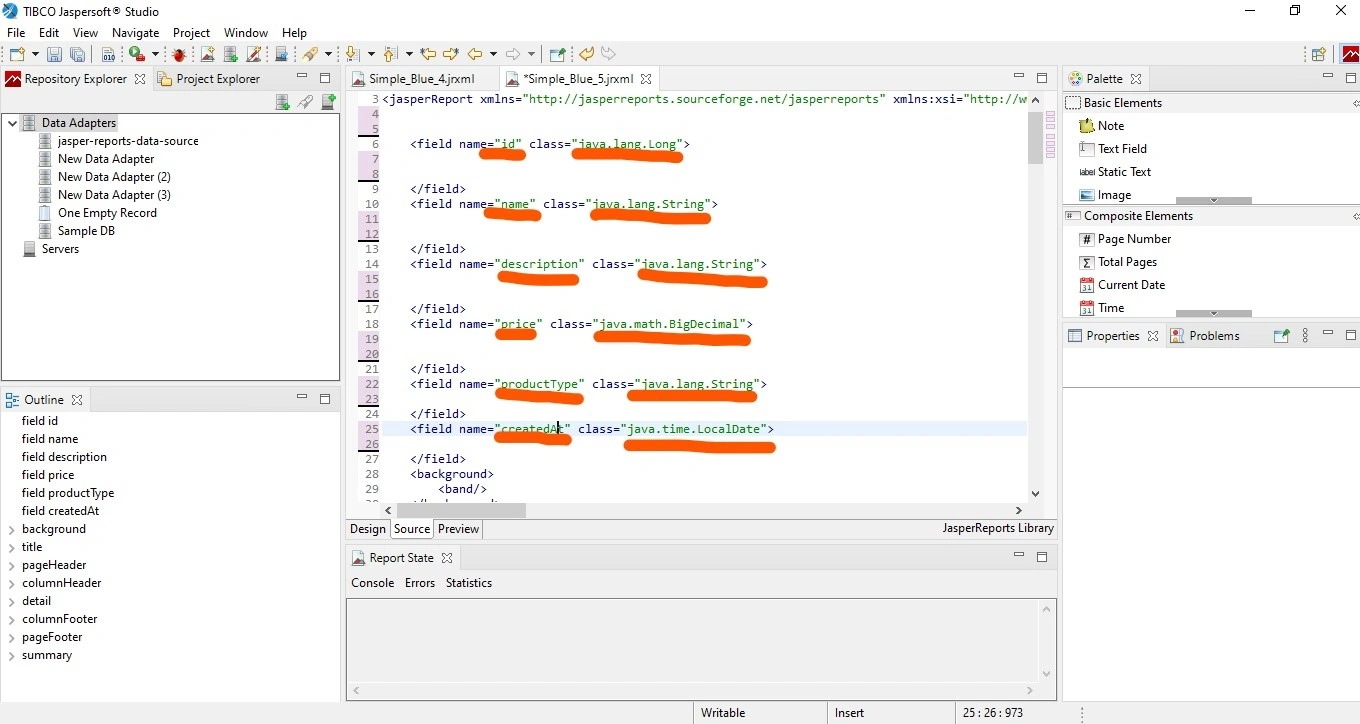
The productType is an enum and it will throw a ClassCastException when we try to cast it to a string. To avoid this add a getter method in the products class that returns the string value of the enum.
public String getProductType() {
    return String.valueOf(productType);
}
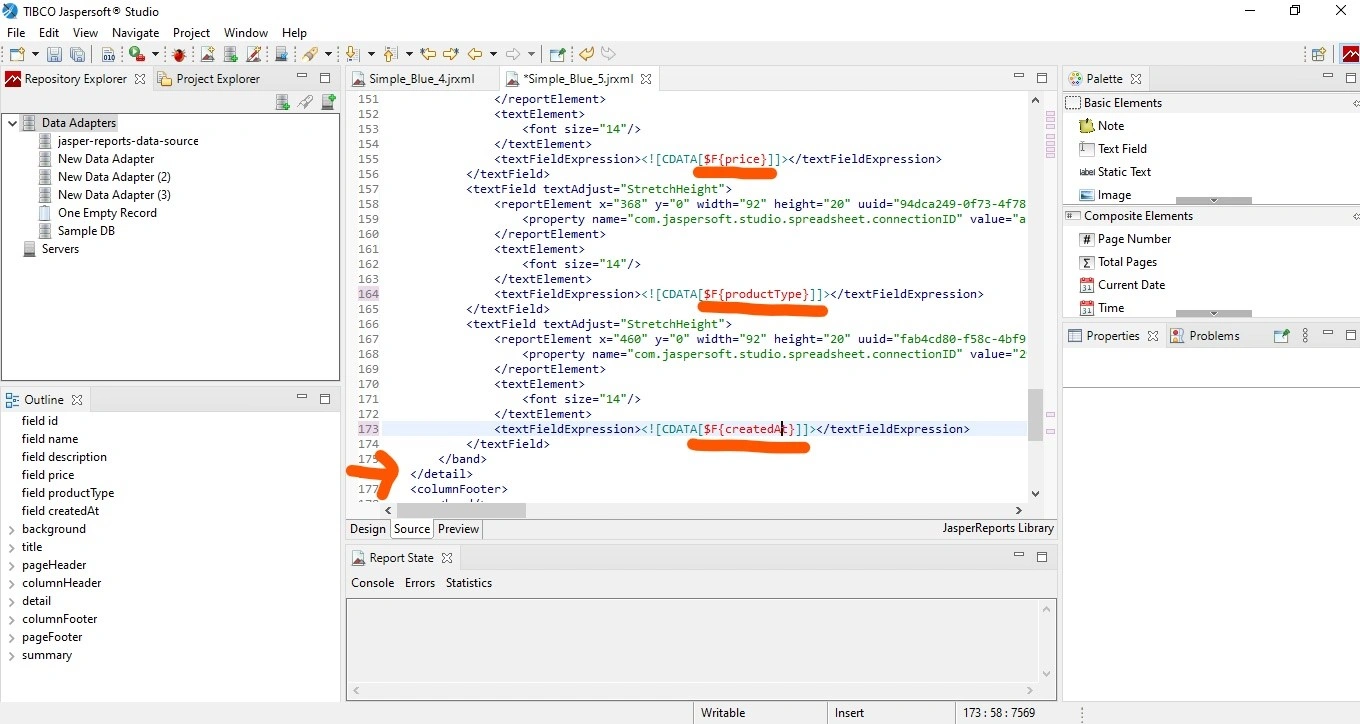
Also, ensure that the text field expression in the details section is of the same name as that of our product fields.
Copy the entire source code in our Spring Boot application. Name the file products.jrxml in the resources package.
Add the Jaspersoft dependency to our spring boot app
The Jaspersoft dependency will help us in adding the functionalities. These functionalities include loading, compiling, filling, and generating the document. Add this dependency in the pom.xml file. Maven will download it for us and add it to the classpath where we can invoke its methods:
<dependency>
  <groupId>net.sf.jasperreports</groupId>
  <artifactId>jasperreports</artifactId>
  <version>6.18.1</version>
</dependency>
This dependency can be found from the maven central repository
Load and compile the Jaspersoft design source file in the report service
Create a class named ReportServiceImpl that implements the ReportService interface. Implement the generateReport() and findAllProducts() methods. The getJasperPrint() method handles the functionality of compiling the jasper report file.
This method accepts the collection of data that we use to fill the report and a string. The string indicates the location of the Jasper report source file. When run, the function returns an instance of JasperPrint:
import com.reports.jaspersoft.jasperreports.model.Product;
import net.sf.jasperreports.engine.*;
import net.sf.jasperreports.engine.data.JRBeanCollectionDataSource;
import org.springframework.stereotype.Service;
import org.springframework.util.ResourceUtils;

import java.io.File;
import java.io.FileNotFoundException;
import java.util.HashMap;
import java.util.List;
import java.util.Map;

@Service
public class ReportServiceImpl implements ReportService{
    private JasperPrint getJasperPrint(List<Product> phoneCollection, String resourceLocation) throws FileNotFoundException, JRException {
        File file = ResourceUtils.getFile(resourceLocation);
        JasperReport jasperReport = JasperCompileManager
                .compileReport(file.getAbsolutePath());
        JRBeanCollectionDataSource dataSource = new
                JRBeanCollectionDataSource(phoneCollection);
        Map<String, Object> parameters = new HashMap<>();
        parameters.put("createdBy","David");

        JasperPrint jasperPrint = JasperFillManager
                .fillReport(jasperReport,parameters,dataSource);

        return jasperPrint;
    }

    @Override
    public String generateReport(LocalDate localDate, String fileFormat){

        return null;

    }

    @Override
    public List<Product> findAllProducts() {
        return null;
    }

}
Create a folder to store the report
In the ReportServiceImpl class create a method named getUploadPath(). Add the file format, a JasperPrint returned from the above method, and a file name as parameters. This method creates the specified directory if it does not exist. It also creates the generated PDF file in the folder with the file name passed to it.
We will also add a method named getPdfFileLink() that returns the link to our generated report. This method will take the file path returned by the getUploadPath() method as a string argument. We will use the two methods getJasperPrint() and getUploadPath() in the generateReport() method which currently returns null to generate our report.
import com.reports.jaspersoft.jasperreports.model.Product;
import net.sf.jasperreports.engine.*;
import net.sf.jasperreports.engine.data.JRBeanCollectionDataSource;
import org.springframework.stereotype.Service;
import org.springframework.util.ResourceUtils;
import org.springframework.util.StringUtils;

import java.io.File;
import java.io.FileNotFoundException;
import java.io.IOException;
import java.nio.file.Files;
import java.nio.file.Path;
import java.nio.file.Paths;
import java.util.HashMap;
import java.util.List;
import java.util.Map;

@Service
public class ReportServiceImpl implements ReportService{

    private JasperPrint getJasperPrint(List<Product> phoneCollection, String resourceLocation) throws FileNotFoundException, JRException {
        File file = ResourceUtils.getFile(resourceLocation);
        JasperReport jasperReport = JasperCompileManager
                .compileReport(file.getAbsolutePath());
        JRBeanCollectionDataSource dataSource = new
                JRBeanCollectionDataSource(phoneCollection);
        Map<String, Object> parameters = new HashMap<>();
        parameters.put("createdBy","David");

        JasperPrint jasperPrint = JasperFillManager
                .fillReport(jasperReport,parameters,dataSource);

        return jasperPrint;
    }

    private Path getUploadPath(String fileFormat, JasperPrint jasperPrint, String fileName) throws IOException, JRException {
        String uploadDir = StringUtils.cleanPath("./generated-reports");
        Path uploadPath = Paths.get(uploadDir);
        if (!Files.exists(uploadPath)){
            Files.createDirectories(uploadPath);
        }
        //generate the report and save it in the just created folder
        if (fileFormat.equalsIgnoreCase("pdf")){
            JasperExportManager.exportReportToPdfFile(
                    jasperPrint, uploadPath+fileName
            );
        }

        return uploadPath;
    }

    private String getPdfFileLink(String uploadPath){
        return uploadPath+"/"+"products.pdf";
    }

    @Override
    public String generateReport(LocalDate localDate, String fileFormat){

        return null;

    }

    @Override
    public List<Product> findAllProducts() {
        return null;
    }
}
Create a resource handler to display the generated PDF
Create a class named AppWebConfig that implements MvcConfigurer and override the addResourceHandlers() method. Create a method named uploadPath() that returns the absolute path. The application should allow requests to our PDF links using the string /generated-reports/**. Pass the absolute path returned by the method to the addResourceLocations() method:
import org.springframework.context.annotation.Configuration;
import org.springframework.web.servlet.config.annotation.ResourceHandlerRegistry;
import org.springframework.web.servlet.config.annotation.WebMvcConfigurer;

import java.nio.file.Path;
import java.nio.file.Paths;

@Configuration
public class AppWebConfig implements WebMvcConfigurer {
    @Override
    public void addResourceHandlers(ResourceHandlerRegistry registry) {
        String reportPath = uploadPath("./generated-reports");

        registry.addResourceHandler("/generated-reports/**")
                .addResourceLocations("file:/"+reportPath+"/");
    }

    private String uploadPath(String directory){
        Path uploadDirPath = Paths.get(directory);
        return uploadDirPath.toFile().getAbsolutePath();
    }
}
Generate a report with the filtered products
We implement this functionality using the generateReport() method in the ReportServiceImpl class. This method accepts two parameters of type LocalDate and String. To implement it, first, inject the ProductsRepository bean. We will use it to search for products created on that specific day. Create a string containing the resource location of our source file, i.e, products.jrxml.
Then call the getJasperPrint() method and pass the collection of products. Create a string containing the name of the PDF report to generate i.e, products.pdf. Next, call the getUploadPath() method with the fileFormat parameter provided by the generateReport() method.
Now, return the value from the getFilePdfLink() method, passing the value returned by the call to getUploadPath() as a string. This method returns a link containing the path of our generated PDF file to our controller.
import com.reports.jaspersoft.jasperreports.model.Product;
import com.reports.jaspersoft.jasperreports.repository.ProductRepository;
import lombok.RequiredArgsConstructor;
import net.sf.jasperreports.engine.*;
import net.sf.jasperreports.engine.data.JRBeanCollectionDataSource;
import org.springframework.stereotype.Service;
import org.springframework.util.ResourceUtils;
import org.springframework.util.StringUtils;

import java.io.File;
import java.io.FileNotFoundException;
import java.io.IOException;
import java.nio.file.Files;
import java.nio.file.Path;
import java.nio.file.Paths;
import java.time.LocalDate;
import java.util.HashMap;
import java.util.List;
import java.util.Map;

@Service
@RequiredArgsConstructor
public class ReportServiceImpl implements ReportService{
    private final ProductRepository productRepository;

    private JasperPrint getJasperPrint(List<Product> phoneCollection, String resourceLocation) throws FileNotFoundException, JRException {
        File file = ResourceUtils.getFile(resourceLocation);
        JasperReport jasperReport = JasperCompileManager
                .compileReport(file.getAbsolutePath());
        JRBeanCollectionDataSource dataSource = new
                JRBeanCollectionDataSource(phoneCollection);
        Map<String, Object> parameters = new HashMap<>();
        parameters.put("createdBy","David");

        JasperPrint jasperPrint = JasperFillManager
                .fillReport(jasperReport,parameters,dataSource);

        return jasperPrint;
    }

    private Path getUploadPath(String fileFormat, JasperPrint jasperPrint, String fileName) throws IOException, JRException {
        String uploadDir = StringUtils.cleanPath("./generated-reports");
        Path uploadPath = Paths.get(uploadDir);
        if (!Files.exists(uploadPath)){
            Files.createDirectories(uploadPath);
        }
        //generate the report and save it in the just created folder
        if (fileFormat.equalsIgnoreCase("pdf")){
            JasperExportManager.exportReportToPdfFile(
                    jasperPrint, uploadPath+fileName
            );
        }

        return uploadPath;
    }

    private String getPdfFileLink(String uploadPath){
        return uploadPath+"/"+"products.pdf";
    }

    @Override
    public String generateReport(LocalDate localDate, String fileFormat) throws JRException, IOException {
        List<Product> phoneCollection = productRepository.findAllByCreatedAt(localDate);
        //load the file and compile it
        String resourceLocation = "classpath:products.jrxml";
        JasperPrint jasperPrint = getJasperPrint(phoneCollection,resourceLocation);
        //create a folder to store the report
        String fileName = "/"+"products.pdf";
        Path uploadPath = getUploadPath(fileFormat, jasperPrint, fileName);
        //create a private method that returns the link to the specific pdf file

        return getPdfFileLink(uploadPath.toString());
    }

    @Override
    public List<Product> findAllProducts() {
        return productRepository.findAll();
    }
}
Our products page will display the list of products in the database. Ensure that the findAllProducts() method calls the findAll() method instead of returning null.
Create a report controller
Allow any request to the root path and iterate through the list of products using a products model. Set the value of this model to be the return value of the findAllProducts() method of the ReportService:
import com.reports.jaspersoft.jasperreports.service.ReportService;
import lombok.RequiredArgsConstructor;
import org.springframework.stereotype.Controller;
import org.springframework.ui.Model;
import org.springframework.web.bind.annotation.GetMapping;

@Controller
@RequiredArgsConstructor
public class ReportController {
    private final ReportService reportService;

    @GetMapping("/")
    public String showProducts(Model model){
        model.addAttribute("products",reportService.findAllProducts());
        return "products";
    }
}
Create a products page with date and file type fields
The products page contains two sections. One has a form where we enter the date and select the document type to generate (which in our case is) a PDF document. These two values are request parameters. Leverage the th:name property as shown on the input and option tags of the form below:
<!-- products.html -->
<!DOCTYPE html>
<html lang="en" xmlns:th="http://www.thymeleaf.org">
<head>
    <meta charset="UTF-8">
    <title>Products</title>
  <link th:href="@{products.css}" rel="stylesheet">
</head>
<body>
<section class="products-form-section">
  <div class="container">
    <div class="card">
      <form th:action="@{/report}" method="post" class="form-control">
        <div class="date-control">
          <input type="date" th:name="date">

        </div>
        <div class="file-type-control">
          <select th:name="fileFormat">
            <option th:value="pdf" th:text="PDF"></option>

          </select>

        </div>
        <div class="generate-btn">
          <input type="submit" class="btn-primary" value="generate report">

        </div>

      </form>

    </div>

  </div>

</section>
<section class="products-section">
  <div class="container">
    <div class="card" th:each="product : ${products}">
      <p th:text="${product.id}"></p>
      <p th:text="${product.name}"></p>
      <p th:text="${product.description}"></p>
      <p th:text="${product.productType}"></p>
      <p th:text="${product.price}"></p>
      <p th:text="${product.createdAt}"></p>

    </div>

  </div>

</section>

</body>
</html>
/*products.css*/
*{
    margin: 0;
    padding: 0;
    box-sizing: border-box;
}

body{
    background-color: darkslategray;
}

.container{
    padding: 20px;
    margin: 20px;
    display: flex;
    flex-direction: column;
    flex-wrap: wrap;
    align-content: center;
}

.card{
    width: 100%;
    padding: 20px;
    margin: 20px;
    border-radius: 10px;
    border: 1px solid lightslategray;
    background-color: white;
}

.products-section .card{
    background-color: black;
    color: white;
}

.products-section .card:hover{
    background-color: lightblue;
    color: black;
}

.products-section .card{
    display: flex;
    flex-direction: row;
    justify-content: space-between;
    flex-wrap: wrap;
}

.form-control{
    display: flex;
    flex-direction: row;
    justify-content: space-between;
}

.btn-primary{
    padding: 10px;
    background-color: green;
    color: white;
    border-radius: 10px;
}
.btn-primary:hover{
    cursor: pointer;
}
Add a post mapping
When we press the generate report button of the above form a post request goes to the /report path. This URL corresponds to the generateReport() method of the controller. The @RequestParam annotation retrieves the date and the file format from the request.
It passes the values to the generateReport() method of our ReportService. Return a string containing the path to our generated PDF as we discussed earlier. We then issue a new request to the path by redirecting to it in the controller. The redirect allows us to display the report in our browser. Note that the resource handler must be available for this to work.
import com.reports.jaspersoft.jasperreports.service.ReportService;
import lombok.RequiredArgsConstructor;
import org.springframework.stereotype.Controller;
import org.springframework.ui.Model;
import org.springframework.web.bind.annotation.GetMapping;

@Controller
@RequiredArgsConstructor
public class ReportController {
    private final ReportService reportService;

    @GetMapping("/")
    public String showProducts(Model model){
        model.addAttribute("products",reportService.findAllProducts());
        return "products";
    }

    @PostMapping("/report")
    public String generateReport(@RequestParam("date") String date,
                                 @RequestParam("fileFormat") String fileFormat) throws JRException, IOException {
        LocalDate localDate = LocalDate.parse(date);
        String fileLink = reportService.generateReport(localDate, fileFormat);
        return "redirect:/"+fileLink;
    }
}
Test the application
We need to populate our products table with dummy data for testing purposes. Add a CommandLineRunner with a list of products to create when our application starts up:
import com.reports.jaspersoft.jasperreports.model.Product;
import com.reports.jaspersoft.jasperreports.model.ProductType;
import com.reports.jaspersoft.jasperreports.repository.ProductRepository;
import org.springframework.boot.CommandLineRunner;
import org.springframework.boot.SpringApplication;
import org.springframework.boot.autoconfigure.SpringBootApplication;
import org.springframework.context.annotation.Bean;

import java.math.BigDecimal;
import java.time.LocalDate;
import java.util.List;

@SpringBootApplication
public class JasperReportsApplication {

    public static void main(String[] args) {
        SpringApplication.run(JasperReportsApplication.class, args);
    }

    @Bean
    public CommandLineRunner commandLineRunner(ProductRepository productRepository){
        return args -> {
            List<Product> products = List.of(
                    new Product("Samsung galaxy",
                            "4GB RAM",
                            ProductType.PHONE,
                            new BigDecimal("300"),
                            LocalDate.now()),
                    new Product("Techno Spark",
                            "2GB RAM",
                            ProductType.PHONE,
                            new BigDecimal("500"),
                            LocalDate.now()),
                    new Product("HP parvillion",
                            "250GB SSD",
                            ProductType.COMPUTER,
                            new BigDecimal("600"),
                            LocalDate.now().minusDays(1)),
                    new Product("Dell",
                            "DDR4 hard disk",
                            ProductType.COMPUTER,
                            new BigDecimal("700"),
                            LocalDate.now().minusDays(1)),
                    new Product("Acer",
                            "4GB RAM",
                            ProductType.COMPUTER,
                            new BigDecimal("200"),
                            LocalDate.now().minusDays(1)),
                    new Product("Huawei",
                            "high resolution camera",
                            ProductType.PHONE,
                            new BigDecimal("400"),
                            LocalDate.now().minusDays(1))
            );

            productRepository.saveAll(products);
        };
    }

}
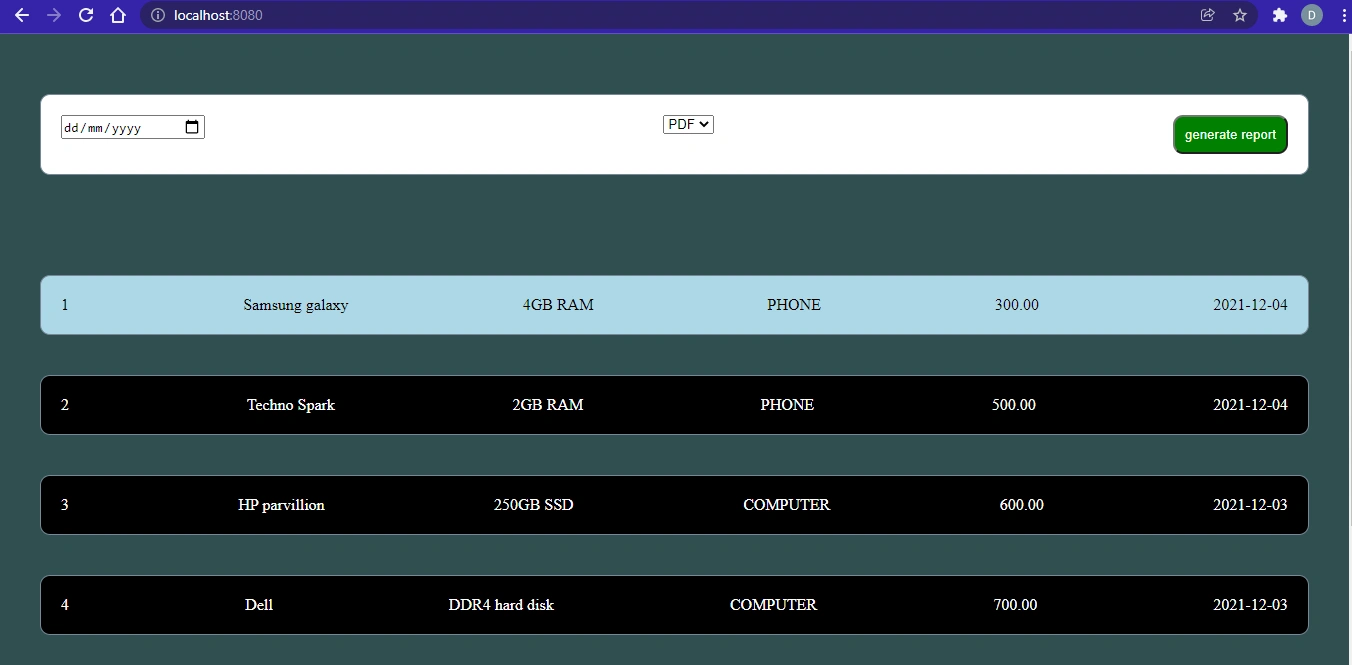
Run the Spring Boot application and visit the page at localhost 8080. Our page displays a form and a list of products:
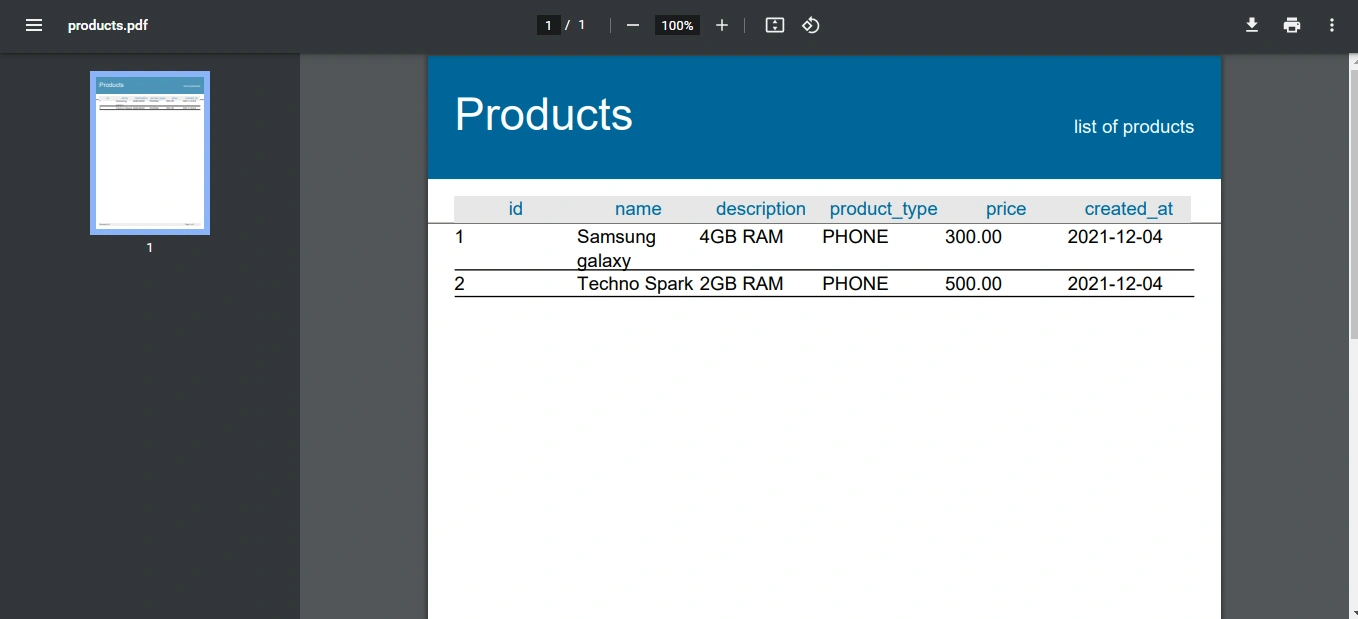
Enter the current date, select PDF as the file type, and press the generate button. This redirects us to the generated PDF on a new browser tab as shown below.
Note that the dates will be different depending on the time you are reading this article.
We can play with the results using the current and previous dates. Some of the products created have LocalDate.now() to get the current date. Some of the products have LocalDate.now().minusDays(1) to get the date of the previous day.
Conclusion
In this tutorial, we have learned how to generate a PDF report using Jaspersoft studio. We have used an existing template and customized it to meet our needs. We have also learned how to load, compile, fill and generate the different types of documents.
Happy coding!


Comments: