


Job scheduling is crucial in all streaming applications. There are various ways of streaming data from an external API into an application through automation.
Sometimes, developers need to automate things like writing data into the database every minute or hour(s). In this tutorial, we will be making a Python application to demonstrate job queues with a library called django_cron.
Prerequisites
To follow along with this tutorial, the reader is required to have the following:
- An understanding of the Python programming language.
- A pre-installed IDE, preferably Visual Studio Code.
- A pre-installed API tester, preferably Postman.
- Python 3.x installed.
- An understanding of Django 3.
Objectives
In this tutorial, we will be learning jobs scheduling automation with django_cron in a Python application. In addition, you will learn and apply the following to your project.
- How
django_cronworks. - Jobs scheduling automation with the
django_cronlibrary.
Overview of job scheduling
Every repeated task carried out in the background is reffered to as a job in software development. Job scheduling deals with various tasks ensuring the connection of system applications.
Schedulers used in the industry follow the company’s requirements. For instance, Oracle FLEXCUBE FCJ uses the two types of jobs schedulers named Quartz and Flux.
Furthermore, jobs schedulers are important where repetitive tasks are needed. For example, notifications sent by social media applications to user accounts are sent through this process.
It is possible to schedule a job that needs to carry out once a particular action is accomplished or executed. In every social application, the Like button keeps updating once clicked, and this action updates the database or cache too. However, millions of users can like the content at a time.
All of these execute through job scheduling automation. Stay tuned to learn more and how to integrate this into your next Python project.
Next, I will be introducing a library called django_cron for this automation.
How django_cron works
Here, we will talk about achieving job scheduling automation with the library. It allows the Django-Python code to run on repeated basics.
It helps in tracking and execute recurring tasks. There are two main ways of going about the automation stuff.
They are as follows:
1. Through a custom script file
In this case, developers write their scripts to achieve the queueing of jobs. It can take time while engineers get to design what they want based on their needs.
Here is how the file might look like;
cron:
- description: "daily summary job"
  url: /tasks/summary
  schedule: every 24 hours
- description: "monday morning mailout"
  url: /mail/weekly
  schedule: every monday 09:00
  timezone: Australia/NSW
- description: "new daily summary job"
  url: /tasks/summary
  schedule: every 24 hours
  target: beta
Note: This is a
cron.ymlfile used to automate jobs based on the steps defined.
2. Using pre-defined libraries
Libraries like django_cron, celery are used to achieve job scheduling. These are all pre-defined packages.
Jobs scheduling automation with the django_cron library
Now, let’s see how to incorporate django_cron in a Python application. To install the django_cron package into the project, run the command below:
pip install django_cron
The convention is to prepare a Python script file for the code. The python class extends the CronJobBase class from the installed library in the file.
Also, a method called Schedule takes an argument of minutes that will be imported. Such a job will run in a repeated manner in the interval of minutes provided. However, this will execute a do() method inside the cron job class.
Then, the job can be run manually by executing the snippet below.
python manage.py runcrons
Note: The command above will run all available cron jobs. To run a specific cron job, you should provide the class name of the job instead of
run cron.
We will be developing a demo API using an external endpoint https://hackernews.api-docs.io data. Furthermore, this application will ensure writing into the database from the endpoint based on the configured number of minutes. Before anything, let us set up the project directory itself.
Project setup
We will start by setting up a project structure in Django’s way of doing things. First off, we have to design a storage location for the project.
Open your terminal, and run the following commands:
cd Desktop
mkdir project && cd project
Now create a virtual environment for the project and install the required dependencies as shown below:
python -m venv env
source env/Scripts/activate

pip install Django==3.2 django_cron djangorestframework
pip freeze > requirements.txt
You have configured the environment for the project and installed all of the dependencies. You are keeping track of them via the requirements.txt file.
Now start the project, spin up the Django server and create an app called news with the commands below:
django-admin startproject hackernewsdemo
python manage.py startapp news

python manage.py runserver
If you open your browser to http://127.0.0.1:8000, you should see the default Django welcome page as shown below:
Now open to the project settings.py file, navigate to the INSTALLED_APPS and add the snippet below:
# ...
'rest_framework',
'django_cron',
'news'
In addition, it is mandatory to register the CRON_CLASSES list at the bottom of the settings.py file. The list contains all the cron classes that the application has. Also, we need to add the permission classes for the API inside settings.py.
CRON_CLASSES = [
    "news.cron.MyCronJob",
    # ...
]

REST_FRAMEWORK = {
  'DEFAULT_PERMISSION_CLASSES': [
      'rest_framework.permissions.AllowAny',
  ],
}
Making models for the endpoint
In this API, what is needed from the external endpoint is the ids of the external news data. Therefore, you will make the model with just two properties, the id and the datetime fetched.
The best is to let the fetched ids be the primary keys of the database. They are needed to get the latest news from the external endpoint.
Add the snippet below to your models.py of the news app.
from django.db import models
from datetime import datetime

class HackerNewsID(models.Model):
    hackernews = models.BigIntegerField(unique=True, primary_key=True)
    fetched_at = models.DateTimeField(default=datetime.now())

    def save(self, *args, **kwargs):
        self.id = self.hackernews # replacing the id(primary key) as the hackernews id
        super(HackerNewsID, self).save(*args, **kwargs)

    def __str__(self):
        return str(self.hackernews)
Note: The
savemethod under the classHackerNewsIDsaves data when called. This only formats the primary key to theidfetched.
Making cron jobs
Here, we will make the cron job class. This class is needed by the django_cron to execute every minute(s) as configured in the code below.
The code snippet below describes the cron job class. It goes inside the cron.py file in the news app directory.
from django_cron import CronJobBase, Schedule
import requests
from .models import HackerNewsID

class MyCronJob(CronJobBase):
    RUN_EVERY_MINS = 5 # every 5 minutes
    RETRY_AFTER_FAILURE_MINS = 1
    schedule = Schedule(run_every_mins=RUN_EVERY_MINS, retry_after_failure_mins=RETRY_AFTER_FAILURE_MINS)
    code = 'news.my_cron_job'    # a unique code

    def do(self):

        NEWS_URL = 'https://hacker-news.firebaseio.com/v0/topstories.json?print=pretty' # external endpoint that returns list of ids

        headers = {'user-agent': 'quickcheck/0.0.1'}
        response = requests.get(NEWS_URL, headers=headers)

        result = response.text.split(',')[1:len(response.text.split(','))-2] # in order to trim the last element
        last = response.text.split(',')[-1] # got this from API " 499287535 ] /n" --> reshaped to that below
        result.insert(len(result), last.strip().split()[0]) # "499287535"

        news = 400 # 100 downward/latest
        res = [int(id.strip()) for id in result[news+1:news+6]] # list comprehension

        for id in res:
            news_id = HackerNewsID(hackernews=id)
            news_id.save()
Note: Run the command below to add the latest hacker news id to the database. It also executes the cron job class(es) by looping through the response from API and then calling the
save()method on each.
python manage.py runcrons
The MyCronJob class extends the CRONJoBBase class imported from the library. Among the properties of the class is code which serves as a signature for a particular cron job. The identification references settings.py.
In the case of the do() method, it sends data to the external source with some formatting. The response generated would be the latest 5 ids added from the external source.
We loop through the ids and add each id to the database using the save() method.
Serializing data from models
The convention is to make a seralizers.py file inside the news app folder. The framework wraps the data from models.py into JSON format before saving it to the database.
from rest_framework import serializers
from .models import HackerNewsID

class NewsIdSerializer(serializers.ModelSerializer):

    class Meta:
        model = HackerNewsID
        fields = ('hackernews',)
Note: In this application, we only care about the
id, and that’s why we made the fields a tuple with only one element from our model.
Setting up the views
We will make two class-based views called NewsIdView and NewsItemView. The first view requests to the external endpoint and then gets the list of ids for the endpoint through the get method under the class.
However, the other view will match the saved id in the database to get the specific data from the external endpoint. It matches half of the ids from the database and then performs a request on each to fetch data of the id.
import json
import requests
from rest_framework.generics import ListAPIView
from rest_framework.views import APIView
from rest_framework.response import Response
from rest_framework.permissions import AllowAny
from rest_framework import status
from .models import HackerNewsID


class NewsIdView(APIView):
  permission_classes = [AllowAny]

# get a list of all news ids from hacker news
  def get(self, request, format=None):

    NEWS_URL = 'https://hacker-news.firebaseio.com/v0/topstories.json?print=pretty'

    headers = {'user-agent': 'quickcheck/0.0.1'}
    response = requests.get(NEWS_URL, headers=headers)

    result = response.text.split(',')[1:len(response.text.split(','))-2]  # to trim the last element
    last = response.text.split(',')[-1]  #got this from API " 499287535 ] /n" --> reshaped to that below
    result.insert(len(result), last.strip().split()[0]) # "499287535"

    res = [int(id.strip()) for id in result] # list comprehension to strip each element of the data

    return Response(res, status=status.HTTP_200_OK)


class NewsItemView(APIView):
    permission_classes = [AllowAny]

    def get_data_from_API(self):
        """
            This helps to return
            formatted data fetched from endpoint provided
            using request.
        """
        # latest = HackerNewsID.objects.all()[len(HackerNewsID.objects.all())-1].hackernews # getting latest id from db
        result = []
        half = 0
        total = len(HackerNewsID.objects.all()) # getting the total ids from the db

        #slicing into half based on even or odd total
        if total % 2 == 0:
            half = len(HackerNewsID.objects.all()) / 2
        else:
            half = (len(HackerNewsID.objects.all()) / 2) + 1

        ids = HackerNewsID.objects.all()[:half] #slicing the queryset to get last half

        for id in ids:
            NEWS_URL = f'https://hacker-news.firebaseio.com/v0/item/{str(id)}.json?print=pretty'
            headers = {'user-agent': 'quickcheck/0.0.1'}
            response = requests.get(NEWS_URL, headers=headers)
            data = json.loads(response.text)
            result.append(data)

        return result


#GET the latest hackernews streamed
    def get(self, request, format=None):
        return Response(self.get_data_from_API(),status=status.HTTP_201_CREATED)
Configuring routes for your endpoint
Under the project directory, open to the urls.py and paste the snippet below. These are the routes for the rest-framework, admin, and the news app.
from django.contrib import admin
from django.urls import path, include

urlpatterns = [
    path('admin/', admin.site.urls),
    path('api-auth/', include('rest_framework.urls')),
    path('api/v0/items/', include('news.urls'))
]
To connect the news app with the hacker news demo project route, you must make your customed urls.py inside the app directory. Then add the code below.
from django.urls import path
from .views import NewsIdView, NewsItemView

urlpatterns = [
    path('all/', NewsIdView.as_view(), name='index'),
    # http://127.0.0.1:8080/api/v0/items/all --> lists all news id from hackernews endpoint
    path('hackernews/', NewsItemView.as_view(), name='news-item'),
    # http://127.0.0.1:8080/api/v0/items/hackernews --> GET the latest hackernews from db
]
Creating an admin site
As a Django developer, you should be familiar with the default admin page that is configured by default. Executing the command below makes a new administration page where administrative activities are all done.
python manage.py createsuperuser
Having created a superuser admin account, you will have to register the news app model in the admin.py. Add this code in the admin.py file.
from django.contrib import admin
from .models import HackerNewsID


class HackerNewsIDAdmin(admin.ModelAdmin):
    list_display = ('hackernews', 'fetched_at') #these are the features to be listed
    list_display_links = ('hackernews', 'fetched_at') #these are the features links

admin.site.register(HackerNewsID, HackerNewsIDAdmin)
Furthermore, you can test the admin page by executing the following command.
python manage.py runserver
Now open http://127.0.0.1:8000/admin in your browser and log in.
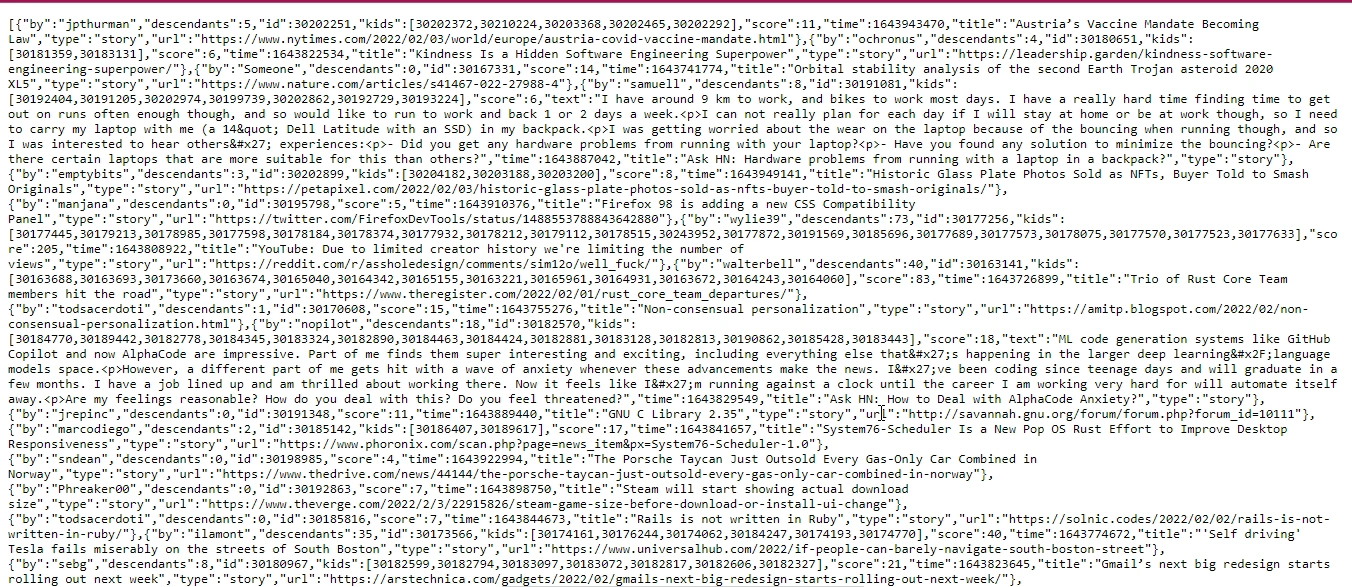
Running the command showcased below will perform the API requests to the external endpoints from the cron class. It cycles through the endpoints inside the cron.py job class. By doing so, the latest ids generated adds to the application database.
python manage.py runcrons

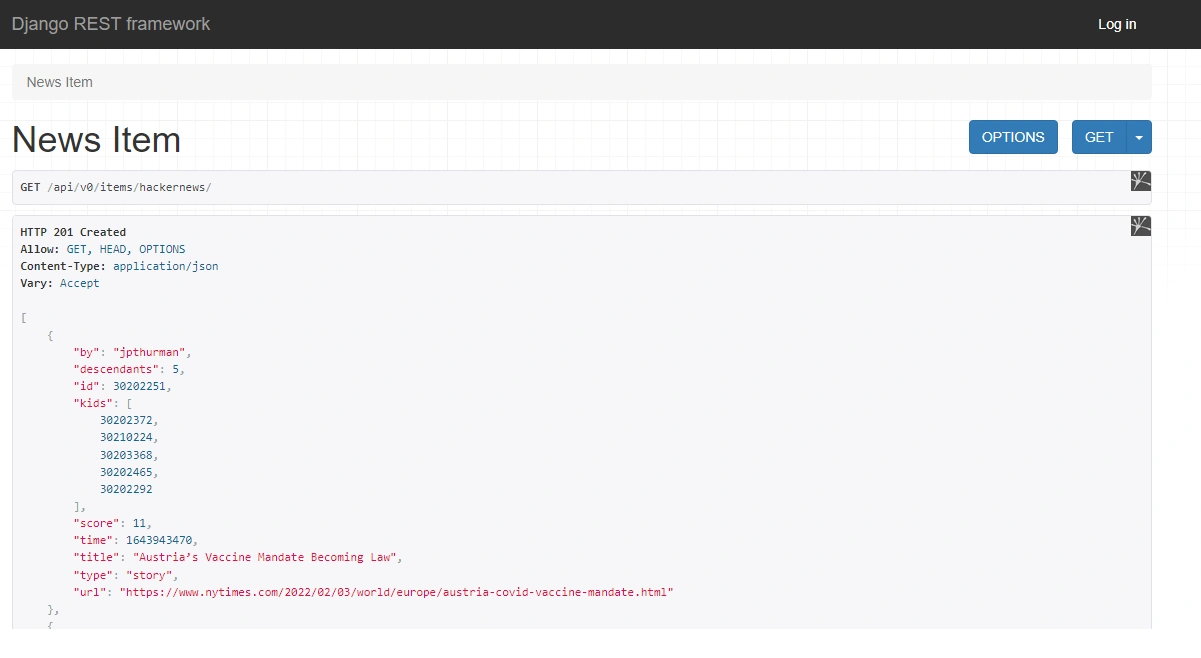
In addition, you can make an API request to the endpoint http://127.0.0.1:8000/api/v0/items/hackernews to fetch the data that each of the saved ids returns. You should get something like the images below.
Conclusion
In this tutorial, we learned how to make a cron job in a Python application from the library.
We also performed API requests to an external source by fetching data and writing it to the database using job scheduling. You can now apply your job-scheduling skills in a real-world application.
Happy coding!


Comments: