


Often, you want to manage and manipulate dates in your web app. These may include adding events or setting reminders. Having a calendar in your web application is a way to implement this.
In this article, you’ll learn how to utilize react-calendar to handle and modify dates in React.
Prerequisites
To follow this tutorial along, you will need the following:
- Basic understanding of React.
- Basic understanding of the command line(Nodejs 14.5.1 or higher).
- A code editor. We’ll be using VSCode.
Goals
In this article, you will learn:
- How to add react-calendar to your React app.
- How to style react-calendar.
- How to customize react-calendar.
- How to enable users to select a date range in react-calendar.
- How to create a date picker.
What is react-calendar?
React-calendar is an easy-to-use calendar library for React. It provides functionality that helps you to manipulate and manage date and time.
React-calendar gives end-users the ability to pick a day, month, or even a year.
Installation
Nodejs 14.5.1 or higher is required for this tutorial. To install, visit Nodejs’ official website to download. It comes with a pre-installed Node Package Manager(NPM).
Check Nodejs version installed. Open your terminal and copy and paste the command below.
node --version
Verify the installation and version of npm using the command below.
npm --version
Creating a new React project
To begin, you must first create a react development environment.
Type the command below in the built-in terminal of your code editor.
npm create-react-app calendar-project
This may take a few minutes; wait for the installation of the development environment to complete.
Your development environment will set up an application structure that looks like the one below.
Next, start your application by running the command below.
npm start
Integrate React-calendar library into your project
Run the command below to integrate react-calendar into your React project.
npm install react-calendar
Add calendar to our project using react-calendar
In this step, you will add a calendar to your React project. The calendar will enable users to select their date of birth.
Let’s follow the steps below to add a calendar to our project:
- Navigate to
app.js. - Clear the boilerplate.
- Import calendar component from react-calendar in
App.js. - Copy the code below into your
App.jsfile.
Next edit the src/App.js file as shown below:
import {useState} from 'react';
import Calendar from 'react-calendar';
import './App.css';

function App() {
 const [date, setDate] = useState(new Date())


return (
 <div className="app">
   <h1 className="header">React Calendar</h1>
   <div className="calendar-container">
     <Calendar onChange={setDate} value={date}/>
   </div>
   <div className="text-center">
      Selected date: {date.toDateString()}
   </div>
 </div>
  )

}

export default App;
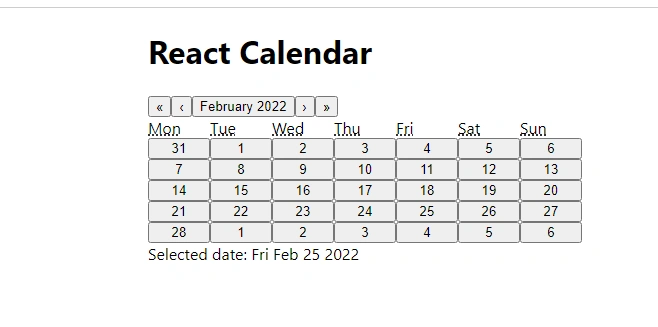
In the code above, we used useState to store a date, and we set the current date as its initial value using Javascript Date object. We then pass the date as a value to our Calendar component.
When a user selects a date, the value of the date will be set to the user’s selected date. This value is then printed below your calendar.
Your application should look like the one below.
Add style to your calendar
You can improve the calendar appearance by importing the react-calendar default stylesheet.
Add the line stylesheet to App.js as shown below:
import 'react-calendar/dist/Calendar.css'
import Calendar from 'react-calendar'
Add custom styling to your calendar
You may want your calendar to be consistent with a particular design.
This can be accomplished by following the steps below.
- Navigate to
node_modules/react-calendar/dist. - Copy the code in the stylesheet into
App.css. - Remove import
'react-calendar/dist/Calendar.css'fromApp.js. - You can now edit the code according to your taste.
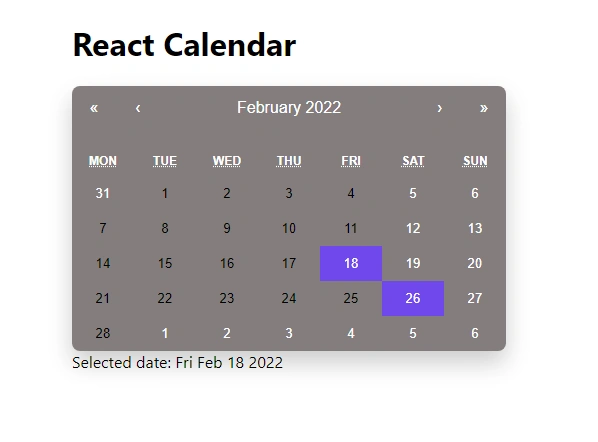
In this tutorial, we have changed the default styling by implementing the custom styling in this link.
The final customized calendar now looks as shown below:
Select date range
React-calendar has the date range feature. This gives users the ability to select a custom date range.
Then, after that, you can give some data that falls within the user’s preferred date range.
Paste the following code into your App.js file:
import { useState } from 'react';
import Calendar from 'react-calendar';
import './App.css';
function App() {
const [date, setDate] = useState(new Date());
return (
<div className='app'>
<h1>React Calendar with Range</h1>
<div>
<Calendar onChange={setDate} value={date} selectRange={true}/>
</div>
{date.length > 0 ? (
<p>
<span>Start:</span>{' '} {date[0].toDateString()}
to
<span>End:</span> {date[1].toDateString()}
</p>
) : (
<p>
<span>Default selected date:</span>{' '} {date.toDateString()}
</p>
)}
</div>
);
}
export default App;
We passed a selectRange prop into our Calendar component in the above script. selectRange has a default value of false. We changed this value to true. This enables the user to select a date range.
When a user chooses a date range to work with, react-calendar highlights the range.
Next, react-calendar returns an array containing two elements as our state. The two elements indicate the start date and the end date. We can then print the start date and end date in the array.
Build booking application with react-calendar.
You can integrate other features with react-calendar to build an application with a complex feature.
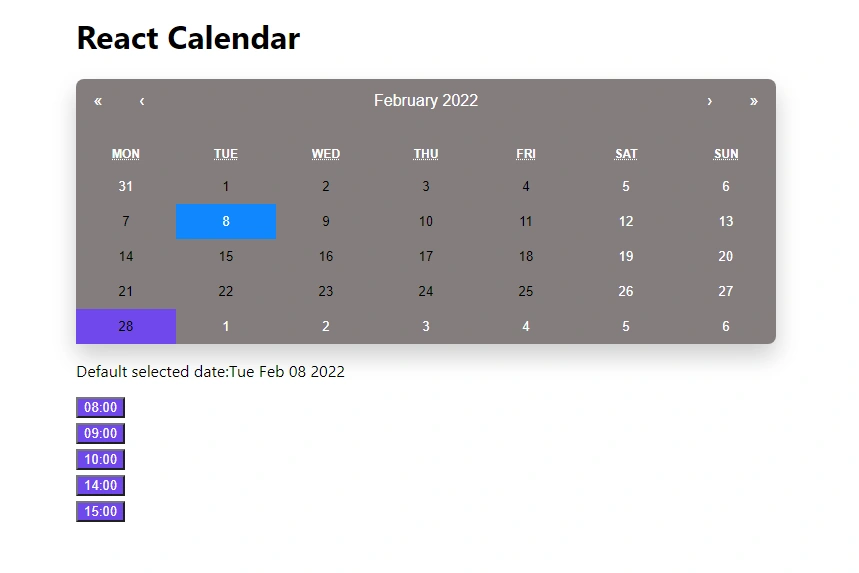
We will demonstrate this by building a booking app. In the booking app, users can click on a date.
After clicking on the desired date, the application will display the available time slot. Users can then select a time slot.
Finally, after choosing a time slot, the date and time of the appointment will be displayed on the screen.
Copy the code below into your app.js file.
import {useState} from 'react';
import Calendar from 'react-calendar';
import './App.css';
import Time from './Time.js'
function App() {
const [date, setDate] = useState(new Date());
const [showTime, setShowTime] = useState(false)
return (
<div className='app'>
<h1 className='header'>React Calendar</h1>
<div>
<Calendar onChange={setDate} value={date} onClickDay={() => setShowTime(true)}/>
</div>
{date.length > 0 ? (
<p>
<span>Start:</span>
{date[0].toDateString()}
<span>End:</span>{date[1].toDateString()}
</p>
) : (
<p>
<span>Default selected date:</span>{date.toDateString()}
</p>
)
}
<Time showTime={showTime} date={date}/>
</div>
)
}
export default App;
In the code above, we used useState to store the initial value of showTime as false.
The Calendar component has a default onClickDay prop. This listens to the user click event. We passed in setShowTime into onClickDay prop. This sets showTime new value to true when any day in the calendar is clicked.
The Time component displays the time slot when the value of showTime changes to true. We passed showTime and date as props in Time component.
Create time component
Create a Time.js component. This will display the elements in the Times.js component.
Copy the code below into your Time.js file.
import {useState} from 'react';
import Calendar from 'react-calendar';
import './App.css';
import Times from './Times.js'

import React from 'react'

function Time(props) {

 return (
 <div>
  {props.showTime ? <Times date={props.date}/> : null}
 </div>
  )
}

export default Time;
When showTime is true in the code above, our application displays the Times.js component elements. If false, they are not displayed.
creating the Times.js component
This component will contain an array of time slots.
Copy the code below into the Time.js component.
import React from 'react'
import {useState} from 'react';
import Calendar from 'react-calendar';
import './App.css';

const time = ['08:00','09:00','10:00','14:00','15:00']

function Times(props) {

 const [event, setEvent] = useState(null)
 const [info, setInfo] = useState(false)

 function displayInfo(e) {
   setInfo(true);
   setEvent(e.target.innerText);
}

return (

 <div className="times">
   {time.map(times => {
    return (
    <div>
      <button onClick={(e)=> displayInfo(e)}> {times} </button>
    </div>
        )
     })}
    <div>
      {info ? `Your appointment is set to ${event} ${props.date.toDateString()}` : null}
    </div>
 </div>
  )
}

export default Times;
The code above has an array of time slots called time. We map through the array to display each time slot as a button element.
Also, the button element has an onClick event handler. Finally, it contains a dislayInfo function that triggers when a user clicks any buttons.
The displayInfo() function contains two useState. When displayInfo triggers, the value of info changes to true, and the value of event changes to the innerText of the button element.
We passed in date as a prop from App.js to Time.js finally to Times.js.
When the value of info changes to true, the app displays the time slot and date selected by the user.
Our final application will look like the image below.
Conclusion
We went over how to integrate the react-calendar package into our react app, customize it, set a date range, and add a booking feature.
You can now use this knowledge to build a more dynamic and powerful calendar in react.
You can head to the official documentation to explore more functionalities.
Happy coding!


Comments: