


This tutorial will teach you how to display data in Angular Material tables. We’ll build a complete project for displaying data on the Angular Material table.
Prerequisites
To follow along with this tutorial, you are required to have:
- Some background knowledge on Angular. In this tutorial, we’ll be using Angular 12.
- Knowledge on using Angular Material. It will help you get started quicker.
- An Angular project created on your machine.
Getting started with Angular Material
In this section, I’ll show you how to set up your Angular project to use Angular Material.
In your project root, open the terminal and run the following commands:
ng add @angular/material
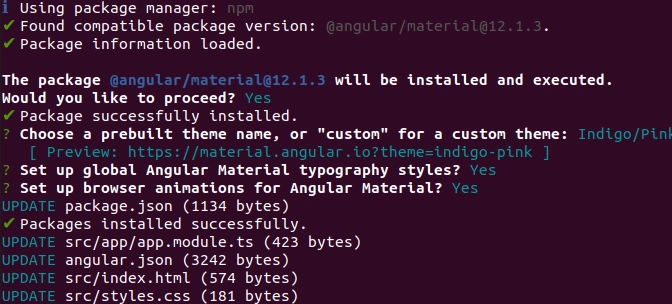
This command will prompt for a yes/no question as shown below:
.......
# installation starts
✔ Found compatible package version: @angular/material@12.1.3.
# ..................
Would you like to proceed? (Y/n)
Enter y to proceed with the Angular Material installation. This will install all packages required for Material.
Now that we’ve successfully installed Material, let’s now import the material modules into our project.
Create a new file src/app/app.material-module.ts and add the following code:
import {NgModule} from '@angular/core';
import {MatTableModule} from '@angular/material/table';
import {MatPaginatorModule} from '@angular/material/paginator';
import {MatInputModule} from '@angular/material/input';
import {MatProgressSpinnerModule} from '@angular/material/progress-spinner';
import {MatSortModule} from '@angular/material/sort';

@NgModule({
// since we're exporting these modules, add them to export
    exports: [
        MatTableModule,
        MatSortModule,
        MatProgressSpinnerModule,
        MatInputModule,
        MatPaginatorModule,

    ]
})
export class AppMaterialModule {}
In the module above, we’ve imported the Material modules from @angular/material/*. We will then export all these modules since we’ll be using them in our main module (app.module.ts).
Open your app.module.ts file and import the AppMaterialModule in the imports array:
// ..........................
import { AppMaterialModule } from "./app.material-module";

@NgModule({
  declarations: [
    // ....
  ],
  imports: [
    // .........
    AppMaterialModule,

  ],
  // ...
})
export class AppModule { }
We’ve updated our app.module.ts by importing the AppMaterialModule module to expose the Material modules we had imported.
Using material table to display data
In this section, I’ll show you how to create the Material table to display some students information. The table will comprise basic student details such as names and registrations.
Let’s start by creating the details interface.
Run the following commands on your project root to create the student interface:
ng g i student
This will create an interface in the app/student.ts file.
Proceed and edit it to look as follows:
export interface Student {
  firstName:string;
  lastName:string;
  studentEmail:string;
  course:string;
  yearOfStudy: bigint;
  registrationNumber:string;
}
Create an src/assets/students.json file and define the student details that we will use in our table.
[
  {
    "firstName": "John",
    "lastName": "Doe",
    "studentEmail": "johndoe@example.com",
    "course": "Bsc Software Engineering",
    "yearOfStudy": 2
  },
  {
    "firstName": "Test2",
    "lastName": "Test2",
    "studentEmail": "test@example.com",
    "course": "Bsc Computer Science",
    "yearOfStudy": 4
  }
]
Then define the baseURL in /src/environments/environment.ts as an environment variable.
// ...

export const environment = {
  // ...
  baseURL:'assets/',
};

// ...
Create an api service by running the following command:
ng g s api
Then update it as follows:
// ...
//import student interface
import {Student} from "../student";
//import this to make http requests
import {HttpClient} from "@angular/common/http";
import {Observable} from "rxjs";
//we've defined our base url here in the env
import {environment} from "../../environments/environment";
// ....
//class apiService
export class ApiService {

  constructor(private httpClient: HttpClient) { }

  /**
   * This method returns students details
   */
  getStudentsInformation(): Observable<Student[]>{
    return this.httpClient.get<Student[]>(`${environment.baseURL}student.json`);
  }
}
Now that we’ve got the logic to get data from our API, let’s proceed and add it to the controller.
First, let’s update our app.module.ts file as follows:
// ...

import { HttpClientModule} from "@angular/common/http";

@NgModule({
  declarations: [
    // ...
  ],
  imports: [
    // ...
    HttpClientModule, //endsure your import this module
  ],
  // ...
})
// ...
Then update the app.component.ts contents as shown below:
// ...
import {Component, OnInit} from '@angular/core';
import {MatTableDataSource} from "@angular/material/table";
import {Student} from "./student";
import {ApiService} from "./services/api.service";

@Component({
  // ...
})

export class AppComponent implements OnInit{

  student: Student[] = [];
  // columns we will show on the table
  public displayedColumns = ['firstName', 'lastName', 'studentEmail', 'yearOfStudy', 'registrationNumber', 'course' ];
  //the source where we will get the data
  public dataSource = new MatTableDataSource<Student>();

  //dependency injection
  constructor(private studentApiService: ApiService) {
  }

  ngOnInit(){
    //call this method on component load
    this.getStudentsInformation();
  }
  /**
   * This method returns students details
   */
  getStudentsInformation(){
    this.studentApiService.getStudentsInformation()
      .subscribe((res)=>{
        console.log(res);
        this.dataSource.data = res;
      })
  }
}
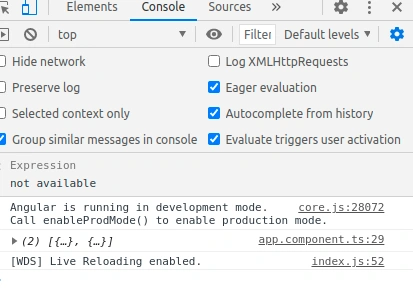
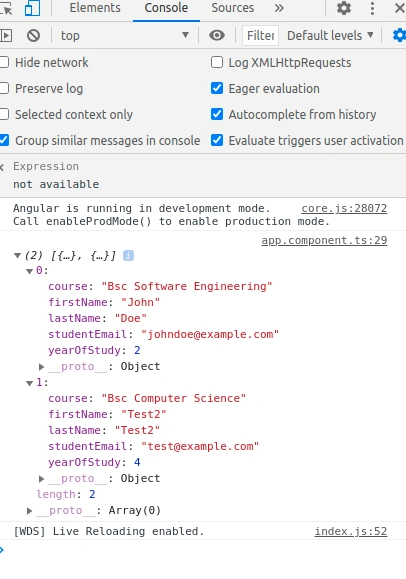
At this point, you can now test your application by logging your API response observable output using the steps below:
- Serve your application by running
ng serve --port 3000. - Go to your browser and open the new tab and enter
localhost:3000. Ctrl + Shift + Ito go to the logs.
You will see the following output if you followed the steps above correctly:
Output:
Now let’s update our app.component.html as shown below to display our data.
<table mat-table [dataSource]="dataSource">
  <ng-container matColumnDef="firstName">
    <th mat-header-cell *matHeaderCellDef> First Name </th>
    <td mat-cell *matCellDef="let element"> {{element.firstName}} </td>
  </ng-container>

  <ng-container matColumnDef="lastName">
    <th mat-header-cell *matHeaderCellDef> Last Name </th>
    <td mat-cell *matCellDef="let element"> {{element.lastName}} </td>
  </ng-container>

  <ng-container matColumnDef="studentEmail">
    <th mat-header-cell *matHeaderCellDef> Student Email </th>
    <td mat-cell *matCellDef="let element"> {{element.studentEmail }} </td>
  </ng-container>
  <ng-container matColumnDef="registrationNumber">
    <th mat-header-cell *matHeaderCellDef> Registration Number </th>
    <td mat-cell *matCellDef="let element"> {{element.registrationNumber}} </td>
  </ng-container>

  <ng-container matColumnDef="course">
    <th mat-header-cell *matHeaderCellDef> Course </th>
    <td mat-cell *matCellDef="let element"> {{element.course}} </td>
  </ng-container>

  <ng-container matColumnDef="yearOfStudy">
    <th mat-header-cell *matHeaderCellDef> Year Of Study </th>
    <td mat-cell *matCellDef="let element"> {{element.yearOfStudy}} </td>
  </ng-container>

  <tr mat-header-row *matHeaderRowDef="displayedColumns"></tr>
  <tr mat-row *matRowDef="let row; columns: displayedColumns;"></tr>
</table>
Then open your app.component.css file and add the following CSS code:
table {
  width: 100%;
  overflow-x: auto;
  overflow-y: hidden;
  min-width: 500px;
}
th.mat-header-cell {
  text-align: left;
  max-width: 300px;
}
You should now see the following table:

Conclusion
In this tutorial, we’ve discussed Angular Material tables. We saw how we can use Angular material table to display data.
I hope this article builds a firm foundation for you to use the Angular Material tables. From there, you can then sort or add other features to your tables.
You can find the code in this tutorial on this Replit. The Replit only includes the project’s src directory.
Happy coding!


Comments: