


Many developers tend to handle clicks on a RecyclerView the wrong way. In this tutorial, we will focus on the most appropriate way to handle clicks on a RecyclerView.
Prerequisites
To follow along with this tutorial, the reader should:
- Know how to create a project in
Android Studio. - Have some good understanding of
Kotlin. - Have worked with the basic
RecyclerViewto display data from an API (We will be fetching data from a REST API). - Know what Retrofit is and how to use it.
- Have some understanding of Jetpack libraries like
ViewModelandLiveData. - Be familiar with
ViewBinding.
Goal
At the end of this tutorial, the reader should have:
- An Overview of what a
RecyclerViewis. - Learned
ListAdapterandDiffUtil. - The ability to handle clicks in a
RecyclerView.
Introduction
A RecyclerView is a great widget to display a list of data items. The RecyclerView class supports the display of a collection of data. If it is your first time creating a RecyclerView you can take a look at this article.
What is a ListAdapter?
According to the official documentation: A ListAdapter is a RecyclerView.Adapter base class for presenting List data in a RecyclerView, including computing diffs between Lists on a background thread.
While using a LiveData<List>, a ListAdapter provides an easy way to provide data to the adapter. You can use submitList(POJO) when new data is available. It handles the addition and removal of items without the need to redraw the entire view. It also animates those changes.
What is a DiffUtil?
According to the official documentation: DiffUtil is a utility class that calculates the difference between two lists and outputs a list of update operations that converts the first list into the second one.
This class removes the need to call the notifyDataSetChanged() method. We override two of its methods; areItemsTheSame(oldItem: Pojo, newItem: Pojo) and areContentsTheSame(oldItem: Pojo, newItem: Pojo).
The first method checks if the two objects are the same (for example, based on ids). While the second checks if the data between the two objects is the same. DiffUtil makes it possible for ListAdapter to change the items in the list.
We’ll be fetching memes from https://api.imgflip.com/get_memes API. Then display them in a RecyclerView and add a click listener to handle clicks on each row.
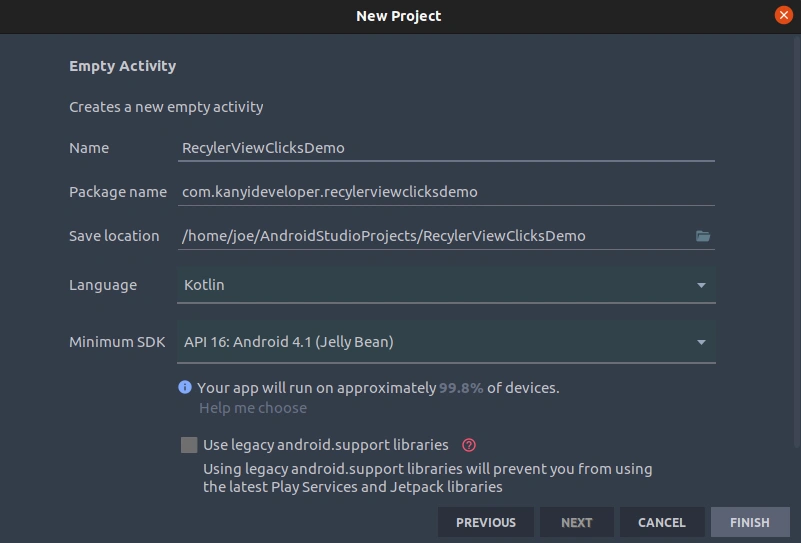
Step 1: Creating the project
In this step, we will create a new project, you can refer to the image below for guidance.
Step 2: Adding dependencies
After creating the project, we will add some dependencies to our app-level build Gradle.
Retrofit will help us make network calls to the API. GsonConverter will play the role of converting JSON strings to Java objects.
// Retrofit and Gson Converter for Networking
  implementation 'com.squareup.retrofit2:retrofit:2.9.0'
  implementation 'com.squareup.retrofit2:converter-gson:2.9.0'

  // Glide for Image Loading
  implementation 'com.github.bumptech.glide:glide:4.12.0'
  annotationProcessor 'com.github.bumptech.glide:compiler:4.12.0'

  // ViewModels and LiveData
  def lifecycle_version = "2.3.1"
  implementation "androidx.lifecycle:lifecycle-viewmodel-ktx:$lifecycle_version"
  implementation "androidx.lifecycle:lifecycle-livedata-ktx:$lifecycle_version"
  kapt "androidx.lifecycle:lifecycle-compiler:$lifecycle_version"
Make sure to also enable ViewBinding in the app level build.gradle gradle buildFeatures{ viewBinding true }.
ViewBinding generates a Java class that replaces findViewById in your code.
Step 3: XML layouts
In this step, we will create layouts for both the recycler row and the main layout.
First, we’ll design the recycler row which will have an ImageView that will display the meme photo and also a TextView to display the meme name. Next, we will design the main activity. It will have a RecyclerView, a ProgressBar, and a TextView that will display an error when our API call fails.
Recycler row layout
<?xml version="1.0" encoding="utf-8"?>
<androidx.cardview.widget.CardView xmlns:android="http://schemas.android.com/apk/res/android"
 xmlns:app="http://schemas.android.com/apk/res-auto"
 xmlns:tools="http://schemas.android.com/tools"
 android:layout_width="match_parent"
 android:layout_height="wrap_content"
 android:layout_margin="5dp"
 app:cardElevation="5dp"
 app:cardCornerRadius="15dp">

 <androidx.constraintlayout.widget.ConstraintLayout
 android:layout_width="match_parent"
 android:layout_height="match_parent">

 <androidx.appcompat.widget.AppCompatImageView
 android:id="@+id/imageView"
 android:layout_width="0dp"
 android:layout_height="200dp"
 android:scaleType="centerInside"
 app:layout_constraintEnd_toEndOf="parent"
 app:layout_constraintStart_toStartOf="parent"
 app:layout_constraintTop_toTopOf="parent"
 tools:srcCompat="@tools:sample/backgrounds/scenic" />

 <TextView
 android:id="@+id/memeName"
 android:layout_width="wrap_content"
 android:layout_height="wrap_content"
 android:layout_marginTop="16dp"
 android:layout_marginBottom="8dp"
 android:textAppearance="@style/TextAppearance.AppCompat.Medium"
 android:textStyle="bold"
 app:layout_constraintBottom_toBottomOf="parent"
 app:layout_constraintEnd_toEndOf="@+id/imageView"
 app:layout_constraintStart_toStartOf="@+id/imageView"
 app:layout_constraintTop_toBottomOf="@+id/imageView"
 tools:text="Drake Hotline Bling" />

 </androidx.constraintlayout.widget.ConstraintLayout>
</androidx.cardview.widget.CardView>
Main layout
<?xml version="1.0" encoding="utf-8"?>
<androidx.constraintlayout.widget.ConstraintLayout xmlns:android="http://schemas.android.com/apk/res/android"
 xmlns:app="http://schemas.android.com/apk/res-auto"
 xmlns:tools="http://schemas.android.com/tools"
 android:layout_width="match_parent"
 android:layout_height="match_parent"
 tools:context=".MainActivity">

 <androidx.recyclerview.widget.RecyclerView
 android:id="@+id/recyclerView"
 android:layout_width="0dp"
 android:layout_height="0dp"
 app:layoutManager="androidx.recyclerview.widget.LinearLayoutManager"
 app:layout_constraintBottom_toBottomOf="parent"
 app:layout_constraintEnd_toEndOf="parent"
 app:layout_constraintStart_toStartOf="parent"
 app:layout_constraintTop_toTopOf="parent"
 tools:listitem="@layout/recycler_row" />

 <ProgressBar
 android:id="@+id/progressBar"
 style="?android:attr/progressBarStyle"
 android:layout_width="wrap_content"
 android:layout_height="wrap_content"
 android:visibility="gone"
 app:layout_constraintBottom_toBottomOf="@+id/recyclerView"
 app:layout_constraintEnd_toEndOf="parent"
 app:layout_constraintStart_toStartOf="parent"
 app:layout_constraintTop_toTopOf="parent" />

 <TextView
 android:id="@+id/textViewFailed"
 android:layout_width="0dp"
 android:layout_height="wrap_content"
 android:gravity="center_horizontal"
 android:textAlignment="center"
 android:visibility="gone"
 app:layout_constraintBottom_toBottomOf="parent"
 app:layout_constraintEnd_toEndOf="parent"
 app:layout_constraintStart_toStartOf="parent"
 app:layout_constraintTop_toTopOf="@+id/recyclerView"
 tools:text="TextView" />
</androidx.constraintlayout.widget.ConstraintLayout>
Step 4: Model class
In this step, we will come up with our model class where we are only interested in the meme name (name) and the meme image (url). For now, we’ll ignore the rest of the attributes.
package com.kanyideveloper.recyclerviewitemclicksdemo

import com.google.gson.annotations.SerializedName

data class Memes(
    @SerializedName("data")
    val `data`: Data?,
    @SerializedName("success")
    val success: Boolean?
)

data class Data(
    @SerializedName("memes")
    val memes: List<Meme?>?
)

data class Meme(
    @SerializedName("box_count")
    val boxCount: Int?,
    @SerializedName("height")
    val height: Int?,
    @SerializedName("id")
    val id: String?,
    @SerializedName("name")
    val name: String?,
    @SerializedName("url")
    val url: String?,
    @SerializedName("width")
    val width: Int?
)
Step 5: Api service class
In this step, we will design our ApiService to make the API call with Retrofit. Our base URL will be https://api.imgflip.com/ and the endpoint will be get_memes.
package com.kanyideveloper.recyclerviewitemclicksdemo

import retrofit2.Call
import retrofit2.Retrofit
import retrofit2.converter.gson.GsonConverterFactory
import retrofit2.http.GET

interface ApiService {
    @GET("get_memes")
    fun getPhotos(): Call<Memes>
}

object MemesApi {
    private const val BASE_URL = "https://api.imgflip.com/"

    private val retrofit: Retrofit = Retrofit.Builder()
        .baseUrl(BASE_URL)
        .addConverterFactory(GsonConverterFactory.create())
        .build()

    val apiService: ApiService by lazy {
        retrofit.create(ApiService::class.java)
    }
}
Step 6: RecyclerView adapter class
In this step, we will create our Adapter class that will do all the click operations.
First, we create a class called OnClickListener that takes in a lambda with one meme item as a parameter in its Constructor. This class contains a matching function called onClick. It will be set to the lambda’s parameter. All this creates a sort of named lambda.
class OnClickListener(val clickListener: (meme: Meme) -> Unit) {
    fun onClick(meme: Meme) = clickListener(meme)
}
Then we added an onClickListener property on the Constructor of the MemesAdapter.
class MemesAdapter(private val onClickListener: OnClickListener) :
    ListAdapter<Meme, MemesAdapter.MyViewHolder>(MyDiffUtil)
Finally, in this class, we’ll finish by calling our onClickListener inside onBindViewHolder.
holder.itemView.setOnClickListener {
            onClickListener.onClick(meme)
}
Here is the whole class implementation:
package com.kanyideveloper.recyclerviewitemclicksdemo

import android.view.LayoutInflater
import android.view.ViewGroup
import androidx.recyclerview.widget.DiffUtil
import androidx.recyclerview.widget.ListAdapter
import androidx.recyclerview.widget.RecyclerView
import com.bumptech.glide.Glide
import com.kanyideveloper.recyclerviewitemclicksdemo.databinding.RecyclerRowBinding

class MemesAdapter(private val onClickListener: OnClickListener) :
    ListAdapter<Meme, MemesAdapter.MyViewHolder>(MyDiffUtil) {

    companion object MyDiffUtil : DiffUtil.ItemCallback<Meme>() {
        override fun areItemsTheSame(oldItem: Meme, newItem: Meme): Boolean {
            return oldItem == newItem
        }

        override fun areContentsTheSame(oldItem: Meme, newItem: Meme): Boolean {
            return oldItem.id == newItem.id
        }
    }

    inner class MyViewHolder(private val binding: RecyclerRowBinding) :
        RecyclerView.ViewHolder(binding.root) {
        fun bind(meme: Meme?) {
            Glide.with(binding.imageView)
                .load(meme?.url)
                .into(binding.imageView)

            binding.memeName.text = meme?.name
        }
    }

    override fun onCreateViewHolder(parent: ViewGroup, viewType: Int): MyViewHolder {
        return MyViewHolder(
            RecyclerRowBinding.inflate(
                LayoutInflater.from(parent.context),
                parent,
                false
            )
        )
    }

    override fun onBindViewHolder(holder: MyViewHolder, position: Int) {
        val meme = getItem(position)
        holder.itemView.setOnClickListener {
            onClickListener.onClick(meme)
        }
        holder.bind(meme)
    }

    class OnClickListener(val clickListener: (meme: Meme) -> Unit) {
        fun onClick(meme: Meme) = clickListener(meme)
    }
}
Step 7: ViewModel class
Next, we will create a ViewModel class which will contain codes that will survive configuration changes, i.e screen rotation. Particularly, it has a function that will perform the network request to the API.
package com.kanyideveloper.recyclerviewitemclicksdemo

import androidx.lifecycle.LiveData
import androidx.lifecycle.MutableLiveData
import androidx.lifecycle.ViewModel
import retrofit2.Call
import retrofit2.Callback
import retrofit2.Response

class MainViewModel : ViewModel() {

    private val _reponse = MutableLiveData<Memes>()
    val response: LiveData<Memes>
        get() = _response

    private val _loading = MutableLiveData<Boolean>()
    val loading: LiveData<Boolean>
        get() = _loading

    private val _failed = MutableLiveData<String>()
    val failed: LiveData<String>
        get() = _failed

    init {
        _loading.value = true
        getApiResponse()
    }

    private fun getApiResponse() {
        MemesApi.apiService.getPhotos().enqueue(object : Callback<Memes> {
            override fun onResponse(call: Call<Memes>, response: Response<Memes>) {
                _response.value = response.body()
                _loading.value = false
            }

            override fun onFailure(call: Call<Memes>, t: Throwable) {
                _loading.value = false
                _failed.value = t.localizedMessage
            }
        })
    }
}
Step 8: Wrap-up MainActivity
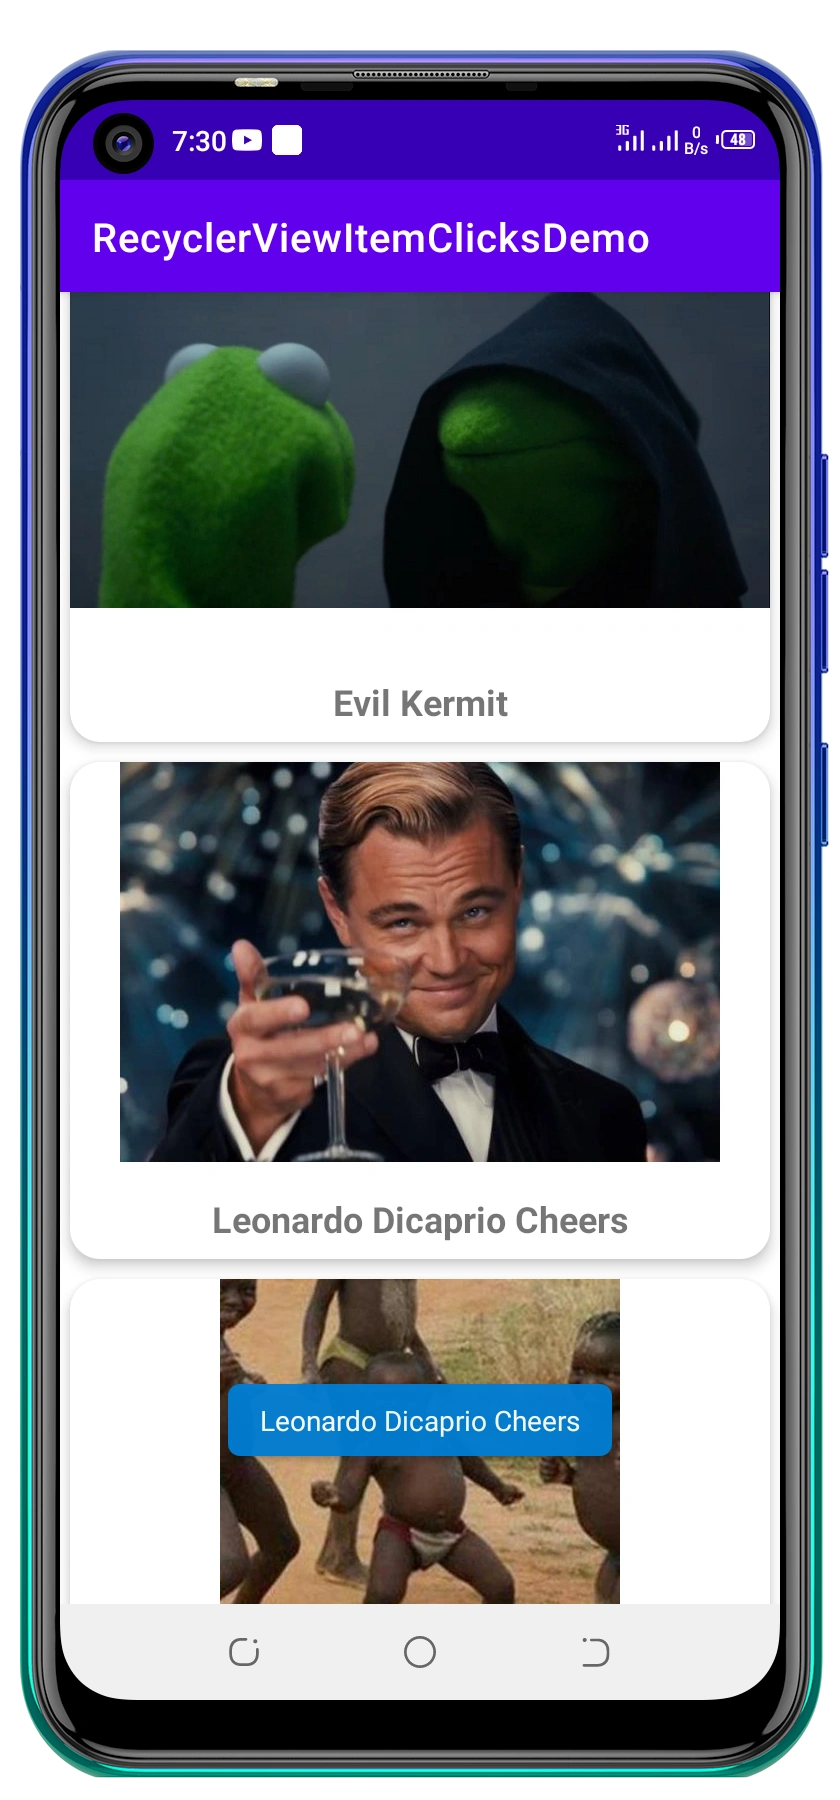
In this final step, we will instantiate the adapter by adding the OnClickListener object to the MemesAdapter. Which will return a meme from the Adapter.
For now, we can try to Toast the name of the clicked meme. In other cases, one may need to move to another activity or fragment and display details of the clicked item.
package com.kanyideveloper.recyclerviewitemclicksdemo

import android.os.Bundle
import android.widget.Toast
import androidx.appcompat.app.AppCompatActivity
import androidx.core.view.isVisible
import androidx.lifecycle.Observer
import androidx.lifecycle.ViewModelProvider
import com.kanyideveloper.recyclerviewitemclicksdemo.databinding.ActivityMainBinding

class MainActivity : AppCompatActivity() {

    private lateinit var binding: ActivityMainBinding
    private val viewModel by lazy { ViewModelProvider(this).get(MainViewModel::class.java) }
    private lateinit var adapter: MemesAdapter

    override fun onCreate(savedInstanceState: Bundle?) {
        super.onCreate(savedInstanceState)
        binding = ActivityMainBinding.inflate(layoutInflater)
        setContentView(binding.root)

        adapter = MemesAdapter(MemesAdapter.OnClickListener { photo ->
Toast.makeText(applicationContext, "${photo.name}", Toast.LENGTH_SHORT).show() })

        viewModel.response.observe(this, Observer { meme ->
            val list = meme.data?.memes
            adapter.submitList(list)
            binding.recyclerView.adapter = adapter
        })

        viewModel.loading.observe(this, Observer { loading ->
            binding.progressBar.isVisible = loading
        })

        viewModel.failed.observe(this, Observer { failed ->
            binding.textViewFailed.text = failed
            binding.textViewFailed.isVisible = true
        })
    }
}
adapter = MemesAdapter(MemesAdapter.OnClickListener { photo ->
           Toast.makeText(applicationContext, "${photo.name}", Toast.LENGTH_SHORT).show()
 })
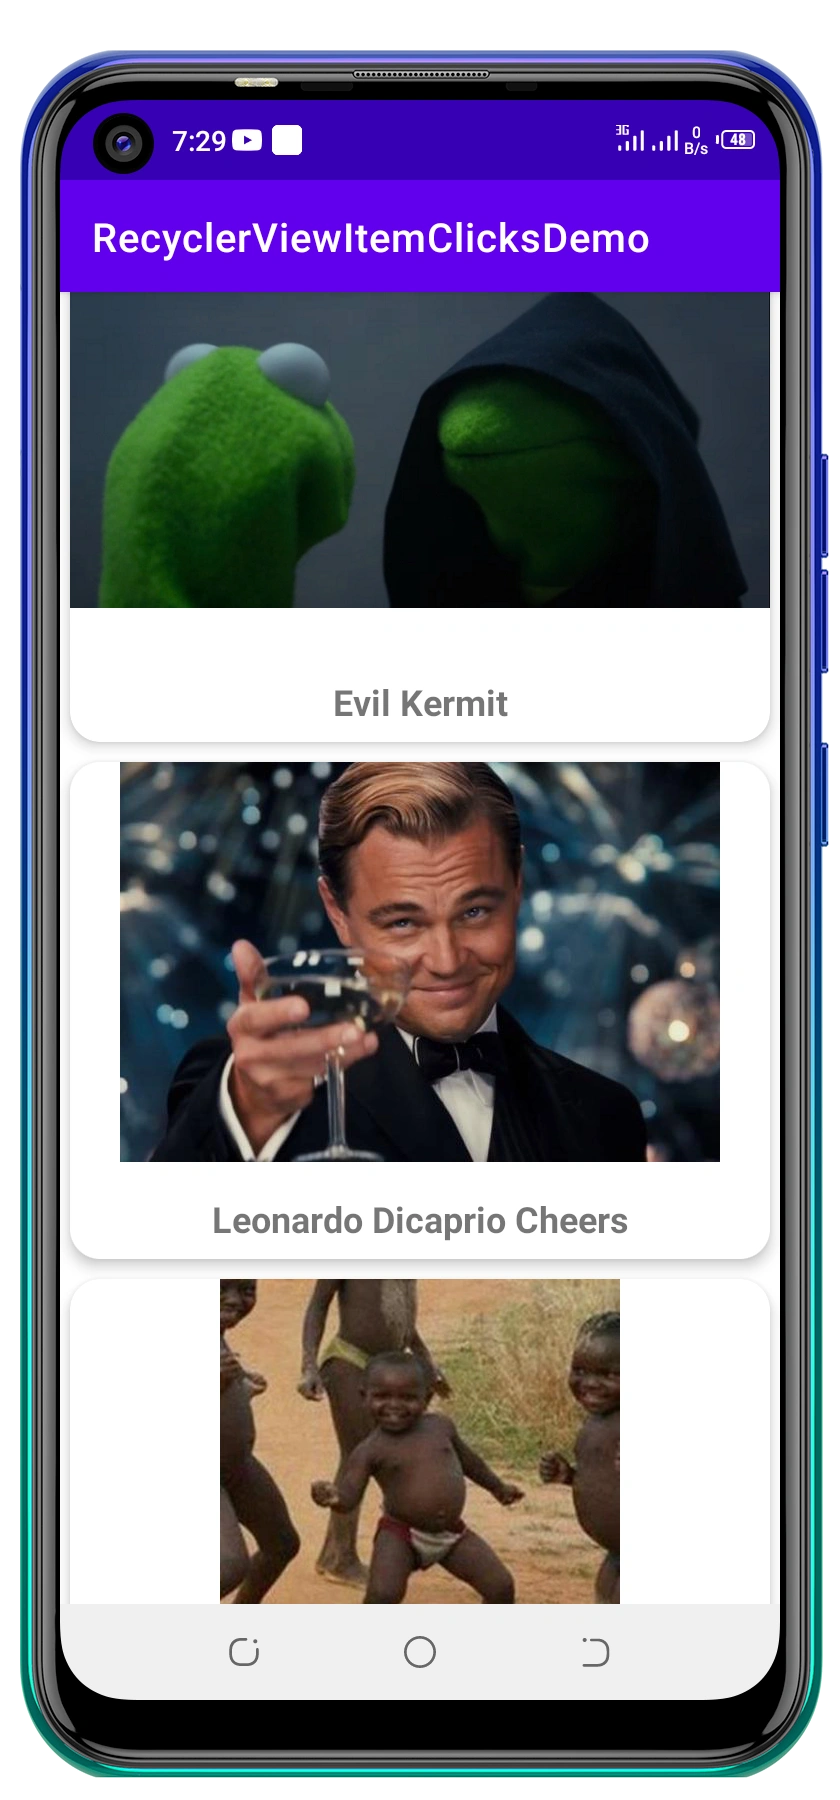
Demo screens
Once done, run the app. Here is what you should expect:
Check out the entire project on GitHub.
Conclusion
That’s not all about Recyclerviews clicks, keep exploring. Through this article, I hope you have got an idea of how to handle clicks on your Recyclerviews.
Keep upskilling and happy coding!


Comments: