


One benefit of REST APIs is the flexibility and scalability it gives to our application. Since the client and server are independent, the REST protocol separates the data storage from the User Interface in the server.
With this, our application can be scaled quickly, primarily due to the separation of concerns (the separation of the frontend from the server), which helps our application be loosely coupled. This also offers flexibility in modifying our code in the future, as developers can easily integrate RESTful API without much-added work.
Goal
This article teaches how to create a Spring Boot RESTful API that performs CRUD operations by making a database call to a MySQL database using Hibernate – an implementation of JPA (Java Persistence API).
In this tutorial, we will be building an employee management system that registers employees, read, update and deletes employee’s information.
You will also learn how to document your APIs using Swagger UI.
Key takeaways
- How to create and set up a Spring Boot application with a tomcat server.
- MySQL database Configuration in a Spring Boot project.
- You will learn how to implement Object Relational Mapping using Hibernate.
- Maven for dependency management.
- Exception handling in Java.
- How to consume a REST API using postman.
- How to document API using Swagger.
Prerequisites
To fully understand this tutorial, you are required to have the following in place:
- A good understanding of Java.
- A little understanding of the Spring framework and Spring Boot.
- Java Development Kit (JDK) installed or click on this link to install.
- Postman API testing tool installed or click on this link to download and install.
- Maven dependency manager installed or click on this link to download and install.
- IntelliJ code editor installed or click on this link to install.
Project initialization and setup
There are different ways to set up a new Spring Boot application. We will be using Spring Initializer.
Method 1: Setup using IntelliJ
In this tutorial, we are going to learn how to initialize a Spring Boot project using IntelliJ.
Intellij has inbuilt extensions to create a Spring Boot project using Spring initializer, which makes it easier to set up a project in no time at all.
To get started Run IntelliJ IDEA and click to create a new project from File > New > Project.
The next step is to select Spring initializer (highlighted with green).
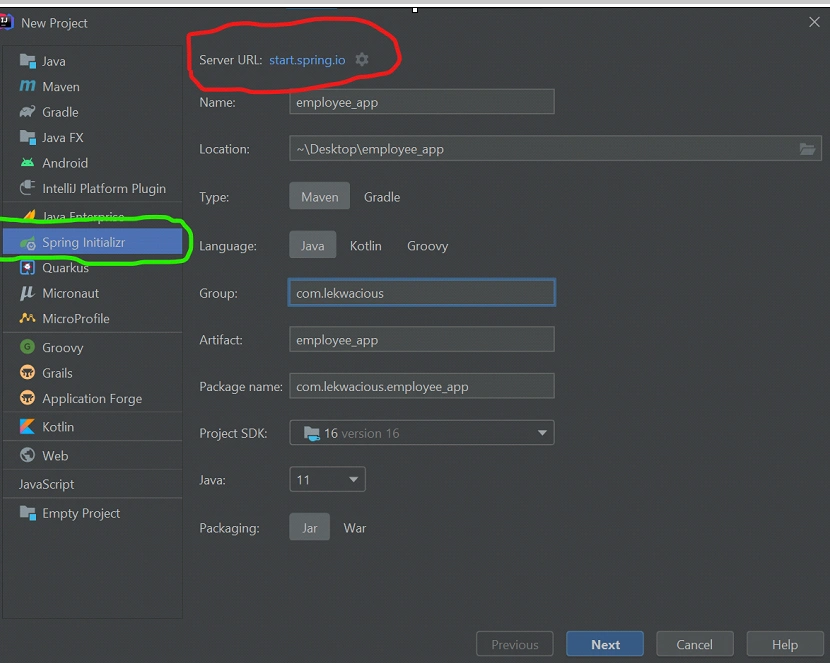
NOTE: If you look at the highlighted in Red, you will realize that we are connecting to the Spring initializer on the web.
Follow the below steps to set it up:
- Enter the Maven project properties and click
Next - Give the project a name. Let’s call it
employee_app. - Choose the location where you want your project to reside.
- For the
Typeof project, chooseMaven. - The
Languagefor this project will beJava. - Let’s name the
Groupascom.lekwacious. - Let’s call the
Artifactasemployee_app. - Select the Java
SDK versionusing the dropdown list. - Select your
Java versiontoo. - We are going to package our project as a
Jarfile.
JAR is an acronym for Java ARchive. It comes in a ZIP file format and is used for aggregating many files into one.
Select the Spring Boot version (I’ve selected 2.5.2) and other required dependencies for your project. The correct Spring Boot starters will be added based on the selected dependencies added in the pom.xml file.
After selecting these dependencies click the Finish button as shown:

This project will have three dependencies namely:
Spring web: Makes your project a web application. Thespring-boot-starter-webdependency transitively pulls in all dependencies related to web development. It uses Spring MVC, REST, and Tomcat as a default embedded server.Spring Data JPA: Allow us to persist data in SQL databases using Spring Data and Hibernate, which is an implementation of the JPA.
JPA is a specification that is part of Java EE (Enterprise Edition) and defines an API for Object-Relational Mappings (ORM) and for managing persistent objects and relational databases. It is considered a standard approach for Object Relational Mapping.
Being that JPA is a specification, it does not perform any operation by itself. Hibernate is one of those ORM (Object Relational Mapping) tools that implements JPA. Others include TopLink, MyBatis.
MySQL Driver: It is a dependency that connects the MySQL database to a spring boot application.
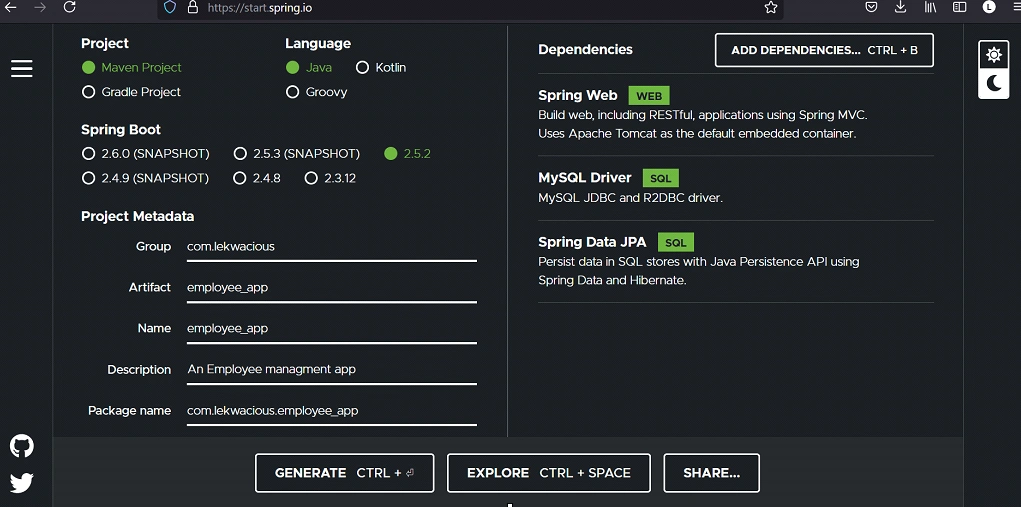
Method 2: Setup using Spring Initializer
Alternatively, if you are not using IntelliJ you can use the Spring Initializer to set up your project.
Enter the Maven project properties including the dependencies as we did above and click on the Generate button. This will generate a zip file and download it for you. Unzip it and open in your favorite code editor and sync the dependencies with Maven.
Maven dependency management
The pom.xml file houses the dependencies, and Maven plugins in our project.
The dependency section simply contains the dependencies we added to the project namely MySQL Driver, Spring Data JPA, and SpringWeb.
Here is a sample of pom.xml file:
<?xml version="1.0" encoding="UTF-8"?>
<project xmlns="http://maven.apache.org/POM/4.0.0" xmlns:xsi="http://www.w3.org/2001/XMLSchema-instance"
         xsi:schemaLocation="http://maven.apache.org/POM/4.0.0 https://maven.apache.org/xsd/maven-4.0.0.xsd">
    <modelVersion>4.0.0</modelVersion>
    <parent>
        <groupId>org.springframework.boot</groupId>
        <artifactId>spring-boot-starter-parent</artifactId>
        <version>2.5.2</version>
        <relativePath/> <!-- lookup parent from repository -->
    </parent>
    <groupId>com.lekwacious</groupId>
    <artifactId>employee_app</artifactId>
    <version>0.0.1-SNAPSHOT</version>
    <name>employee_app</name>
    <description>Demo project for Spring Boot</description>
    <properties>
        <java.version>11</java.version>
    </properties>
    <dependencies>
        <dependency>
            <groupId>org.springframework.boot</groupId>
            <artifactId>spring-boot-starter-data-jpa</artifactId>
        </dependency>
        <dependency>
            <groupId>org.springframework.boot</groupId>
            <artifactId>spring-boot-starter-web</artifactId>
        </dependency>

        <dependency>
            <groupId>mysql</groupId>
            <artifactId>mysql-connector-java</artifactId>
            <scope>runtime</scope>
        </dependency>
        <dependency>
            <groupId>org.springframework.boot</groupId>
            <artifactId>spring-boot-starter-test</artifactId>
            <scope>test</scope>
        </dependency>
    </dependencies>

    <build>
        <plugins>
            <plugin>
                <groupId>org.springframework.boot</groupId>
                <artifactId>spring-boot-maven-plugin</artifactId>
            </plugin>
        </plugins>
    </build>

</project>
Configuring MySQL, JPA, and Hibernate
In the resources folder within the src/main folder, open the application.properties file and write the properties below.
spring.datasource.url=jdbc:mysql://localhost:3306/employee_db?useSSL=false&serverTimezone=UTC&useLegacyDatetimeCode=false
spring.datasource.username=root
spring.datasource.password=mypassword

server.port=8081

spring.jpa.properties.hibernate.dialect=org.hibernate.dialect.MySQL5InnoDBDialect
spring.jpa.hibernate.ddl-auto=update
spring.datasource.url: Springboot uses the URL along with the credentials (Here, the MySQL is configured with port 3306, and the database name asemployee_db) to establish a database connection to our MySQL database.spring.datasource.username&spring.datasource.passwordproperties are the MySQL database username and password. (Please use the correct username and password of the MySQL server installed on your computer).- The default Spring boot port is
8080. I’ve configured the port of our Spring Boot application to run on8081. Springboot.jpa.properties.hibernate.dialect: The SQL dialect makes Hibernate generate better SQL for the chosen database.- We have set out DDL (Data definition language) to
update.
For example, the update operation will attempt to add new columns, constraints, etc., but will never remove a column or constraint that may have existed previously, but no longer is as part of the object model.
- Other values include
create-dropdrops objects on the schema leaving an empty database anytime you rerun your application. It is suitable when you are running a test.
Entry point of the application
By simply initializing your project, your application is ready to be run.
That’s the beauty of Spring Boot, it makes it easier to create stand-alone, production-grade Spring based Applications that you can “just run”.
Locate the EmployeeAppApplication.java file in the src/main/java/com/lekwacious/employee_app folder.
package com.lekwacious.employee_app;

import org.springframework.boot.SpringApplication;
import org.springframework.boot.autoconfigure.SpringBootApplication;

@SpringBootApplication
public class EmployeeAppApplication {

    public static void main(String[] args) {
        SpringApplication.run(EmployeeAppApplication.class, args);
    }

}
Spring Boot applications should have an entry point class with the public static void main(String[] args) method, which is annotated with the @SpringBootApplication annotation and will be used to bootstrap the application.
When launched, the @SpringBootApplication annotation informs the Spring framework to scan for Spring components inside this package and register them.
It also tells Spring Boot to enable Autoconfiguration, a process where beans are automatically created based on classpath settings, property settings, and other factors.
The @SpringBootApplication annotation is composed of three other annotations namely @EnableAutoConfiguration, @ComponentScan, and @Configuration that helps in automatic configuration. So, we can call it a shortcut for the three annotations.
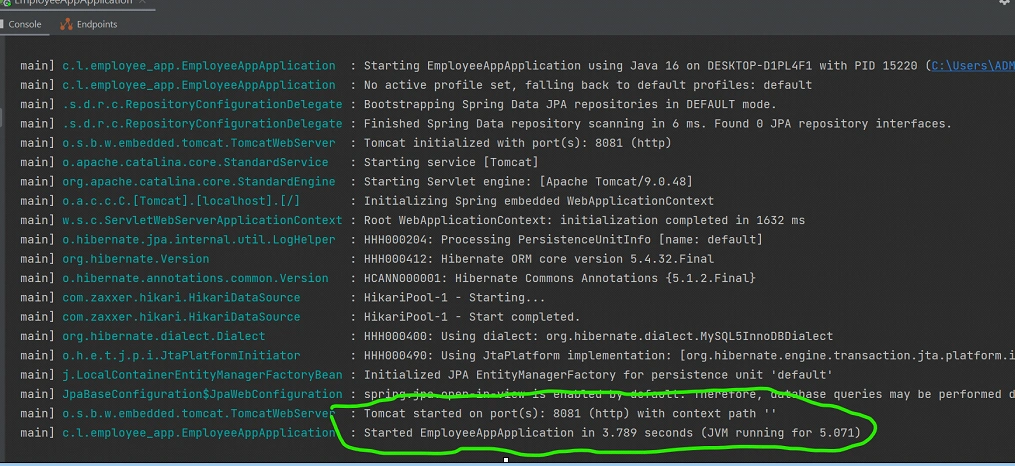
Now, run the application. You can do this by either clicking on the play button on your IDEA or running this command: mvn spring-boot:run on your command line.
Navigate to the root of the project via the command line and execute the command.
Boom! Tomcat started on port 8081.
Project structure
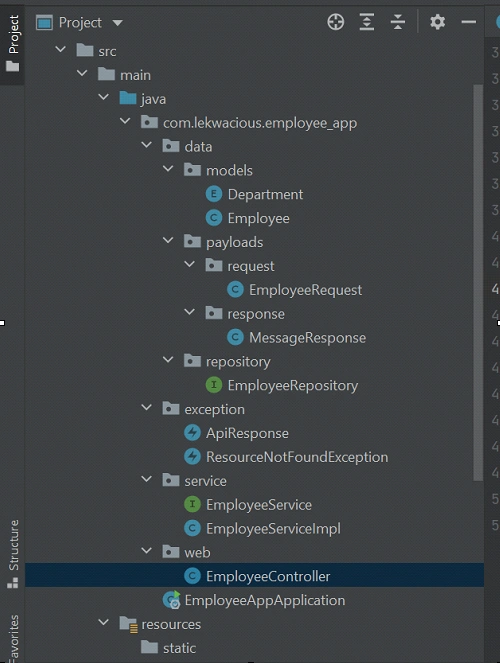
We are going to structure our code into four packages as follows:
- Data: This subpackage will house our Data access layer, that will include our Domain and repository.
- Service: This is where our business logic will be.
- Web: This package will house our controllers.
- Exceptions: The is where all our custom exceptions will be.
Throwing exceptions is very important in building a resilient system.
This structure will ensure that the client does not have direct access to our database, rather the request is redirected via controllers.
Controller calls the right service (the business logic) using repository, which in turn makes a call to our database. This architecture also ensures the separation of concerns.
Below is the project structure:
Creating the domain class
In the data package, create another package called models.
Inside the models package, create an enum class called Department.
Enumis used as a constant in Java. The properties are implicitlyfinalandstatic. Enums are primarily used to specify all the constants that are not going to be mutated. For example, the days of the week.
The department enum class should contain the following code:
package com.lekwacious.employee_app.data.models;

public enum Department {
    HUMAN_RESOURCE,
    MARKETING,
    ENGINEERING
}
Create another class called Employee with the following code:
package com.lekwacious.employee_app.data.models;

import javax.persistence.*;
import java.util.Objects;

@Entity
public class Employee {
    @Id
    @GeneratedValue(strategy = GenerationType.AUTO)
    private Integer id;
    private String firstName;
    private String lastname;
    private String phoneNumber;
    private String email;
    private double salary;
    @Enumerated(EnumType.STRING)
    private Department department;

    public Employee(){}
    public Integer getId() {
        return id;
    }
    public void setId(Integer id) {
        this.id = id;
    }
    public String getFirstName() {
        return firstName;
    }
    public void setFirstName(String firstName) {
        this.firstName = firstName;
    }
    public String getLastname() {
        return lastname;
    }
    public void setLastname(String lastname) {
        this.lastname = lastname;
    }
    public String getPhoneNumber() {
        return phoneNumber;
    }
    public void setPhoneNumber(String phoneNumber) {
        this.phoneNumber = phoneNumber;
    }
    public String getEmail() {
        return email;
    }
    public void setEmail(String email) {
        this.email = email;
    }
    public double getSalary() {
        return salary;
    }
    public void setSalary(double salary) {
        this.salary = salary;
    }
    public Department getDepartment() {
        return department;
    }
    public void setDepartment(Department department) {
        this.department = department;
    }

    @Override
    public String toString() {
        return "Employee{" +
                "id=" + id +
                ", firstName='" + firstName + '\'' +
                ", lastname='" + lastname + '\'' +
                ", phoneNumber='" + phoneNumber + '\'' +
                ", email='" + email + '\'' +
                ", salary=" + salary +
                ", department=" + department +
                '}';
    }

    @Override
    public boolean equals(Object o) {
        if (this == o) return true;
        if (o == null || getClass() != o.getClass()) return false;
        Employee employee = (Employee) o;
        return Double.compare(employee.salary, salary) == 0 && Objects.equals(id, employee.id) && Objects.equals(firstName, employee.firstName) && Objects.equals(lastname, employee.lastname) && Objects.equals(phoneNumber, employee.phoneNumber) && Objects.equals(email, employee.email) && department == employee.department;
    }

    @Override
    public int hashCode() {
        return Objects.hash(id, firstName, lastname, phoneNumber, email, salary, department);
    }
}
@Entityannotation tells Spring that theEmployeeclass which is simply a POJO (Plain Old Java Object) which should be persisted on the database.@Idannotation makes theidfield the primary key of the employee table when it is persisted on the database.- We have used the
@GeneratedValueannotation to specify the primary key generation strategy. The valueautoinstructs the database to automatically generate a value for the field. Therefore, theIdwill be generated automatically. @Enumeratedannotation converts the enum into a String.- Next, we created a no-argument constructor, setters and getters for our field, and override the
toString,equals, andhashCodemethods.
Adding additional Maven dependencies
In this section, we are going to add additional dependencies to the project.
Go to Maven Repository and search for the following dependencies and add them to the dependencies section of the pom.xml file:
- Javax validation: It is used to validate the fields of an object before persisting to the database.
- Io springfox: A dependency that will allow us to document our APIs.
- Add the two dependencies below into the dependencies tag of the
pom.xml. - Sync the newly added dependencies to the application.
<dependencies>
    <dependency>
        <groupId>javax.validation</groupId>
        <artifactId>validation-api</artifactId>
    </dependency>
    <dependency>
        <groupId>io.springfox</groupId>
        <artifactId>springfox-boot-starter</artifactId>
        <version>3.0.0</version>
    </dependency>
</dependencies>
Payloads
Inside the data package, create a package with the name payloads.
This package will have two sub-packages request and response to handle our request payloads and response payloads respectively.
Request payload
Inside the request package create an EmployeeRequest class with the following code:
package com.lekwacious.employee_app.data.payloads.request;

import com.lekwacious.employee_app.data.models.Department;
import javax.persistence.EnumType;
import javax.persistence.Enumerated;
import javax.validation.constraints.Email;
import javax.validation.constraints.NotBlank;
import javax.validation.constraints.NotNull;

public class EmployeeRequest {
    @NotBlank
    @NotNull
    private String firstName;
    @NotBlank
    @NotNull
    private String lastname;
    @NotBlank
    @NotNull
    private String phoneNumber;
    @Email
    private String email;
    @NotBlank
    @NotNull
    private double salary;
    @NotBlank
    @NotNull
    @Enumerated(EnumType.STRING)
    private Department department;

    public String getFirstName() {
        return firstName;
    }
    public void setFirstName(String firstName) {
        this.firstName = firstName;
    }
    public String getLastname() {
        return lastname;
    }
    public void setLastname(String lastname) {
        this.lastname = lastname;
    }
    public String getPhoneNumber() {
        return phoneNumber;
    }
    public void setPhoneNumber(String phoneNumber) {
        this.phoneNumber = phoneNumber;
    }
    public String getEmail() {
        return email;
    }
    public void setEmail(String email) {
        this.email = email;
    }
    public double getSalary() {
        return salary;
    }
    public void setSalary(double salary) {
        this.salary = salary;
    }
    public Department getDepartment() {
        return department;
    }
    public void setDepartment(Department department) {
        this.department = department;
    }
}
@NotBlankand@NotNull: These two annotation checks and validate the fields where they are mapped to ensure the values are not blank and null.@Email: It validates that the annotated field is a valid email address.- Next, we created setters and getters for the class’s instance variables.
Response payload
Inside the response package create an MessageReponse class with the following code:
package com.lekwacious.employee_app.data.payloads.response;

public class MessageResponse {

    private String message;

    public MessageResponse(String message){
        this.message = message;
    }

    public void setMessage(String message){
        this.message = message;
    }

    public String getMessage(){
        return message;
    }
}
- The code above is a simple POJO with one instance variable, a constructor, a mutator (setters), and an accessor (getters).
Repository
Inside the data package, create a sub-package called repository. Then, create an interface called EmployeeRepository that extends JpaRepository.
The JpaRepository is generic, so it takes a model class (Type) and the data type of the primary key.
Write the following code in the EmployeeRepository interface:
package com.lekwacious.employee_app.data.repository;

import com.lekwacious.employee_app.data.models.Employee;
import org.springframework.data.jpa.repository.JpaRepository;
import org.springframework.stereotype.Repository;

@Repository
public interface EmployeeRepository extends JpaRepository<Employee, Integer> {
}
@Repositorymakes the interface a bean. It is treated identically to the@Componentannotation, therefore it is a specialization of the@Componentannotation. Beans are simply Java classes that spring knows.- By extending the
JpaRepositoryinterface we inherit thesave,findAll,findByIdmethods.
Employee service
Create a service package under the employee_app package.
This package is going to house our business logic. To ensure more separation of concerns, we are going to divide our service into two parts – an interface where the methods of our business logic will be declared and a concrete class that implements the interface.
Create an interface with the name employeeService with the following code:
package com.lekwacious.employee_app.service;

import com.lekwacious.employee_app.data.models.Employee;
import com.lekwacious.employee_app.data.payloads.request.EmployeeRequest;
import com.lekwacious.employee_app.data.payloads.response.MessageResponse;
import org.springframework.stereotype.Component;

import java.util.List;
import java.util.Optional;

@Component
public interface EmployeeService {
    MessageResponse createEmployee(EmployeeRequest employeeRequest);
    Optional<Employee> updateEmployee(Integer employeeId, EmployeeRequest employeeRequest);
    void deleteEmployee(Integer employeeId);
    Employee getASingleEmployee(Integer employeeId);
    List<Employee> getAllEmployee();
}
@Componentannotation is a shorthand for the@Beanannotation. It registers the EmployeeService interface as a bean in the application context and makes it accessible during classpath scanning.- We created five methods that allow us to create, update, get, and delete employees.
Next, create an EmployeeServiceImpl class that implements the EmployeeService interface as shown:
package com.lekwacious.employee_app.service;

import com.lekwacious.employee_app.data.models.Employee;
import com.lekwacious.employee_app.data.payloads.request.EmployeeRequest;
import com.lekwacious.employee_app.data.payloads.response.MessageResponse;
import com.lekwacious.employee_app.data.repository.EmployeeRepository;
import com.lekwacious.employee_app.exception.ResourceNotFoundException;
import org.springframework.beans.factory.annotation.Autowired;
import org.springframework.stereotype.Service;

import java.util.List;
import java.util.Optional;

@Service
public class EmployeeServiceImpl implements EmployeeService {
    @Autowired
    EmployeeRepository employeeRepository;

    @Override
    public MessageResponse createEmployee(EmployeeRequest employeeRequest) {
        Employee newEmployee = new Employee();
        newEmployee.setFirstName(employeeRequest.getFirstName());
        newEmployee.setLastname(employeeRequest.getLastname());
        newEmployee.setPhoneNumber(employeeRequest.getPhoneNumber());
        newEmployee.setEmail(employeeRequest.getEmail());
        newEmployee.setSalary(employeeRequest.getSalary());
        newEmployee.setDepartment(employeeRequest.getDepartment());
        employeeRepository.save(newEmployee);
        return new MessageResponse("New Employee created successfully");

    }

    @Override
    public Optional<Employee> updateEmployee(Integer employeeId, EmployeeRequest employeeRequest)  throws ResourceNotFoundException{
        Optional<Employee> employee = employeeRepository.findById(employeeId);
        if (employee.isEmpty()){
        throw new ResourceNotFoundException("Employee", "id", employeeId);
        }
        else
        employee.get().setFirstName(employeeRequest.getFirstName());
        employee.get().setLastname(employeeRequest.getLastname());
        employee.get().setPhoneNumber(employeeRequest.getPhoneNumber());
        employee.get().setEmail(employeeRequest.getEmail());
        employee.get().setSalary(employeeRequest.getSalary());
        employee.get().setDepartment(employeeRequest.getDepartment());
        employeeRepository.save(employee.get());
        return employee;
    }

    @Override
    public Employee getASingleEmployee(Integer employeeId) throws ResourceNotFoundException{
        return employeeRepository.findById(employeeId).orElseThrow(() -> new ResourceNotFoundException("Employee", "id", employeeId));
    }

    @Override
    public List<Employee> getAllEmployee() {
        return employeeRepository.findAll();
    }
    @Override
    public void deleteEmployee(Integer employeeId) throws ResourceNotFoundException {
        if (employeeRepository.getById(employeeId).getId().equals(employeeId)){
            employeeRepository.deleteById(employeeId);
        }
        else throw new ResourceNotFoundException("Employee", "id", employeeId);
    }
}
- @Service is specifically a collection of library methods that manage one aspect of an application business logic. It is a specialized form of
@Component. With the@Serviceannotation, the class is registered in the application context and accessible during classpath scanning. - The
@autowiredannotation is used to perform field dependency injection. It automatically injects theEmployeeRespository interfacewhich is the dependent bean into theEmployeeServiceImplclass so we can use it. This is possible becauseEmployeeRepositoryis annotated with the@Repositoryannotation making it a bean. - The
EmployeeServiceImplclass implemented the EmployeeService interface by overriding the method and implementing them. - The class throws an exception (
ResourceNotFoundException– This is the custom exception class we created that extendsRunTimeException) where the Id supplied to get a single employee does not exist on the database.
Controller
Create a package called web under the employee_app package. This package is going to house the APIs controller.
Create an EmployeeController class with the following code:
package com.lekwacious.employee_app.web;

import com.lekwacious.employee_app.data.models.Employee;
import com.lekwacious.employee_app.data.payloads.request.EmployeeRequest;
import com.lekwacious.employee_app.data.payloads.response.MessageResponse;
import com.lekwacious.employee_app.service.EmployeeService;
import org.springframework.beans.factory.annotation.Autowired;
import org.springframework.http.HttpStatus;
import org.springframework.http.ResponseEntity;
import org.springframework.web.bind.annotation.*;

import java.util.List;

@RestController
@RequestMapping("/employee")
public class EmployeeController {

    @Autowired
    EmployeeService employeeService;

    @GetMapping("/all")
    public ResponseEntity<List<Employee>> getAllEmployees () {
        List<Employee> employees = employeeService.getAllEmployee();
        return new ResponseEntity<>(employees, HttpStatus.OK);
    }
    @GetMapping("/find/{id}")
    public ResponseEntity<Employee> getEmployeeById (@PathVariable("id") Integer id) {
        Employee employee = employeeService.getASingleEmployee(id);
        return new ResponseEntity<>(employee, HttpStatus.OK);
    }
    @PostMapping("/add")
    public ResponseEntity<MessageResponse> addEmployee( @RequestBody EmployeeRequest employee) {
        MessageResponse newEmployee = employeeService.createEmployee(employee);
        return new ResponseEntity<>(newEmployee, HttpStatus.CREATED);
    }
    @PutMapping("/update/{id}")
    public ResponseEntity<MessageResponse> updateEmployee( @PathVariable Integer id, @RequestBody EmployeeRequest employee) {
        MessageResponse updateEmployee = employeeService.updateEmployee(id, employee);
        return new ResponseEntity<>(updateEmployee, HttpStatus.OK);
    }
    @DeleteMapping("/delete/{id}")
    public ResponseEntity<?> deleteEmployee(@PathVariable("id") Integer id) {
        employeeService.deleteEmployee(id);
        return new ResponseEntity<>(HttpStatus.OK);
    }
}
@RestController: This annotation marks the EmployeeController as an HTTP request handler and allows Spring to recognize it as a RESTful service.@RequestMapping("/employee")annotation sets the base path to the resource endpoints in the controller as /employee.- Next, we autowired the EmployeeService into our controller to use the methods declared implemented in it. This is dependency injection.
@GetMappingis a shortcut for@RequestMapping(method = RequestMethod.GET), and is used to map HTTP GET requests to the mapped controller methods. We used it to return all the employees and a single employee.@PathVariableannotation shows that a method parameter should be bound to a URI template variable.@PostMappingis a shorthand for @RequestMapping where the method is equal to POST. It is used to map HTTP POST request to the mapped controller methods.@RequestBody: This annotation takes care of binding the web request body to the method parameter with the help of the registered HttpMessageConverters. So when you make a POST request to the “/employee/add” URL with a Post JSON body, the HttpMessageConverters converts the JSON request body into a Post object and passes it to the addEmployee method.@PutMappingis a shorthand for @RequestMapping where the method is equal to PUT. It is used to map HTTP PUT request to the mapped controller methods.@DeleteMapping: Using this annotation makes the Mapped controller method be ready for a delete operation. It is a shortcut for@RequestMapping(method = RequestMethod.DELETE).
Testing with Postman
Now, let’s test our APIs with Postman.
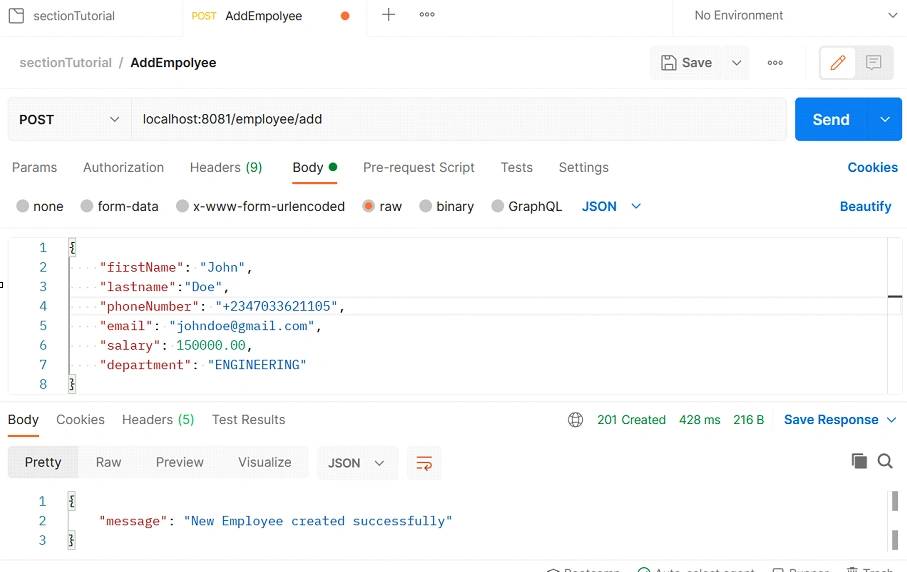
Adding an employee record
Let’s re-run the application and then add an employee by making a POST request to localhost:8081/employee/add.
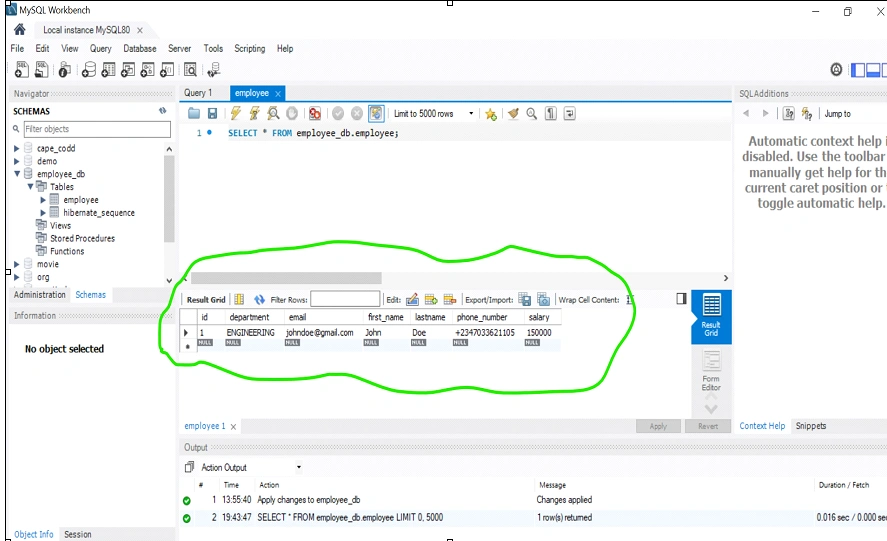
Let’s check our MySQL database to confirm again. Boom! There we go.
Get all employee records
Make a GET request to localhost:8081/employee/all to get all the employees. I have added two employees already.
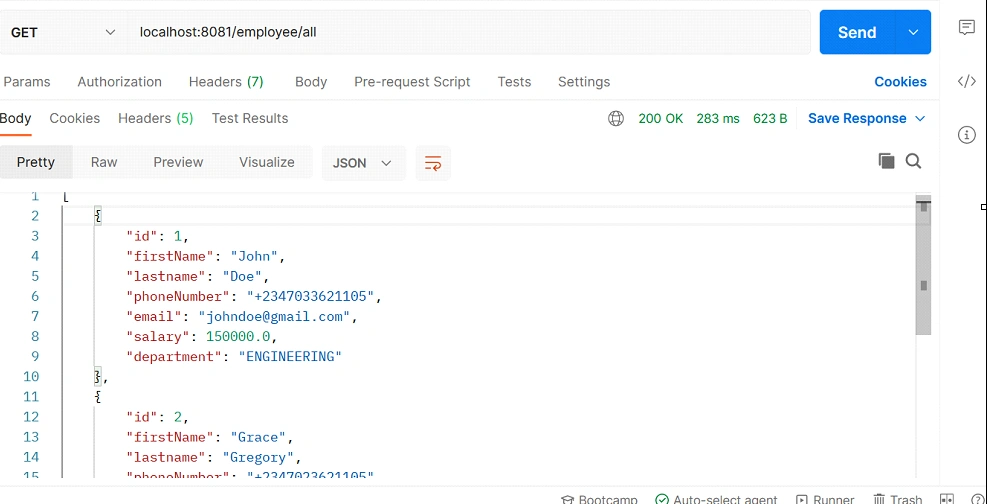
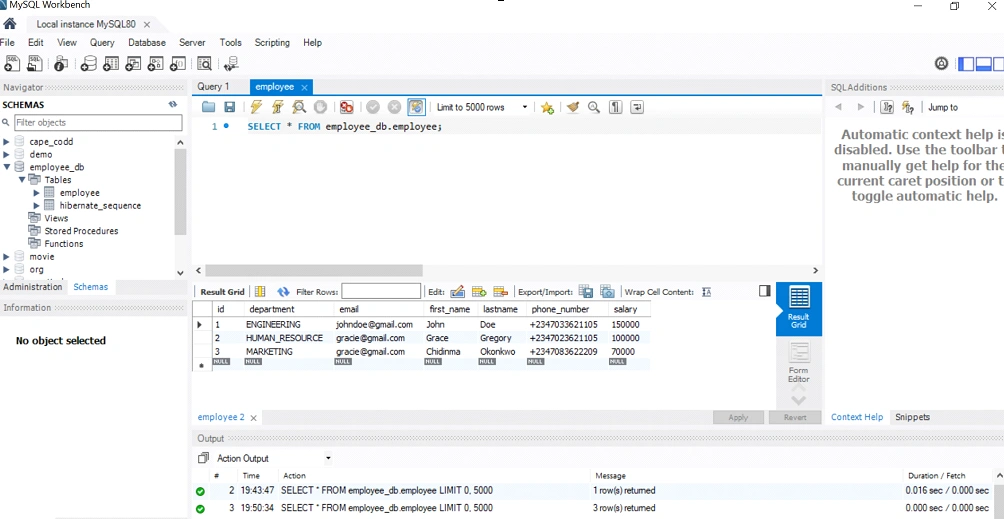
Boom! It has returned a list of all the employees. We can check MySQL Workbench again.
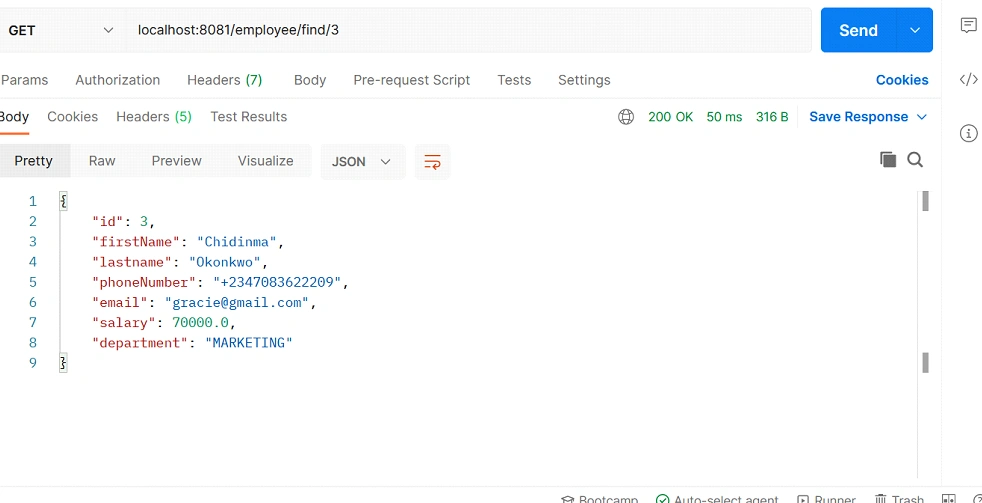
Get a single employee record
Make a GET request to localhost:8081/employee/find/3, specifying the ID of the employee at the end of the URL. In our case, ID is 3.
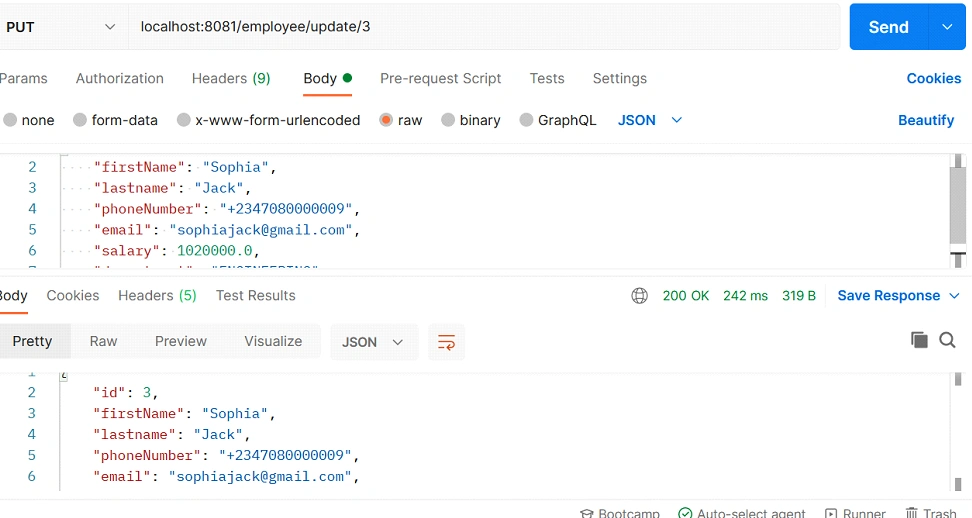
Update an employee record
Make a PUT request to localhost:8081/employee/update/3 specifying the ID of the employee at the end of the URL. In our case, ID is 3. Add the fields to update as a requestBody.
Deleting an employee record
Make a DELETE request to localhost:8081/employee/delete/3 adding to the end of the URL the ID of the todo to delete. In our case, the ID is 3. We got a 200 OK showing a successful delete operation.
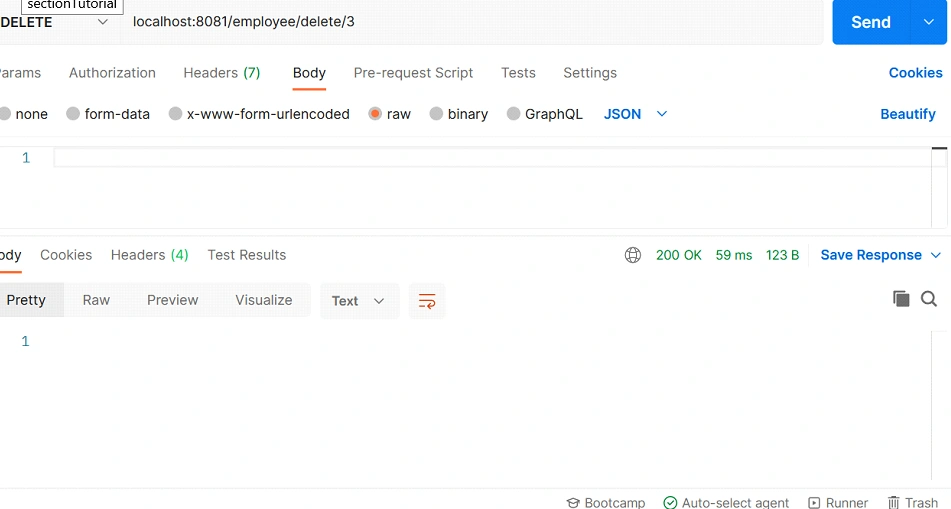
We got a 200 OK showing a successful delete operation. If we check the MySQL database we should have only two employees left having deleted one employee. We deleted the employee with ID as 3.
Documenting the API with Swagger UI
We already added the io.springfox dependency to the pom.xml.
With this dependency, we will document the APIs so that they will be easy for other developers to use. Add the ApiResponses annotation below at the class level of your EmployeeController class.
package com.lekwacious.employee_app.web;

import com.lekwacious.employee_app.data.models.Employee;
import com.lekwacious.employee_app.data.payloads.request.EmployeeRequest;
import com.lekwacious.employee_app.data.payloads.response.MessageResponse;
import com.lekwacious.employee_app.service.EmployeeService;
import io.swagger.annotations.ApiResponses;
import org.springframework.beans.factory.annotation.Autowired;
import org.springframework.http.HttpStatus;
import org.springframework.http.ResponseEntity;
import org.springframework.web.bind.annotation.*;

import java.util.List;
import java.util.Optional;

@RestController
@RequestMapping("/employee")
@ApiResponses(value = {
        @io.swagger.annotations.ApiResponse(code = 400, message = "This is a bad request, please follow the API documentation for the proper request format"),
        @io.swagger.annotations.ApiResponse(code = 401, message = "Due to security constraints, your access request cannot be authorized"),
        @io.swagger.annotations.ApiResponse(code = 500, message = "The server is down. Please bear with us."),
}
)
public class EmployeeController {
}
- We added the
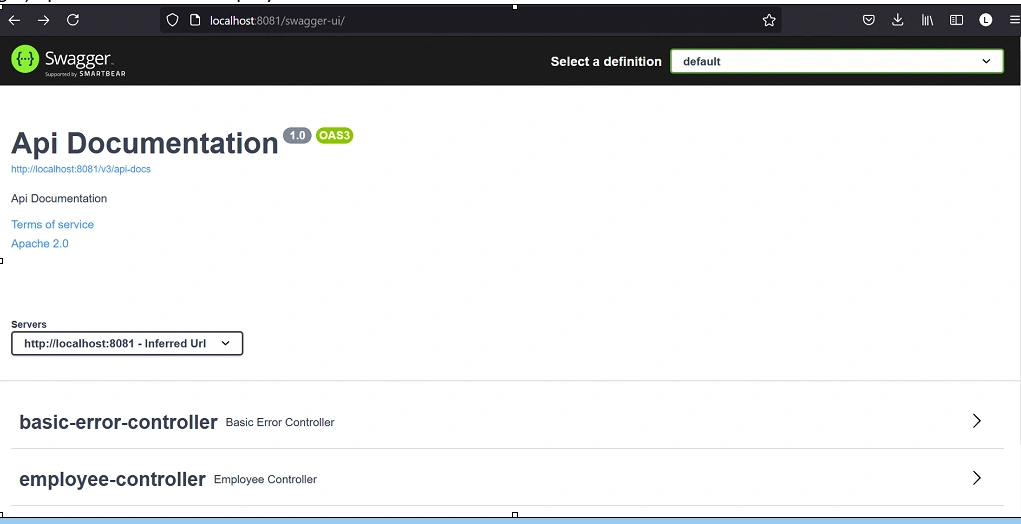
@ApiResponseannotation from swagger at the class level. - Go to
http://localhost:8081/swagger-ui/to access the documentation and test that our APIs are still working properly. - Use the Swagger API documentation at
http://localhost:8081/swagger-ui/to add an employee, get, update, and delete an employee.
Conclusion
We have successfully built APIs using Spring Boot, Maven as the dependency management tool, and MySQL to store data.
You’ve learned how to throw exceptions in your application in other to build a resilient system. You have also learned how to document your API using Swagger.
You can clone the project on this Git Repository.
Happy coding!


Comments: