


React.js framework allows us to create single-page applications (commonly referred to as SPA). A SPA is an application in which the pages do not reload for in-page actions like clicking a hyperlink or clicking a button.
The webpage transition is so quick that it’s difficult to notice when the DOM content changes, thus improving the application’s user experience.
In this tutorial, we will learn about framer motion and how it helps with page transitions.
Prerequisites
To follow through with this article, the reader should have the following:
- A basic understanding of Javascript.
- Should understand how react-router works.
What is framer motion?
Framer motion is an animation library that helps us create animations. Its simplified API removes the complexities of animations.
It is an open-source, production-ready React motion library. Framer motion’s animations are used on over 99 percent of websites.
You can check out their website here to learn more about the library. You can also check out these other cool websites that are built with framer motion at awwards.
The motion component in the framer motion core API can be related to an HTML element. To understand them better, let’s build a project from scratch.
Page transitions With framer-motion
Open the terminal and navigate to the project folder to install the react boilerplate:
npx create react-app framer-motion
Before we proceed further, let’s delete some boilerplate files like App.css, App.test.js, Index.css, reportWebvitals.js, setupWebVitals.js.
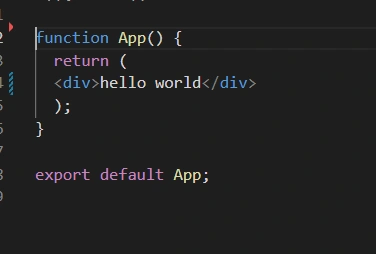
Locate App.js file under the src folder and edit it as shown in the image:
Then, we change the directory to the app. Now, we install the packages that we’ll be using in this tutorial.
The packages that we are going to install are react-router-dom and framer-motion.
To navigate across the pages, we’ll use the react-router-dom:
npm install react-router-dom
To animate the webpage, we use framer-motion:
npm install framer-motion
Now we can start the application:
npm start
Inside the src folder, let’s create a folder called pages (you can name it anything you like). The pages folder should contain the below five files:
Home.jsAbout.jsContact.jsNavbar.jsAnimatedRoutes.js.
We will be using the Home.js, About.js, and Contact.js to show the transitions. We’ll also embed them into the Navbar.js file. The AnimatedRoutes will contain all the routes to navigate between these pages.
Let’s create a folder inside our src folder called pages. Inside this folder, create a file Home.js with the following code:
import React from "react";
import { motion } from "framer-motion";
import React from "react";

function Home() {
  return (
    <div className="container text-center">
      <h1>Home page</h1>
      <p>
        Lorem ipsum dolor sit, amet consectetur adipisicing elit. Sequi, qui.
        Hic animi distinctio et maiores, ab nostrum at neque. Iusto minus
        perspiciatis vitae unde? In quibusdam nulla perspiciatis laboriosam ex.
      </p>
    </div>
  );
}

export default Home;
Here, we created a sample homepage with some dummy content.
Let’s move on to build other components. Now, create a file named About.js:
import React from "react";

function About() {
  return (
    <div className="container text-center">
      <h1>About Page</h1>

      <p>
        Lorem ipsum dolor sit amet consectetur adipisicing elit. Sint quasi
        debitis fuga deserunt, placeat qui optio totam perspiciatis error.
        Repudiandae, enim veniam. Dolorum officiis recusandae consequuntur
        veritatis magni aliquam itaque.
      </p>
    </div>
  );
}

export default About;
Next, we create a file called Contact.js and paste this in:
import React from "react";

function Contact() {
  return (
    <div className="container text-center">
      <h1>Contact us</h1>

      <p>
        Lorem ipsum dolor sit, amet consectetur adipisicing elit. Optio mollitia
        in minima architecto odit sunt enim quidem blanditiis voluptates,
        provident veritatis labore. Natus pariatur eos at nemo, officia
        voluptatibus accusamus.
      </p>
    </div>
  );
}

export default Contact;
Let’s also create our Navbar with:
import React from "react";
import { Link } from "react-router-dom";

const Navbar = () => {
  return (
    <>
      <nav
        fixed="top"
        expand="sm"
        bg="dark"
        className="navbar navbar-expand-lg
				navbar-light bg-light"
      >
        <div className="container-fluid">
          <button
            className="navbar-toggler"
            type="button"
            data-bs-toggle="collapse"
            data-bs-target="#navbarNav"
            aria-controls="navbarNav"
            aria-expanded="false"
            aria-label="Toggle navigation"
          >
            <span className="navbar-toggler-icon"></span>
          </button>
          <div className="collapse navbar-collapse" id="navbarNav">
            <ul className="navbar-nav">
              <li className="nav-item">
                <Link className="nav-link active" to="/home">
                  Home
                </Link>
              </li>

              <li className="nav-item">
                <Link className="nav-link" to="/about">
                  About Us
                </Link>
              </li>
              <li className="nav-item">
                <Link className="nav-link" to="/contact">
                  Contact Us
                </Link>
              </li>
            </ul>
          </div>
        </div>
      </nav>
    </>
  );
};

export default Navbar;
In the above code:
- We imported
Linkfromreact-router-domto create links for each page that is to be embedded in theNavbar. /homefor home page route,/aboutfor about page, and/contactfor the contact page.
Next, we create a file called AnimatedRoutes and paste this:
import React from "react";
import { Routes, Route, useLocation } from "react-router-dom";
import Home from "./Home";
import Contact from "./Contact";
import About from "./About";
import { AnimatePresence } from "framer-motion";

function AnimatedRoutes() {
  const location = useLocation();

  return (
    <AnimatePresence exitBeforeEnter>
      <Routes key={location.pathname} location={location}>
        <Route path="/" element={<Home />} />
        <Route path="/home" element={<Home />} />
        <Route path="/about" element={<About />} />
        <Route path="/contact" element={<Contact />} />
      </Routes>
    </AnimatePresence>
  );
}

export default AnimatedRoutes;
Here, we imported the Routes, Route, and useLocation from react-router-dom.
Routesis a significant improvement over theSwitchelement inv5. The route will allow us to navigate to each page that we created in response to our request.- The
useLocationhook will assist the routes in determining the page we are on. - We also import the page wrapped with
animatedPresencefrom framer motion.
The next thing we want to do is go back to our previous pages and update them as shown:
Home.js
import React from "react";
import { motion } from "framer-motion";

function Home() {
  return (
    <motion.div
      className="container text-center  bg-black"
      initial={{ opacity: 0 }}
      animate={{ opacity: 1 }}
      exit={{ opacity: 0 }}
      transition={{ duration: 3 }}
    >
      <h1>Home page</h1>

      <p>
        Lorem ipsum dolor sit, amet consectetur adipisicing elit. Sequi, qui.
        Hic animi distinctio et maiores, ab nostrum at neque. Iusto minus
        perspiciatis vitae unde? In quibusdam nulla perspiciatis laboriosam ex.
      </p>
    </motion.div>
  );
}

export default Home;
About.js
import React from "react";
import { motion } from "framer-motion";

function About() {
  return (
    <motion.div
      className="container text-center"
      initial={{ opacity: 0 }}
      animate={{ opacity: 1 }}
      exit={{ opacity: 0 }}
      transition={{ duration: 3 }}
    >
      <h1>About Page</h1>

      <p>
        Lorem ipsum dolor sit amet consectetur adipisicing elit. Sint quasi
        debitis fuga deserunt, placeat qui optio totam perspiciatis error.
        Repudiandae, enim veniam. Dolorum officiis recusandae consequuntur
        veritatis magni aliquam itaque.
      </p>
    </motion.div>
  );
}

export default About;
Contact.js
import React from "react";
import { motion } from "framer-motion";

function Contact() {
  return (
    <motion.div
      className="container text-center"
      initial={{ opacity: 0 }}
      animate={{ opacity: 1 }}
      exit={{ opacity: 0 }}
      transition={{ duration: 3 }}
    >
      <h1>Contact us</h1>

      <p>
        Lorem ipsum dolor sit, amet consectetur adipisicing elit. Optio mollitia
        in minima architecto odit sunt enim quidem blanditiis voluptates,
        provident veritatis labore. Natus pariatur eos at nemo, officia
        voluptatibus accusamus.
      </p>
    </motion.div>
  );
}

export default Contact;
In the code above:
- We import
motionfromframer-motioninto all three pages.motionallows us to define how our animation will run. - We add some properties to
motionlike:initial: This defines an element’s initial state.animate: This property defines the animation on the component mount. If the values differ from style or initial, it will animate these values.exit: This specifies the animation that occurs when the component is unmounted.transition: This allows us to change the properties of the animation. They include the duration, easing, type of animation, duration, and many other properties.
These are some of the extra props that we talked about earlier in the article.
The last thing we’ll be doing is to return Navbar and AnimatedRoutes. In our App.js, paste this
import { BrowserRouter as Router } from "react-router-dom";
import Navbar from "./pages/Navbar";
import AnimatedRoutes from "./pages/AnimatedRoutes";
Here, we imported our router. We’ll return our navbar and AnimatedRoutes by wrapping them inside our Router as shown:
<Router>
  <Navbar />
  <AnimatedRoutes />
</Router>
NOTE: We didn’t work on our
index.js, we only edited it to look like this

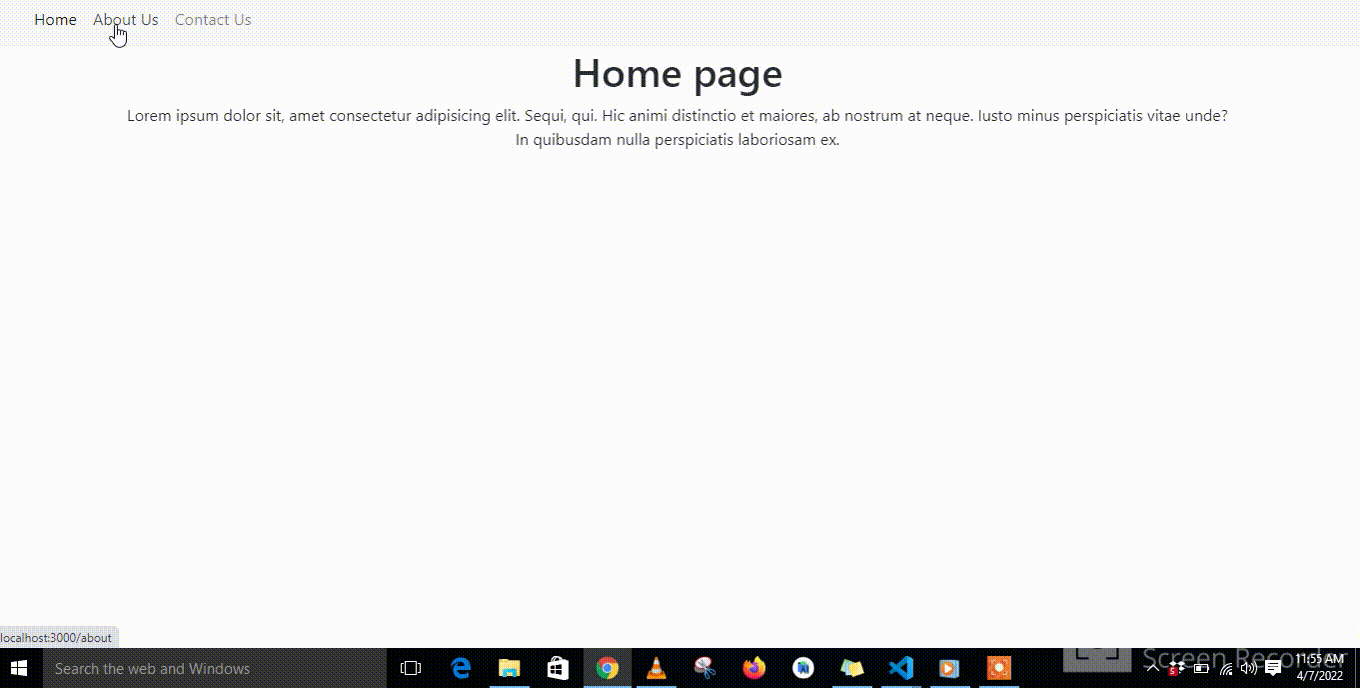
Let’s now check out the webpage in the browser:
Conclusion
In this tutorial, we learned about framer motion as a tool for making page transitions in React. We learned how to make page transitions by building a simple project.
You can check out the source code here.
To learn more about framer-motion, it is suggested to go through their documentation.
Happy coding!


Comments: