


Hand tracking is the process in which a computer uses computer vision to detect a hand from an input image and keeps focus on the hand’s movement and orientation. Hand tracking allows us to develop numerous programs that use hand movement and orientation as their input.
We tend to write the same code in different projects to perform hand tracking as part of our program. Creating a hand tracking module solves this problem since we write the code once.
We then convert this piece of code into a module. We can import this module into any python project that we are working on and it will perform hand tracking.
Introduction
To create the program that will perform hand tracking, we will need two Python libraries. These are openCV and MediaPipe.
We will use openCV to perform operations associated with computer vision. We will use MediaPipe to perform the actual hand detection and tracking on our input image. We will finally need an IDE. For this tutorial, we will use the Pycharm IDE.
This tutorial will be divided into two parts. The first part will focus on how to create a program that does hand tacking. The second part will focus on how to turn the program into a module. A person using Windows, Linux, or macOS can follow through.
Prerequisites
To follow along with this tutorial, you should:
- Be familiar with the Python programming language.
- Have
PycharmIDE installed on your computer. To download it, click here.
Setting up our environment
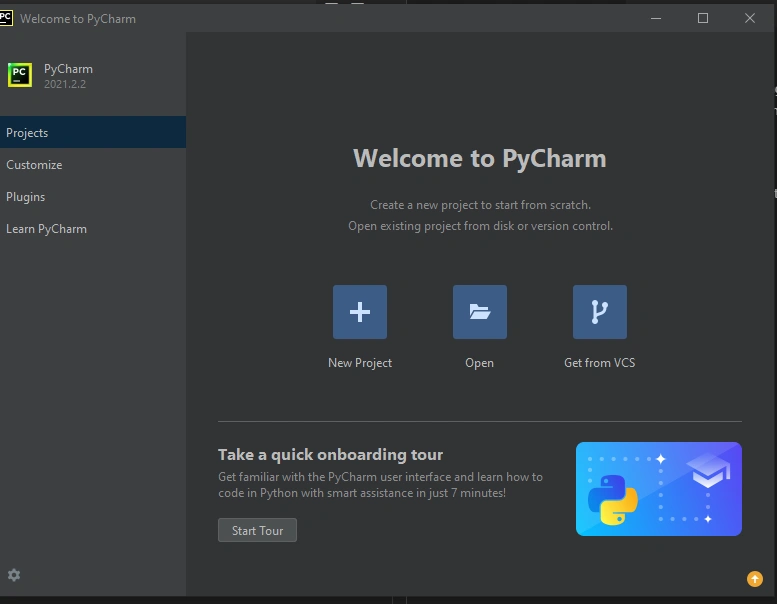
Launch the Pycharm app and do the following:
- Click
create a new projecton the first window that is displayed. This is shown in the following screenshot:
- On the window that appears next, click on create.
- Install the two python libraries we discussed. To do so, open the terminal as shown in the screenshot below then follow the steps below it.
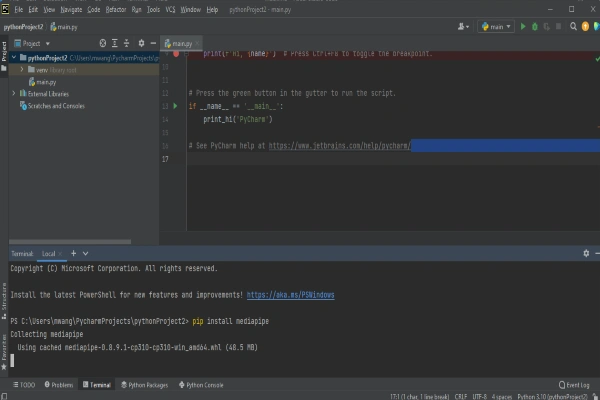
- Type the following command in the terminal to install
MediaPipe:
pip install mediapipe
- To install
openCV, use the following command:
pip install opencv-python
We now have our environment ready. We will begin by creating a program that does hand tracking.
Creating a hand tracking program
Before we jump into coding, let us discuss how MediaPipe performs hand tracking. Hand tracking using MediaPipe involves two stages:
- Palm detection –
MediaPipeworks on the complete input image and provides a cropped image of the hand. - Hand landmarks identification –
MediaPipefinds the21hand landmarks on the cropped image of the hand.
The 21 hand points that MediaPipe identifies are shown in the image below:
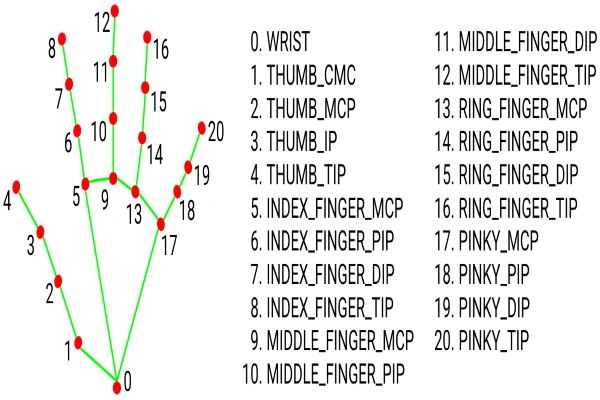
The image above shows the hand landmarks that MediaPipe uses to identify the hand. The numbered parts are the hand points.
Coding
Pycharm creates a main.py file for you automatically after you create a new project. This is where we will write our code.
Step 1 – Importations and initializations
We start by importing the two libraries we discussed. Importing the libraries enables us to use its dependencies.
We will then create an object cap for video capturing. We require the other three objects to manipulate our input using MediaPipe:
import cv2
import mediapipe as mp

cap = cv2.VideoCapture(0)
mpHands = mp.solutions.hands
hands = mpHands.Hands()
mpDraw = mp.solutions.drawing_utils
Step 2 – Capturing an image input and processing it
The code below takes the image input from the webcam. It then converts the image from BGR to RGB. This is because MediaPipe only works with RGB images, not BGR.
It then processes the RGB image to identify the hands in the image:
while True:
    success, image = cap.read()
    imageRGB = cv2.cvtColor(image, cv2.COLOR_BGR2RGB)
    results = hands.process(imageRGB)
Step 3 – Working with each hand
    # checking whether a hand is detected
    if results.multi_hand_landmarks:
        for handLms in results.multi_hand_landmarks: # working with each hand
            for id, lm in enumerate(handLms.landmark):
                h, w, c = image.shape
                cx, cy = int(lm.x * w), int(lm.y * h)
In the code above, we use the if statement to check whether a hand is detected. We then use the first for loop to enable us work with one hand at a time.
The second for loop helps us get the hand landmark information which will give us the x and y coordinates of each listed point in the hand landmark diagram. This loop will also give us the id of each point.
We will then find the height, width, and channel of our image using the image.shape function. We finally get the central positions of the identified hand points.
Step 4 – Drawing the hand landmarks and hand connections on the hand image
                if id == 20 :
                    cv2.circle(image, (cx, cy), 25, (255, 0, 255), cv2.FILLED)

            mpDraw.draw_landmarks(image, handLms, mpHands.HAND_CONNECTIONS)
In the code above, we circle the hand point number 20. This is the tip of the pinkie finger.
Feel free to use the number of the hand point you want to circle as they are listed on the hand landmark diagram. We then draw the hand landmarks and the connections between them on the input image.
Step 5 – Displaying the output
    cv2.imshow("Output", image)
    cv2.waitKey(1)
We use the code above to display the output to the user. The output is a real-time video of the user. It has the user’s hands tracked, hand landmarks, and connections drawn on the hands.
The output of this code is shown in the results section.
Creating a module from our code
Create a new file and name it handTrackingModule. Feel free to name it whatever name you want. Let us now create a module from the code above by following the steps below:
Step 1 – Importing the required libraries
We first import the Python libraries that we need in our project. This will enable us to use its dependencies:
import cv2
import mediapipe as mp
Step 2 – Creating a class that we will use for hand detection
class handTracker():
    def __init__(self, mode=False, maxHands=2, detectionCon=0.5,modelComplexity=1,trackCon=0.5):
        self.mode = mode
        self.maxHands = maxHands
        self.detectionCon = detectionCon
        self.modelComplex = modelComplexity
        self.trackCon = trackCon
        self.mpHands = mp.solutions.hands
        self.hands = self.mpHands.Hands(self.mode, self.maxHands,self.modelComplex,
                                        self.detectionCon, self.trackCon)
        self.mpDraw = mp.solutions.drawing_utils
In the code above, we create a class that we will use for tracking. We then key in the basic parameters that we require for the hands function to work. MediaPipe provides these parameters in the hands function.
Afterwards, we provide all the initializations that we need for our class. These are the parameters above and the MediaPipe initializations.
We put self before every object to allow access to the methods and the attributes of that object. This in turn allows each object to possess its own attributes and methods.
Step 3 – Creating a method that will track the hands in our input image
    def handsFinder(self,image,draw=True):
        imageRGB = cv2.cvtColor(image,cv2.COLOR_BGR2RGB)
        self.results = self.hands.process(imageRGB)

        if self.results.multi_hand_landmarks:
            for handLms in self.results.multi_hand_landmarks:

                if draw:
                    self.mpDraw.draw_landmarks(image, handLms, self.mpHands.HAND_CONNECTIONS)
        return image
In the code above, we created a method that we will use to specifically track the hands in our input image. The code that goes in this method is the one that converts the image to RGB and processes the RGB image to locate the hands.
It also draws the hand landmarks on the image and finally draws the hand connections.
Step 4 – Creating a method to find the ‘x’ and ‘y’ coordinates of each hand point
    def positionFinder(self,image, handNo=0, draw=True):
        lmlist = []
        if self.results.multi_hand_landmarks:
            Hand = self.results.multi_hand_landmarks[handNo]
            for id, lm in enumerate(Hand.landmark):
                h,w,c = image.shape
                cx,cy = int(lm.x*w), int(lm.y*h)
                lmlist.append([id,cx,cy])
            if draw:
                cv2.circle(image,(cx,cy), 15 , (255,0,255), cv2.FILLED)

        return lmlist
In the code above, we created a method that we will use to find the x and y coordinates of each of the 21 hand points. We also created a list that we will use to store the values of these coordinates.
The code that goes in this method is the one we use to find the id and hand landmark information of each hand point. We also put in the code that we will use to circle the hand-point that we want to use.
Step 5 – Creating the main method
def main():
    cap = cv2.VideoCapture(0)
    tracker = handTracker()

    while True:
        success,image = cap.read()
        image = tracker.handsFinder(image)
        lmList = tracker.positionFinder(image)
        if len(lmList) != 0:
            print(lmList[4])

        cv2.imshow("Video",image)
        cv2.waitKey(1)
The code above represents the dummy code that we will use to showcase what the module can do. In our case, it can identify and track hands. It uses the image and lmlist object. This code appears in the main method.
Step 6 – Executing the main method
if __name__ == "__main__":
    main()
This code implies that, if we are running the module script, then execute the main method.
Results
The output of the program and the module will be identical. When each of them has run into completion without any errors, the output will be as shown below:
Conclusion
You now understand and possess all the skills needed to create a program that performs hand tracking. You also have the skills required to convert the code into a module.
Go ahead and import the module into any Python project that requires hand tracking and watch the module perform its magic.
Happy coding!


Comments: