


Geolocation refers to the ID of the geographic location of a client or computing device employing an assortment of data collection systems. Most geolocation administrations use network routing addresses or inward GPS devices to decide this location.
Geolocation is a device explicit API. It implies that programs or devices would need to support geolocation to use it through web applications.
HTML5 geolocation API feature assists website owners to have access to the geographic location of each of their visitors. By this implementation, visitors have access to products or search results available to that location.
A large number of websites use the HTML5 geolocation feature. Such as Spine-health, a health and fitness blog in the united states. The role of leaflet.js here is to create easy map layers for a proper visual representation of the HTML5 geolocation feature.
Prerequisites
To understand this guide properly, the reader should have prior knowledge on:
- JavaScript.
- HTML.
- CSS.
- Code editors like visual studio code, sublime text.
- Leaflet.js basics. Here is a guide on building simple maps using leaflet.js.
Goal
This tutorial teaches readers how to build a real-time location tracker. We will use the HTML5 geolocation API to do this and use leaflet to visualize the results.
We will also guide the reader on how to add the location search plugin of leaflet.js. Thus by the end, the reader should be able to:
- Create an
OSMlayer. - Make use of the HTML5 geolocation feature.
- Use the leaflet.js search plugin.
Getting started
Creating an OSM layer
An OpenStreetMap [OSM] layer is a collection of a free editable geographic database of the world. The sources include surveys and personal knowledge, street-level image data, and government data.
According to wiki, there are several OSM tile layers. Tile layers are a collection of web-accessible tiles that reside on a server. The tiles are accessible by a direct URL request from the server.
We can go through the previous leaflet.js documentation for a clearer walkthrough on leaflet basics. In this section, we will only be scratching the surface as we are not required to add much to our OSM layer.
Let’s walk you through the processes:
- First, we will initialize our HTML.
<html lang="en">
  <head>
    <meta charset="UTF-8" />
    <meta http-equiv="X-UA-Compatible" content="IE=edge" />
    <meta name="viewport" content="width=device-width, initial-scale=1.0" />
    <title>Document</title>
  </head>
  <body></body>
</html>
- Then, we import the
leaflet.jsJavaScript and CSS file using its unique content delivery network (CDN).
<html lang="en">
  <head>
    <meta charset="UTF-8" />
    <meta http-equiv="X-UA-Compatible" content="IE=edge" />
    <meta name="viewport" content="width=device-width, initial-scale=1.0" />
    <title>Document</title>
    <link
      rel="stylesheet"
      href="https://unpkg.com/leaflet@1.7.1/dist/leaflet.css"
      integrity="sha512-xodZBNTC5n17Xt2atTPuE1HxjVMSvLVW9ocqUKLsCC5CXdbqCmblAshOMAS6/keqq/sMZMZ19scR4PsZChSR7A=="
      crossorigin=""
    />
  </head>
  <body>
    <script
      src="https://unpkg.com/leaflet@1.7.1/dist/leaflet.js"
      integrity="sha512-XQoYMqMTK8LvdxXYG3nZ448hOEQiglfqkJs1NOQV44cWnUrBc8PkAOcXy20w0vlaXaVUearIOBhiXZ5V3ynxwA=="
      crossorigin=""
    ></script>
  </body>
</html>
- Next, we create a
divelement with anidname. Theidname can be any of your choice, but for the sake of this tutorial, we will use “map” as theidname.
<html lang="en">
  <head>
    <meta charset="UTF-8" />
    <meta http-equiv="X-UA-Compatible" content="IE=edge" />
    <meta name="viewport" content="width=device-width, initial-scale=1.0" />
    <title>Document</title>
    <link
      rel="stylesheet"
      href="https://unpkg.com/leaflet@1.7.1/dist/leaflet.css"
      integrity="sha512-xodZBNTC5n17Xt2atTPuE1HxjVMSvLVW9ocqUKLsCC5CXdbqCmblAshOMAS6/keqq/sMZMZ19scR4PsZChSR7A=="
      crossorigin=""
    />
  </head>
  <body>
    <div id="map"></div>
    <script
      src="https://unpkg.com/leaflet@1.7.1/dist/leaflet.js"
      integrity="sha512-XQoYMqMTK8LvdxXYG3nZ448hOEQiglfqkJs1NOQV44cWnUrBc8PkAOcXy20w0vlaXaVUearIOBhiXZ5V3ynxwA=="
      crossorigin=""
    ></script>
  </body>
</html>
- After doing the above, we’ll have created a container for the
OSMlayer. We have to style the container to prevent the map layer not showing.
Next, we will create a style tag within our current code.
<html lang="en">
  <head>
    <meta charset="UTF-8" />
    <meta http-equiv="X-UA-Compatible" content="IE=edge" />
    <meta name="viewport" content="width=device-width, initial-scale=1.0" />
    <title>Document</title>
    <link
      rel="stylesheet"
      href="https://unpkg.com/leaflet@1.7.1/dist/leaflet.css"
      integrity="sha512-xodZBNTC5n17Xt2atTPuE1HxjVMSvLVW9ocqUKLsCC5CXdbqCmblAshOMAS6/keqq/sMZMZ19scR4PsZChSR7A=="
      crossorigin=""
    />
    <style>
      body {
        margin: 0;
        padding: 0;
      }

      #map {
        width: 100%;
        height: 100vh;
      }
    </style>
  </head>
  <body>
    <div id="map"></div>
    <script
      src="https://unpkg.com/leaflet@1.7.1/dist/leaflet.js"
      integrity="sha512-XQoYMqMTK8LvdxXYG3nZ448hOEQiglfqkJs1NOQV44cWnUrBc8PkAOcXy20w0vlaXaVUearIOBhiXZ5V3ynxwA=="
      crossorigin=""
    ></script>
  </body>
</html>
- Initializing our
OSMlayer is the last thing.
BASE
<html lang="en">
<head>
<meta charset="UTF-8">
<meta http-equiv="X-UA-Compatible" content="IE=edge">
<meta name="viewport" content="width=device-width, initial-scale=1.0">
<title>Document</title>
<link rel="stylesheet" href="https://unpkg.com/leaflet@1.7.1/dist/leaflet.css"
integrity="sha512-xodZBNTC5n17Xt2atTPuE1HxjVMSvLVW9ocqUKLsCC5CXdbqCmblAshOMAS6/keqq/sMZMZ19scR4PsZChSR7A=="
crossorigin=""/>
<style>
body {
margin: 0;
padding: 0;
}
#map {
width: 100%;
height: 100vh;
}
</style>
</head>
<body>
<div id="map"></div>
<script src="https://unpkg.com/leaflet@1.7.1/dist/leaflet.js"
integrity="sha512-XQoYMqMTK8LvdxXYG3nZ448hOEQiglfqkJs1NOQV44cWnUrBc8PkAOcXy20w0vlaXaVUearIOBhiXZ5V3ynxwA=="
crossorigin=""></script>
<script>
var map_init = L.map('map',{
center: [9.0820, 8.6753],
zoom:8
});
var osm = L.tileLayer ('https://{s}.tile.openstreetmap.org/{z}/{x}/{y}.png', {
attribution: '© <a href="https://www.openstreetmap.org/copyright">OpenStreetMap</a> contributors'
}).addTo (map_init);
</script>
</body>
</html>
The above is our base layer and a visualization tool for other components to be added.
Location search plugin
According to the Google maps platform, Geocoding is the process of converting addresses (like “1600 Amphitheatre Parkway, Mountain View, CA”) into geographic coordinates (like latitude 37.423021 and longitude -122.083739). Which, you can use to place markers on a map or position the map.
We will be doing the opposite that is known as Reverse geocoding. Apps like google maps and google earth make use of reverse geocoding to make the location search feature.
Reverse geocoding has been eased up by leaflet.js. Instead of going through an entire lengthy process of reverse geocoding, with the leaflet’s unique CDN, it is limited to a small line of code.
There are several leaflet.js geocoding plugins. We will be working with the Leaflet Control Geocoder because of its extendable nature to other data providers.
To get started, the steps below should be followed:
- Import the leaflet control geocoder unique content delivery network (CDN) into our
BASEcode above.
<link rel="stylesheet" href="https://unpkg.com/leaflet-control-geocoder/dist/Control.Geocoder.css" />
<script src="https://unpkg.com/leaflet-control-geocoder/dist/Control.Geocoder.js"></script>
- Next, we add the control below to our
BASEcode map instance above.
L.Control.geocoder().addTo(map_init);
By that, we are meant to have something like the following:
<html lang="en">
<head>
<meta charset="UTF-8">
<meta http-equiv="X-UA-Compatible" content="IE=edge">
<meta name="viewport" content="width=device-width, initial-scale=1.0">
<title>Document</title>
<link rel="stylesheet" href="https://unpkg.com/leaflet@1.7.1/dist/leaflet.css"
integrity="sha512-xodZBNTC5n17Xt2atTPuE1HxjVMSvLVW9ocqUKLsCC5CXdbqCmblAshOMAS6/keqq/sMZMZ19scR4PsZChSR7A=="
crossorigin="" />
<link rel="stylesheet" href="https://unpkg.com/leaflet-control-geocoder/dist/Control.Geocoder.css" />
<style>
body {
margin: 0;
padding: 0;
}
#map {
width: 100%;
height: 100vh;
}
</style>
</head>
<body>
<div id="map"></div>
<script src="https://unpkg.com/leaflet@1.7.1/dist/leaflet.js"
integrity="sha512-XQoYMqMTK8LvdxXYG3nZ448hOEQiglfqkJs1NOQV44cWnUrBc8PkAOcXy20w0vlaXaVUearIOBhiXZ5V3ynxwA=="
crossorigin=""></script>
<script src="https://unpkg.com/leaflet-control-geocoder/dist/Control.Geocoder.js"></script>
<script>
var map_init = L.map('map', {
center: [9.0820, 8.6753],
zoom: 8
});
var osm = L.tileLayer('https://{s}.tile.openstreetmap.org/{z}/{x}/{y}.png', {
attribution: '© <a href="https://www.openstreetmap.org/copyright">OpenStreetMap</a> contributors'
}).addTo(map_init);
L.Control.geocoder().addTo(map_init);
</script>
</body>
</html>
Location tracker
HTML5 geolocation is regarded as the best HTML5 API. With permission, it identifies the user’s geographic information. Which can be sent to a backend server for location-conscious processes like showing products accessible in geographic zones close to the users.
In this section, we will show you how to build a location tracker that pings users’ geographic information every five seconds. This information includes latitude, longitude, and accuracy (closeness of the user’s device from the true position).
Handling errors
if (!navigator.geolocation) {
  console.log("Your browser doesn't support geolocation feature!");
} else {
  navigator.geolocation.getCurrentPosition(getPosition);
}
navigator.geolocation is a global object that returns a geolocation object by the browser that gives web content access to the location of the device. Most browsers are geolocation enabled.
Browsers like internet explorer only support HTML5 geolocation 9.0 and above. Thus, the aim of the conditional statement above is to handle such errors.
Getting geographic information
var marker, circle, lat, long, accuracy;

function getPosition(position) {
  // console.log(position)
  lat = position.coords.latitude;
  long = position.coords.longitude;
  accuracy = position.coords.accuracy;

  if (marker) {
    map_init.removeLayer(marker);
  }

  if (circle) {
    map_init.removeLayer(circle);
  }

  marker = L.marker([lat, long]);
  circle = L.circle([lat, long], { radius: accuracy });

  var featureGroup = L.featureGroup([marker, circle]).addTo(map_init);

  map_init.fitBounds(featureGroup.getBounds());

  console.log(
    "Your coordinate is: Lat: " +
      lat +
      " Long: " +
      long +
      " Accuracy: " +
      accuracy
  );
}
The callback method getCurrentPosition gives the current geographic location of users. To view this information, we will log the function’s argument.
The method L.marker embodies a marker object given a coordinate (longitude and latitude) while L.circle represents a circle object given a coordinate. And, an options object which contains the circle radius.
L.featureGroup creates a Leaflet Feature Group that adds its child layers into a parent group when added to a map. Lastly, we will need a setInterval method to call a function at specified intervals.
The measurement is in milliseconds. The aim of using this method is to get the change in the user geographic location, thus, making a real-time tracker.
if (!navigator.geolocation) {
  console.log("Your browser doesn't support geolocation feature!");
} else {
  setInterval(() => {
    navigator.geolocation.getCurrentPosition(getPosition);
  }, 5000);
}
Finally, bringing all these components together, we will have our final code as:
<html lang="en">
<head>
<meta charset="UTF-8">
<meta http-equiv="X-UA-Compatible" content="IE=edge">
<meta name="viewport" content="width=device-width, initial-scale=1.0">
<title>Document</title>
<link rel="stylesheet" href="https://unpkg.com/leaflet@1.7.1/dist/leaflet.css"
integrity="sha512-xodZBNTC5n17Xt2atTPuE1HxjVMSvLVW9ocqUKLsCC5CXdbqCmblAshOMAS6/keqq/sMZMZ19scR4PsZChSR7A=="
crossorigin="" />
<link rel="stylesheet" href="https://unpkg.com/leaflet-control-geocoder/dist/Control.Geocoder.css" />
<style>
body {
margin: 0;
padding: 0;
}
#map {
width: 100%;
height: 100vh;
}
</style>
</head>
<body>
<div id="map"></div>
<script src="https://unpkg.com/leaflet@1.7.1/dist/leaflet.js"
integrity="sha512-XQoYMqMTK8LvdxXYG3nZ448hOEQiglfqkJs1NOQV44cWnUrBc8PkAOcXy20w0vlaXaVUearIOBhiXZ5V3ynxwA=="
crossorigin=""></script>
<script src="https://unpkg.com/leaflet-control-geocoder/dist/Control.Geocoder.js"></script>
<script>
var map_init = L.map('map', {
center: [9.0820, 8.6753],
zoom: 8
});
var osm = L.tileLayer('https://{s}.tile.openstreetmap.org/{z}/{x}/{y}.png', {
attribution: '© <a href="https://www.openstreetmap.org/copyright">OpenStreetMap</a> contributors'
}).addTo(map_init);
L.Control.geocoder().addTo(map_init);
if (!navigator.geolocation) {
console.log("Your browser doesn't support geolocation feature!")
} else {
setInterval(() => {
navigator.geolocation.getCurrentPosition(getPosition)
}, 5000);
};
var marker, circle, lat, long, accuracy;
function getPosition(position) {
// console.log(position)
lat = position.coords.latitude
long = position.coords.longitude
accuracy = position.coords.accuracy
if (marker) {
map_init.removeLayer(marker)
}
if (circle) {
map_init.removeLayer(circle)
}
marker = L.marker([lat, long])
circle = L.circle([lat, long], { radius: accuracy })
var featureGroup = L.featureGroup([marker, circle]).addTo(map_init)
map_init.fitBounds(featureGroup.getBounds())
console.log("Your coordinate is: Lat: " + lat + " Long: " + long + " Accuracy: " + accuracy)
}
</script>
</body>
</html>
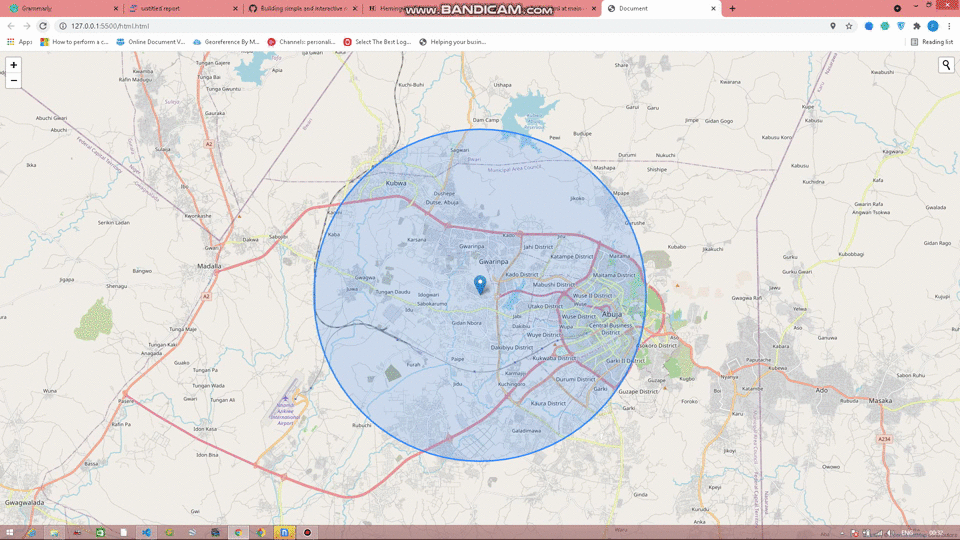
If we run the above HTML code in our browser, we will have our tracker like the gif shown below:
Conclusion
We learned how to add tile layers, use the leaflet search plugin and use the HTML5 geolocation API. We also looked at how to bring all these components together to have a real-time tracker using leaflet.js.
You can find the entire code here


Comments: