


In this tutorial, we are going to build a Spring Boot Rest CRUD API with Gradle as our build tool. Rest APIs make it possible to establish communication between a backend server and a frontend web or mobile applications.
Prerequisites
- Basics of Spring framework and Spring Boot.
- Basic Knowledge of Java programming language.
- Java development kit (JDK) installed and set up on your computer.
- Postman installed on your computer.
- Your favorite Java IDE installed. I use Intellij
To verify if Java and Java compiler are installed and configured correctly on your system, open the terminal and type in the command java --version to see the version of Java installed and javac --version to see the version of Java compiler installed.
$ java --version
java 15.0.1 2020-10-20
Java(TM) SE Runtime Environment (build 15.0.1+9-18)
Java HotSpot(TM) 64-Bit Server VM (build 15.0.1+9-18, mixed mode, sharing)
$ javac --version
javac 15.0.1
Rest API CRUD operations map to HTTP verbs and SQL operations as shown in the table below.
| Operation | SQL | HTTP verb | Rest web service |
|---|---|---|---|
| Create | INSERT | POST/PUT | POST |
| Read | SELECT | GET | GET |
| Update | UPDATE | POST/PUT/PATCH | PUT |
| Delete | DELETE | DELETE | DELETE |
Project setup
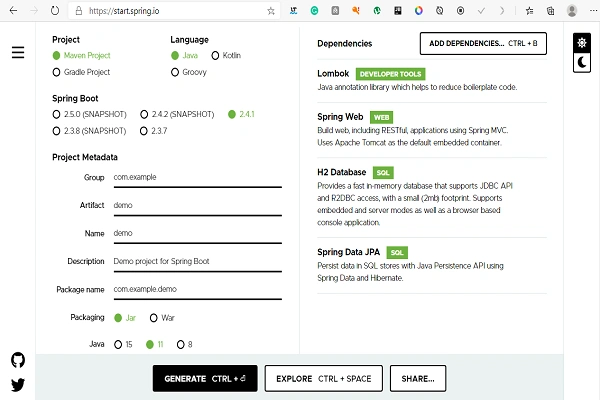
The easiest way to create a new spring boot application is to use the spring initializr.
- Open spring initializr in your web browser.
- Choose the Gradle project.
- Choose Java as the language.
- Leave the default selected Spring Boot version.
- Select Java 8 as the Java Version.
- In the dependencies section add Lombok, Spring Web, H2 Database, Spring Data JPA as the dependencies.
- Click on the generate button to download the project as a zip file.
- Extract the zip file and open the project in your favorite IDE.
- Sync the dependencies with Gradle.
Configuring Spring Datasource, JPA, Hibernate
We are using the H2 database which is an in-memory database, meaning the data stored in the database is destroyed if the application is stopped or restarted.
In the resources folder within the src/main folder, open application.properties file and write the below properties.
spring.datasource.url=jdbc:h2:mem:todo
spring.datasource.driverClassName=org.h2.Driver
spring.datasource.username=sa
spring.datasource.password=password
spring.jpa.database-platform=org.hibernate.dialect.H2Dialect
spring.datasource.username&spring.datasource.passwordproperties are the H2 database username and password. The default H2 databaseusernameissaandpasswordispassword.- Spring Boot uses Hibernate for Spring Data JPA implementation, that is why we configure
spring.jpa.database-platform=org.hibernate.dialect.H2Dialect. spring.datasource.url=jdbc:h2:mem:todospecies the database url and the database name. In our case the database name istodo.
Todo model
Models are plain old Java objects that represent a table in the database. We will start by creating a model package in our root project package com.example.demo.
Within the model package created above, create a Java enum with the name TodoStatus with the fields as shown below.
public enum TodoStatus {
    COMPLETED, NOT_COMPLETED
}
Within the model package created above, create a Java class with the name Todo with the fields as shown below.
import lombok.AllArgsConstructor;
import lombok.Data;
import lombok.NoArgsConstructor;
import lombok.Builder;
import org.hibernate.annotations.CreationTimestamp;
import org.hibernate.annotations.UpdateTimestamp;

import javax.persistence.Column;
import javax.persistence.Entity;
import javax.persistence.GeneratedValue;
import javax.persistence.Id;
import java.sql.Timestamp;

@Entity
@Data
@NoArgsConstructor
@AllArgsConstructor
@Builder
public class Todo {
    @Id
    @GeneratedValue
    @Column(updatable = false, nullable = false)
    Long id;
    @Column
    String title;
    @Column
    String description;
    @Column
    TodoStatus todoStatus;

    @CreationTimestamp
    @Column(updatable = false)
    Timestamp dateCreated;
    @UpdateTimestamp
    Timestamp lastModified;

}
@Entityannotation shows that the class is a persistent Java class.@Idannotation shows that the annotated field is the primary key.@GeneratedValueannotation is used to specify the generation strategy used for the primary key.@Columnannotation defines the column in the database that maps the annotated field.@CreationTimestampannotation is a JPA annotation that automatically updates thetodocreation timestamp.@UpdateTimestampannotation is a JPA annotation that automatically updates thetodolast modified timestamp.@Dataannotation is from project Lombok. It generates the getters and setters for all the fields that we have in the todo class, equals method, and a toString method.@NoArgsConstructorannotation is from project Lombok and it generates an empty constructor for ourTodoclass.@AllArgsConstructorannotation is from project Lombok and it generates a constructor with all the fields that are available in ourTodoclass.@Builderannotation is from project Lombok. It makes it possible for us to use the builder pattern with ourTodomodel.
We will use the builder pattern later in the article when creating initial bootstrap data.
Creating the repository interface
In the root package of our project, create a package with the name repositories. In the repositories package created above, create an interface with the name TodoRepository that extends the CrudRepository interface and comes with CRUD functions already implemented.
import com.odhiambopaul.demo.model.Todo;
import org.springframework.data.repository.CrudRepository;
import org.springframework.stereotype.Repository;

@Repository
public interface TodoRepository extends CrudRepository<Todo, Long> {
}
The CrudRespository interface takes in the model and the type of the ID, in our case the model is Todo and the ID type is Long. We are now able to use all the CrudRepository methods save(), findOne(), findById(), findAll(), count(), delete(), deleteById() without providing implementation.
@Repositoryannotation marks this interface as a Spring Data JPA repository.
Creating the todo service
A service is an interface from which different implementations of the same functions can be made.
In the root package of our application create a package with the name services. In the services package created above, create an interface with the name TodoService.
import java.util.List;

public interface TodoService {
    List<Todo> getTodos();

    Todo getTodoById(Long id);

    Todo insert(Todo todo);

    void updateTodo(Long id, Todo todo);

    void deleteTodo(Long todoId);
}
The interface above defines the base CRUD operations that we will implement in our TodoServiceImpl class. In the services package create a class with the name TodoServiceImp and implements the TodoService interface we created above.
import com.example.demo.model.Todo;
import com.example.demo.repositories.TodoRepository;
import org.springframework.stereotype.Service;

import java.util.ArrayList;
import java.util.List;

@Service
public class TodoServiceImpl implements TodoService {
    TodoRepository todoRepository;

    public TodoServiceImpl(TodoRepository todoRepository) {
        this.todoRepository = todoRepository;
    }

    @Override
    public List<Todo> getTodos() {
        List<Todo> todos = new ArrayList<>();
        todoRepository.findAll().forEach(todos::add);
        return todos;
    }

    @Override
    public Todo getTodoById(Long id) {
        return todoRepository.findById(id).get();
    }

    @Override
    public Todo insert(Todo todo) {
        return todoRepository.save(todo);
    }

    @Override
    public void updateTodo(Long id, Todo todo) {
        Todo todoFromDb = todoRepository.findById(id).get();
        System.out.println(todoFromDb.toString());
        todoFromDb.setTodoStatus(todo.getTodoStatus());
        todoFromDb.setDescription(todo.getDescription());
        todoFromDb.setTitle(todo.getTitle());
        todoRepository.save(todoFromDb);
    }

    @Override
    public void deleteTodo(Long todoId) {
        todoRepository.deleteById(todoId);
    }
}
We will create and initialize the TodoRepository in the constructor of the class above to be able to use the various methods that CrudRepository provides.
@serviceannotation makes Spring context be aware of this class as a service.
Creating the Rest API controller
In the root package of our project create a package with the name controllers. In the controllers package we created above, create a Java class with the name TodoController.
import com.example.demo.model.Todo;
import com.example.demo.services.TodoService;
import org.springframework.http.HttpHeaders;
import org.springframework.http.HttpStatus;
import org.springframework.http.ResponseEntity;
import org.springframework.web.bind.annotation.*;

import java.util.List;

@RestController
@RequestMapping("/api/v1/todo")
public class TodoController {
    TodoService todoService;

    public TodoController(TodoService todoService) {
        this.todoService = todoService;
    }

    //The function receives a GET request, processes it and gives back a list of Todo as a response.
    @GetMapping
    public ResponseEntity<List<Todo>> getAllTodos() {
        List<Todo> todos = todoService.getTodos();
        return new ResponseEntity<>(todos, HttpStatus.OK);
    }
    //The function receives a GET request, processes it, and gives back a list of Todo as a response.
    @GetMapping({"/{todoId}"})
    public ResponseEntity<Todo> getTodo(@PathVariable Long todoId) {
        return new ResponseEntity<>(todoService.getTodoById(todoId), HttpStatus.OK);
    }
    //The function receives a POST request, processes it, creates a new Todo and saves it to the database, and returns a resource link to the created todo.           @PostMapping
    public ResponseEntity<Todo> saveTodo(@RequestBody Todo todo) {
        Todo todo1 = todoService.insert(todo);
        HttpHeaders httpHeaders = new HttpHeaders();
        httpHeaders.add("todo", "/api/v1/todo/" + todo1.getId().toString());
        return new ResponseEntity<>(todo1, httpHeaders, HttpStatus.CREATED);
    }
    //The function receives a PUT request, updates the Todo with the specified Id and returns the updated Todo
    @PutMapping({"/{todoId}"})
    public ResponseEntity<Todo> updateTodo(@PathVariable("todoId") Long todoId, @RequestBody Todo todo) {
        todoService.updateTodo(todoId, todo);
        return new ResponseEntity<>(todoService.getTodoById(todoId), HttpStatus.OK);
    }
    //The function receives a DELETE request, deletes the Todo with the specified Id.
    @DeleteMapping({"/{todoId}"})
    public ResponseEntity<Todo> deleteTodo(@PathVariable("todoId") Long todoId) {
        todoService.deleteTodo(todoId);
        return new ResponseEntity<>(HttpStatus.NO_CONTENT);
    }
}
@RestControllerannotation marks this class as a controller that can process the incoming HTTP requests.@RequestMapping("/api/v1/todo")annotation sets the base path to the resource endpoints in the controller as/api/v1/todo.- We inject the TodoService through our contractor to be able to use the various methods defined in it within the
TodoControllerclass. @GetMappingannotation indicates that the function processes aGETrequest.@PostMappingannotation indicates that a function processes aPOSTrequest.@PutMappingannotation indicates that a function processes aPUTrequest.@DeleteMappingannotation indicates that a function processes aDELETErequest.
Creating a bootstrapper
Data bootstrapper creates and loads the initial data whenever the application runs. We will make use of the builder pattern we mention while creating the Todo model. In the root package of our project, create a package with the name bootstrap. In the bootstrap package created above create a Java class with the name TodoLoader.
import com.example.demo.model.Todo;
import com.example.demo.model.TodoStatus;
import com.example.demo.repositories.TodoRepository;
import org.springframework.boot.CommandLineRunner;
import org.springframework.stereotype.Component;

@Component
public class TodoLoader implements CommandLineRunner {
    public final TodoRepository todoRepository;

    public TodoLoader(TodoRepository todoRepository) {
        this.todoRepository = todoRepository;
    }

    @Override
    public void run(String... args) throws Exception {
        loadTodos();
    }

    private void loadTodos() {
        if (todoRepository.count() == 0) {
            todoRepository.save(
                    Todo.builder()
                            .title("Go to market")
                            .description("Buy eggs from market")
                            .todoStatus(TodoStatus.NOT_COMPLETED)
                            .build()
            );
            todoRepository.save(
                    Todo.builder()
                            .title("Go to school")
                            .description("Complete assignments")
                            .todoStatus(TodoStatus.NOT_COMPLETED)
                            .build()
            );
            System.out.println("Sample Todos Loaded");
        }
    }
}
@Componentannotation informs Spring that this class is a Spring component.
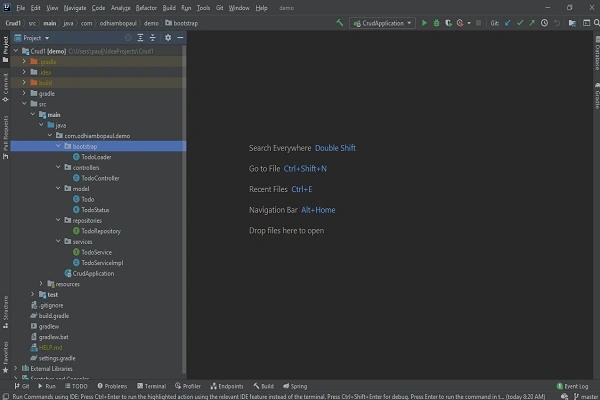
The final project structure should be as shown below.
Testing the CRUD endpoints
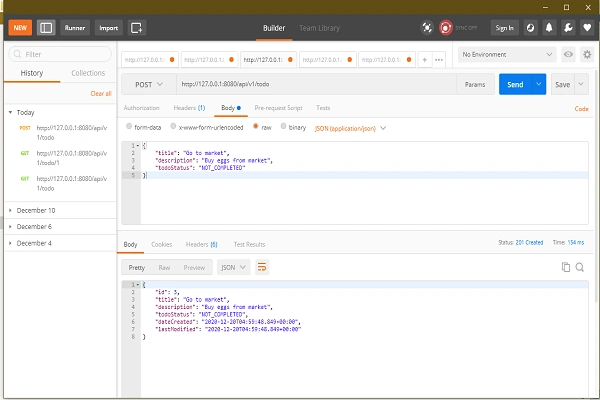
Creating a new Todo
Make a POST request with the JSON body as shown below to http://127.0.0.1:8080/api/v1/todo.
{
    "title": "Go to market",
    "description": "Buy eggs from market",
    "todoStatus": "NOT_COMPLETED"
}
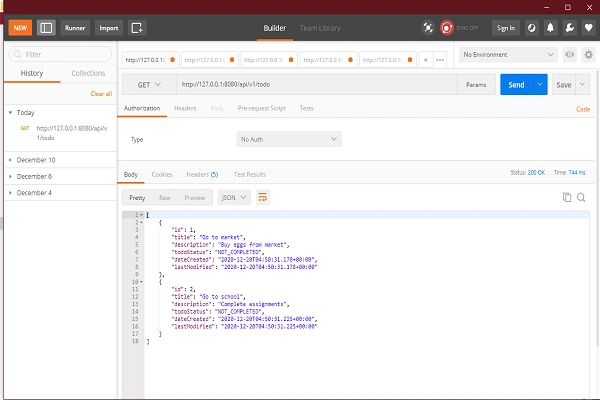
Getting the list of todos
Make a GET request to http://127.0.0.1:8080/api/v1/todo to get all the todos.
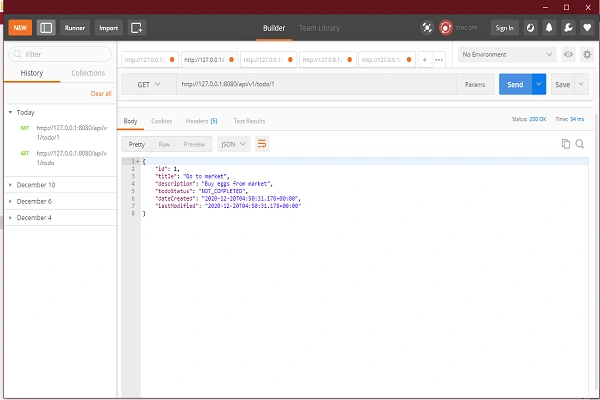
Getting a Todo by ID
Make a GET request to http://127.0.0.1:8080/api/v1/todo/2 specifying the ID of the Todo at the end of the URL, in our case ID is 2.
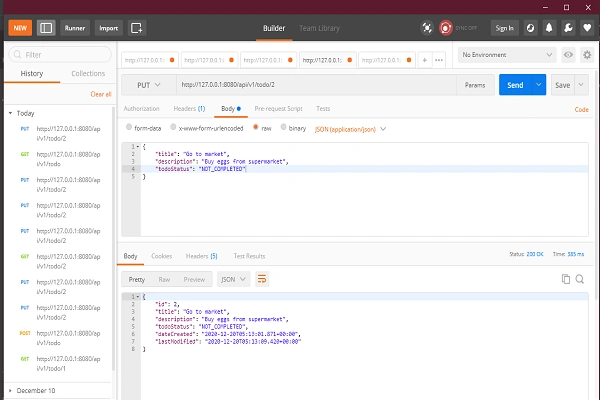
Updating a Todo
Make a PUT request to http://127.0.0.1:8080/api/v1/todo/2 adding the ID of the todo to update in the URL, in our case the ID is 2 and a JSON body with the fields to update.
{
    "title": "Market",
    "description": "Buy eggs from supermarket",
    "todoStatus": "NOT_COMPLETED"
}
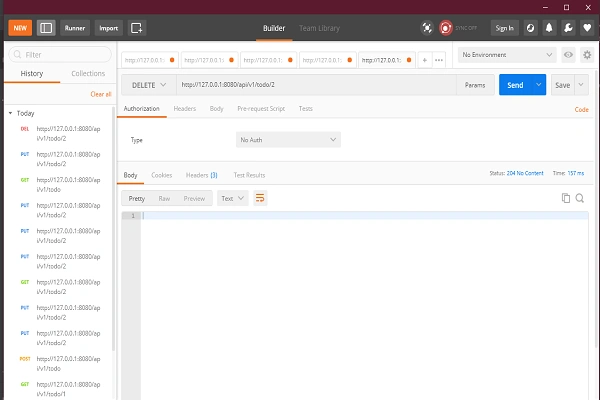
Deleting a Todo
Make a DELETE request to http://127.0.0.1:8080/api/v1/todo/2 adding to the end of the URL the ID of the todo to delete, in our case the ID is 2.
Conclusion
Now that you have learned how to create a Restful web service in Spring Boot, clone the project here and IN_PROGRESS status to our TodoStatus enum in the models package.
In our next article we will demonstrate how to secure our Restful endpoints and handle various exceptions in our application.


Comments: