


This tutorial is suitable for beginners. Especially those who have just started learning Android programming in Kotlin. Every application needs to follow certain architectural principles.
Failure to adhere to this requirement results in applications difficult to scale and maintain. As a result, more time and resources will be needed to push even simple updates. Therefore, the developer may end up missing crucial opportunities.
Introduction
Let us start by evaluating what android architectures existed before MVVM. The first component is Model View Presenter denoted by MVP. Though this architecture separates the business logic from the app’s UI, it is difficult to implement.
In the long-run, this can translate into high development costs. The second android architecture is MVC.
Just like MVP, it is also quite complex and not suitable for minor projects. Google introduced MVVM (Model-View-ViewModel) to resolve these challenges. By separating code into smaller chunks, MVVM simplifies the debugging process.
Through this article, you’ll understand MVVM architecture and implement it in an application. This article shows how to debug common errors resulting from this architecture.
Learn more about MVVM here.
Let’s dive in!
Prerequisites
- Have Android studio installed.
- You must be familiar with Kotlin.
- Install lifecycle dependencies.
- Download the start code from here.
The goal of the tutorial
By the end of this tutorial, you will create an app that takes input and displays it on a recycler view. Below is the screenshot of the app.
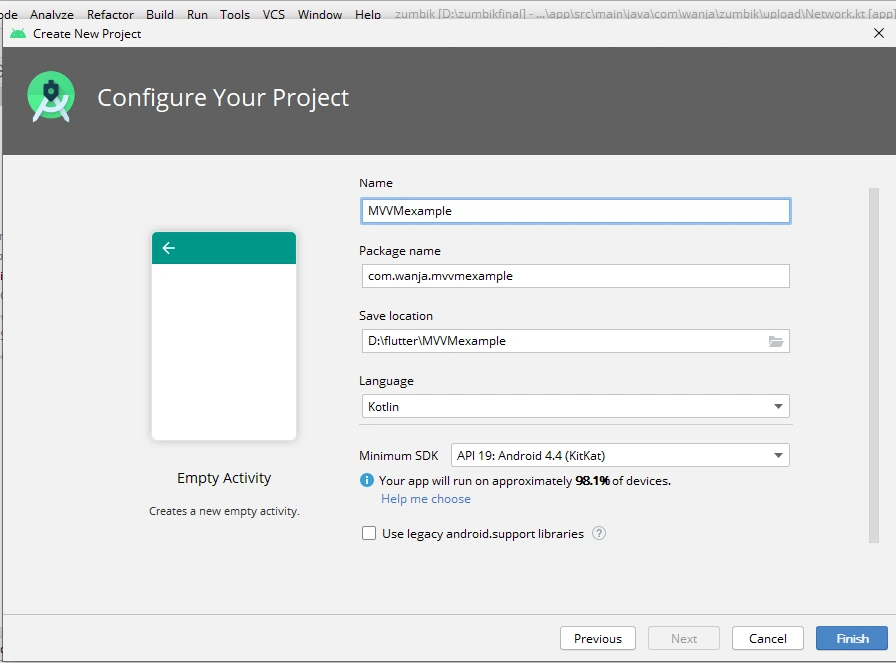
Step 1 – Launching Android Studio
Launch Android Studio and create a new project, as shown below. Make sure that you select Kotlin as your preferred programming language.
If you don’t have Android Studio, you can install it from here.
Step 2 – Creating the model
Create the app model. Also referred to as the data class. To avoid confusion, create a package named model inside the java folder. Then, create a data class named Blog in the model package, as shown below.
For simplicity, the data class will only have one variable (title). There is no need to add getters and setters; Kotlin adds them to the class automatically.
Here’s the code for the class.
data class Blog(
    var title:String
)
Step 3 – Creating the view
The view is what the user sees on the screen. The UI, therefore, needs to be well structured to minimize any confusion and dissatisfaction.
Open activity_main.xml file and change the Layout from constraint to linear Layout. Set the orientation to vertical; this arranges the UI components vertically in the Layout. Our app’s primary widgets are Edittext, Button, and a RecyclerView.
Make sure all these widgets have IDs since they will be vital at a later stage. This is how our activity_main.xml file should look like.
<?xml version="1.0" encoding="utf-8"?>
<LinearLayout xmlns:android="http://schemas.android.com/apk/res/android"
    xmlns:app="http://schemas.android.com/apk/res-auto"
    xmlns:tools="http://schemas.android.com/tools"
    android:layout_width="match_parent"
    android:orientation="vertical"
    android:layout_height="match_parent"
    tools:context=".MainActivity">

    <EditText
        android:id="@+id/titletxt"
        android:layout_width="match_parent"
        android:layout_height="wrap_content"
        android:layout_marginTop="24dp"
        android:ems="10"
        android:textColor="#000"
        android:inputType="textPersonName"
        android:hint="Enter Information"
        android:textAlignment="center"
        app:layout_constraintBottom_toTopOf="@+id/button"
        app:layout_constraintEnd_toEndOf="parent"
        app:layout_constraintHorizontal_bias="0.497"
        app:layout_constraintStart_toStartOf="parent"
        app:layout_constraintTop_toTopOf="parent" />

    <Button
        android:id="@+id/button"
        android:layout_width="wrap_content"
        android:layout_height="wrap_content"
        android:layout_marginBottom="40dp"
        android:backgroundTint="@color/colorAccent"
        android:layout_marginTop="20dp"
        android:text="Submit"
        android:layout_gravity="center"
        app:layout_constraintBottom_toTopOf="@+id/recycler"
        app:layout_constraintEnd_toEndOf="parent"
        app:layout_constraintHorizontal_bias="0.498"
        app:layout_constraintStart_toStartOf="parent" />

    <androidx.recyclerview.widget.RecyclerView
        android:id="@+id/recycler"
        android:background="#E8DDDD"
        android:layout_width="match_parent"
        android:layout_height="match_parent"
        app:layout_constraintBottom_toBottomOf="parent"
        app:layout_constraintEnd_toEndOf="parent"
        app:layout_constraintStart_toStartOf="parent" />
</LinearLayout>
Step 4 – Creating the item_view
Still on the Layout, we need to create the design of the element shown in the RecyclerView. Therefore, create a file named item.xml and add the code shown in the image below. The design is simple since the user can also access one attribute from the data class.
<?xml version="1.0" encoding="utf-8"?>
    <androidx.cardview.widget.CardView
        xmlns:android="http://schemas.android.com/apk/res/android"
        xmlns:tools="http://schemas.android.com/tools"
        android:layout_width="match_parent"
        android:layout_margin="10dp"
        android:layout_height="wrap_content">

        <RelativeLayout
            android:layout_width="match_parent"
            android:layout_height="100dp"
            android:orientation="horizontal">

            <TextView
                android:id="@+id/title"
                android:layout_width="wrap_content"
                android:layout_height="wrap_content"
                android:layout_alignParentTop="true"
                android:layout_alignParentBottom="true"
                android:layout_marginTop="31dp"
                android:layout_marginEnd="276dp"
                android:layout_marginBottom="30dp"
                android:padding="10dp"
                android:text="Hallo"
                android:textColor="#000" />

            <ImageButton
                android:id="@+id/delete"
                android:layout_width="wrap_content"
                android:layout_height="wrap_content"
                android:layout_alignParentLeft="true"
                android:layout_alignParentTop="true"
                android:layout_alignParentEnd="true"
                android:layout_alignParentBottom="true"
                android:layout_marginLeft="328dp"
                android:backgroundTint="#ffff"
                android:layout_marginTop="22dp"
                android:layout_marginEnd="16dp"
                android:layout_marginBottom="35dp"
                android:src="@drawable/ic_baseline_delete_24" />

        </RelativeLayout>

    </androidx.cardview.widget.CardView>
Step 5 – Create a RecyclerView Adapter
A RecyclerView adapter handles the binding of the item.xml layout to the RecyclerView. It also takes in a list of items and displays them to the user. The code for the RecyclerView adapter is shown below.
class NoteRecyclerAdapter(val viewModel: MainViewModel, val arrayList: ArrayList<Blog>, val context: Context): RecyclerView.Adapter<NoteRecyclerAdapter.NotesViewHolder>() {
    override fun onCreateViewHolder(
        parent: ViewGroup,
        viewType: Int,
    ): NoteRecyclerAdapter.NotesViewHolder {
       var root = LayoutInflater.from(parent.context).inflate(R.layout.item,parent,false)
        return NotesViewHolder(root)
    }

    override fun onBindViewHolder(holder: NoteRecyclerAdapter.NotesViewHolder, position: Int) {
        holder.bind(arrayList.get(position))
    }

    override fun getItemCount(): Int {
        if(arrayList.size==0){
            Toast.makeText(context,"List is empty",Toast.LENGTH_LONG).show()
        }else{

        }
        return arrayList.size
    }


   inner  class NotesViewHolder(private val binding: View) : RecyclerView.ViewHolder(binding) {
       fun bind(blog: Blog){
           binding.title.text = blog.title
           binding.delete.setOnClickListener {
               viewModel.remove(blog)
               notifyItemRemoved(arrayList.indexOf(blog))
           }
       }

    }

}
Step 6 – Creating the ViewModel
Create a package named ViewModel. Inside this folder, create a Kotlin class and name it MainViewModel. The class should extend the Android ViewModel. You might face an error if you failed to add lifecycle dependencies from Jetpack.
The MainViewModel will have a mutable livedata item that holds the array list. It’s vital to use LiveData since it notifies the UI in case of any data change. The MainViewModel code is shown below.
class MainViewModel: ViewModel() {
    var lst = MutableLiveData<ArrayList<Blog>>()
    var newlist = arrayListOf<Blog>()

    fun add(blog: Blog){
        newlist.add(blog)
        lst.value=newlist
    }

    fun remove(blog: Blog){
       newlist.remove(blog)
        lst.value=newlist
    }

}
Step 7 – Create the ViewModel Factory
The purpose of a ViewModel factory is to instantiate the ViewModel. This prevents the app from crashing in case an activity is not found.
The code for our MainViewModelFactory is shown below.
class MainViewModelFactory(): ViewModelProvider.Factory{
    override fun <T : ViewModel?> create(modelClass: Class<T>): T {
        if(modelClass.isAssignableFrom(MainViewModel::class.java)){
            return MainViewModel() as T
        }
        throw IllegalArgumentException ("UnknownViewModel")
    }

}
Step 8 – MainActivity (connecting the code)
We have created the model, ViewModel, ViewModelfactory, and RecyclerView. These components need to be instantiated in the MainActivity class for the application to work.
Start by declaring the RecyclerView and instantiating it. Set the layout manager for the RecyclerView to LinearLayoutManager. The MainActivity file contains three major methods; initialiseAdapter,observeData, and addData. the initialiseAdapter method assigns a ViewManager to the RecyclerView.
The observeData function looks for changes in the viewmodel and forwards them to the RecyclerAdapter. The addData method takes in the user’s input and updates the list in the ViewModel.
class MainActivity : AppCompatActivity() {
    private var viewManager = LinearLayoutManager(this)
    private lateinit var viewModel: MainViewModel
    private lateinit var mainrecycler: RecyclerView
    private lateinit var but: Button
    override fun onCreate(savedInstanceState: Bundle?) {
        super.onCreate(savedInstanceState)
        setContentView(R.layout.activity_main)
        mainrecycler = findViewById(R.id.recycler)
        val application = requireNotNull(this).application
        val factory = MainViewModelFactory()
        viewModel = ViewModelProviders.of(this,factory).get(MainViewModel::class.java)
        but = findViewById(R.id.button)
        but.setOnClickListener {
            addData()
        }

        initialiseAdapter()
    }
    private fun initialiseAdapter(){
        mainrecycler.layoutManager = viewManager
        observeData()
    }

    fun observeData(){
        viewModel.lst.observe(this, Observer{
            Log.i("data",it.toString())
            mainrecycler.adapter= NoteRecyclerAdapter(viewModel, it, this)
        })
    }


    fun addData(){
        var txtplce = findViewById<EditText>(R.id.titletxt)
        var title=txtplce.text.toString()
        if(title.isNullOrBlank()){
            Toast.makeText(this,"Enter value!",Toast.LENGTH_LONG).show()
        }else{
            var blog= Blog(title)
            viewModel.add(blog)
            txtplce.text.clear()
            mainrecycler.adapter?.notifyDataSetChanged()
        }

    }
}
Step 9 – Results
If there were no errors in your code, it should compile and show the UI in the image below. Whatever you type in the EditText field should display in the recyclerview once you click the submit button.

Conclusion
MVVM architecture has made it easier to build complex applications. As shown, it’s easier to identify bugs due to the separation of business logic from the UI code. The architecture also prevents data loss during configuration changes. Ensure that all dependencies are present before using MVVM. This measure helps prevent runtime errors.


Comments: