


Networking is a crucial factor in mobile development. Most, if not all mobile applications incorporate networking on some level. Applications are either sending or receiving information. Initially, developers did networking on the main thread. This made applications less user-friendly since screens would “freeze”.
Networking on the main thread stopped after the Honeycomb version was released. Google then developed Volley in 2013.
Introduction
You can read my article on Volley here.
Volley offered something better: It was faster, provided better functionality, a simpler syntax, etc. Still, there was room for growth when it came to networking.
Square introduced Retrofit.
Retrofit is a type-safe HTTP networking library used for Android and Java. Retrofit was even better since it was super fast, offered better functionality, and even simpler syntax. Most developers since then have switched to using Retrofit to make API requests.
Uses of retrofit
Retrofit is used to perform the following tasks:
- It manages the process of receiving, sending, and creating HTTP requests and responses.
- It alternates IP addresses if there is a connection to a web service failure.
- It caches responses to avoid sending duplicate requests.
- Retrofit pools connections to reduce latency.
- Retrofit resolves issues before sending an error and crashing the app.
Advantages of retrofit
- It is very fast.
- It enables direct communication with the web service.
- It is easy to use and understand.
- It supports request cancellation.
- It supports post requests and multipart uploads.
- It supports both synchronous and asynchronous network requests.
- Supports dynamic URLs.
- Supports convertors.
Disadvantages of retrofit
- It does not support image loading. It requires other libraries such as
GlideandPicasso. - It does not support setting priorities.
Classes used in retrofit
- Model class – This class contains the objects to be obtained from the JSON file.
- Retrofit instance – This Java class is used to send requests to an API.
- Interface class- This Java class is used to define endpoints.
Prerequisites
- Have Android Studio installed.
- The reader should have a beginner level understanding of Java and XML.
- The reader should have basic knowledge of making network requests, JSON, and REST APIs.
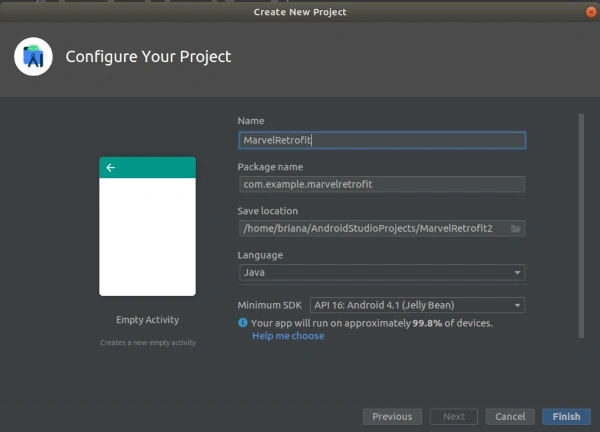
Step 1 – Create a new Android studio project
Open Android Studio and Start a new Android Studio Project -> Empty Activity. Let us name the project MarvelRetrofit. Select Finish and wait for the project to build.
Step 2 – Adding retrofit to our application
Add the following dependencies to your app-level build.gradle file.
implementation 'com.squareup.retrofit2:retrofit:2.7.2'
implementation 'com.squareup.retrofit2:converter-gson:2.7.2'
implementation 'com.squareup.okhttp3:okhttp:3.6.0'
Note: One can add different convertors depending on the JSON one would like to use. The following are examples of some of the converters:
Jackson : com.squareup.retrofit2:converter-jackson:2.1.0Moshi : com.squareup.retrofit2:converter-moshi:2.1.0Protobuf : com.squareup.retrofit2:converter-protobuf:2.1.0Wire : com.squareup.retrofit2:converter-wire:2.1.0Simple XML : com.squareup.retrofit2:converter-simplexml:2.1.0
Add internet permission to you application.
<uses-permission android:name="android.permission.INTERNET" />
Step 3 – Designing the UI for our application
In this step, we will design the layout for our application. Since this is a simple application, we will only use a ListView to display the API’s information.
Add the following lines of code to your layout resource file:
<?xml version="1.0" encoding="utf-8"?>
<LinearLayout
    xmlns:android="http://schemas.android.com/apk/res/android"
    xmlns:tools="http://schemas.android.com/tools"
    android:layout_width="match_parent"
    android:layout_height="match_parent"
    tools:context=".MainActivity"
    android:background="@color/white">

    <ListView
        android:id="@+id/superListView"
        android:layout_width="wrap_content"
        android:layout_height="wrap_content" />

</LinearLayout>
Step 4 – Create a model class
Next, we will create a model class that will contain the objects from the JSON. For our instance, we only want to get the names of the fictional characters.
In the Java directory, right-click and select new-→ java class-→ app/src/main/java–> class. We will name our model class Results.
Add the following lines of code in Results.java:
public class Results {

    @SerializedName("name")
    private String superName;


    public Results(String name) {
        this.superName = name;
    }

    public String getName() {
        return superName;
    }
}
Note: The SerializedName annotation should always display the exact name of an object in the JSON file.
Step 5 – Create a retrofit instance
This Java class is used to send requests to an API. We specify the URL that contains the data required and use the Retrofit Builder class.
In the Java directory, right-click and select new-→ java class-→ app/src/main/java-→class. We shall name our class, RetrofitClient.
Add the following lines of code to the RetrofitClient.java:
public class RetrofitClient {

    private static RetrofitClient instance = null;
    private Api myApi;

    private RetrofitClient() {
        Retrofit retrofit = new Retrofit.Builder().baseUrl(Api.BASE_URL)
                .addConverterFactory(GsonConverterFactory.create())
                .build();
        myApi = retrofit.create(Api.class);
    }

    public static synchronized RetrofitClient getInstance() {
        if (instance == null) {
            instance = new RetrofitClient();
        }
        return instance;
    }

    public Api getMyApi() {
        return myApi;
    }
}
Step 6 – Define the endpoints
Endpoints usually are defined inside an Interface class. An endpoint refers to the path where information is obtained. Our endpoint is ‘marvel’. Since our aim is to obtain information from the API, we will be using the @GET annotation since we are making a Get request.
Next we will have a call<results> object that will return the information from the API.
In the Java directory, right-click and select new–> java class–> app/src/main/java–>class. We will name our Interface class Api.
Add the following lines of code in Api.java:
public interface Api {

    String BASE_URL = "https://simplifiedcoding.net/demos/";
    @GET("marvel")
    Call<List<results>> getsuperHeroes();
}
Step 7 – Sending a GET request
In this step, we will call each of the API endpoints defined in our Interface class. The interface class will enable the information from the API to be displayed in our ListView.
Finally, we will have an onFailure method, that will display a Toast message if the information is not successfully loaded into the ListView.
Add the following lines of code to your MainActivity.java
public class MainActivity extends AppCompatActivity {

    ListView superListView;

    @Override
    protected void onCreate(Bundle savedInstanceState) {
        super.onCreate(savedInstanceState);
        setContentView(R.layout.activity_main);

        superListView = findViewById(R.id.superListView);

        getSuperHeroes();
    }

    private void getSuperHeroes() {
        Call<List<Results>> call = RetrofitClient.getInstance().getMyApi().getsuperHeroes();
        call.enqueue(new Callback<List<Results>>() {
            @Override
            public void onResponse(Call<List<Results>> call, Response<List<Results>> response) {
                List<Results> myheroList = response.body();
                String[] oneHeroes = new String[myheroList.size()];

                for (int i = 0; i < myheroList.size(); i++) {
                    oneHeroes[i] = myheroList.get(i).getName();
                }

                superListView.setAdapter(new ArrayAdapter<String>(getApplicationContext(), android.R.layout.simple_list_item_1, oneHeroes));
            }

            @Override
            public void onFailure(Call<List<Results>> call, Throwable t) {
                Toast.makeText(getApplicationContext(), "An error has occured", Toast.LENGTH_LONG).show();
            }

        });
    }
}
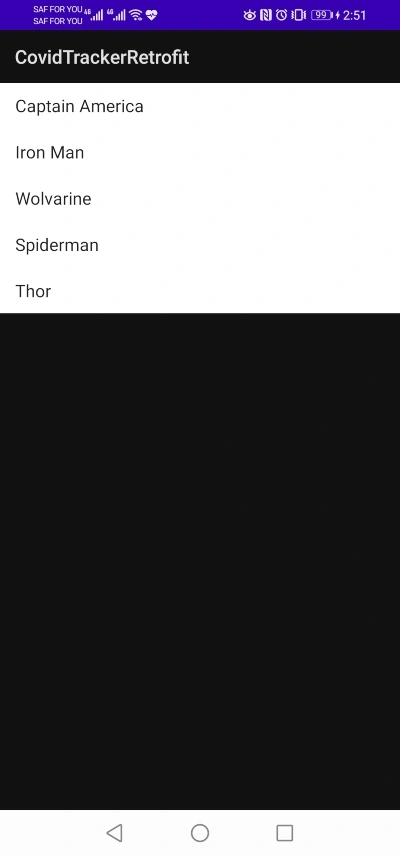
That is it!
Let’s run our application.
To wrap up
We have learned that networking is a crucial factor in mobile application development. We have learned how to use Retrofit and its advantages and disadvantages. Did you know that Retrofit takes 312ms to carry out one discussion? That is super fast.
Check out other ways to use Retrofit in their official documentation. You can access this tutorial’s code on GitHub. You can also download the sample APK on Google Drive.


Comments: